Thanks. Yes - my big learning point for next time is to find a bigger space to work in!Hats off to you for doing all that work, and also in what appears to be a small garage. Nice one")
You are using an out of date browser. It may not display this or other websites correctly.
You should upgrade or use an alternative browser.
You should upgrade or use an alternative browser.
72 Corvette - Restoration Updates
- Thread starter TimP
- Start date
I probably won't post again until the passenger hinge post is back in place (unless anybody is particularly interested in watching progress) but to start the ball rolling...
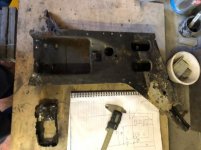
Here is the passenger side reinforcement bracket/gusset bracing the hinge post and the windshield frame lower inner corner area. It's different (larger) than the driver's side and doesn't seem to be available as a replacement part - although the driver's side is. I bought a replacement but it actually came as a mirror image of the drivers side and is too small. Thus the existing one needed to be repaired.


The lower inner corner in my car had totally disappeared taking the flange on the gusset with it. The flange has a particular shape so that it can be spot welded into the inner corner but it was quite straightforward to cut a strip and bend it to the correct shape using the inner corner as a guide. After welding this on and with a fair bit of grinding it looked like this.

Which gives it plenty of scope for it to be puddle welded back on - the flange is a bit bigger than the original. The surface of the gusset facing the engine was also very heavily pitted so this was reworked. Now primered (still wet here) to stop it corroding whilst I do the rest....

Here is the passenger side reinforcement bracket/gusset bracing the hinge post and the windshield frame lower inner corner area. It's different (larger) than the driver's side and doesn't seem to be available as a replacement part - although the driver's side is. I bought a replacement but it actually came as a mirror image of the drivers side and is too small. Thus the existing one needed to be repaired.
The lower inner corner in my car had totally disappeared taking the flange on the gusset with it. The flange has a particular shape so that it can be spot welded into the inner corner but it was quite straightforward to cut a strip and bend it to the correct shape using the inner corner as a guide. After welding this on and with a fair bit of grinding it looked like this.
Which gives it plenty of scope for it to be puddle welded back on - the flange is a bit bigger than the original. The surface of the gusset facing the engine was also very heavily pitted so this was reworked. Now primered (still wet here) to stop it corroding whilst I do the rest....
Chuffer
CCCUK regional rep
Well I am sure it keeps you out of mischief .... or possibly foolhardy.
You will certainly have a huge feeling of satisfaction ( and relief ) when it is completed . I can identify with that sense of achievement having spent most of my adult life restoring and reparing rusted and knackered old steam locos but at least they weren`t my personal property and someone else pics up all the bills . But do`nt you miss not being able to drive it ?There's no doubt that this car will keep me busy for a while. I really hope to have it road legal (but probably not finished - if they ever are) during its 50th anniversary year. I am looking forward to that 'completed' feeling but there will hopefully be plenty of minor victories that will also give satisfaction along the way. There have been several already - on a long rebuild these are what keep you going.
Do I miss not driving it? Of course, but its going to be worth the wait.
Do I miss not driving it? Of course, but its going to be worth the wait.
Removing the front fibre glass section and firewall gave me a better idea of the things that needed to be done. As you can see it's a long list.

Due to my inexperience in these things, thinking and planning takes a significant amount of time: sitting by the car, working out the different stages and sequences, evaluating what will and won't work. Sometimes (I admit) just staring into the abyss.....
After a great deal of thought - and having changed the approach at least a dozen times - I decided that the best thing to do as a first step was to remove the passenger hinge post and refurbish it......
I cut through the passenger windscreen surround in an area of good metal using a dog leg cut to leave as much weld length as possible for the repair and hopefully make a stronger joint.
The bottom of the hinge post was separated from the longitudinal rail section using a grinder. There is an insert that is welded to the longitudinal member and also spot welded to the inside of the hinge post. This insert was largely rusted away but still gave a bit of a fight. The brace behind the hinge post was practically severed by corrosion already. It is amazing that the doors fitted as well as they did - they really should have been touching the ground on the rear edge. Gratifyingly the rest of the birdcage stayed absolutely rigid in the jig when the hinge post was removed. This will make refitting the hinge post much easier - one set of alignments and measurements that I won't have to worry about too much.
On the bench the damage was assessed and there were five main areas of repair required:
1) The bottom six inches of the rear section (with the hole to access the body mount) was badly corroded and some of it missing altogether. The other three sides in this area were badly perforated and the remaining metal was very thin.

2) There was a hole in the top by the windscreen corner and 3) There were multiple holes along the seam with the corner frame. The metal in this area was also quite thin from corrosion so needed to be replaced.

4) The brace at the top of the hinge post had rotted away completely and 5) A missing section at the front of the top of the post.

The basic principle to repair each area was to make a cardboard template of the area to be replaced, then cut out a metal replacement piece, check the fit, cut out the old metal and then weld in the new section.
First assess the damage and do some basic measurements

Make a cardboard template based on the measurements

Cut out the old metal

Weld in the new...

Then after a little trimming and fettling check the fit.

This was done in all four areas, keeping a close eye on dimensions throughout.
To be continued....
Due to my inexperience in these things, thinking and planning takes a significant amount of time: sitting by the car, working out the different stages and sequences, evaluating what will and won't work. Sometimes (I admit) just staring into the abyss.....
After a great deal of thought - and having changed the approach at least a dozen times - I decided that the best thing to do as a first step was to remove the passenger hinge post and refurbish it......
I cut through the passenger windscreen surround in an area of good metal using a dog leg cut to leave as much weld length as possible for the repair and hopefully make a stronger joint.
The bottom of the hinge post was separated from the longitudinal rail section using a grinder. There is an insert that is welded to the longitudinal member and also spot welded to the inside of the hinge post. This insert was largely rusted away but still gave a bit of a fight. The brace behind the hinge post was practically severed by corrosion already. It is amazing that the doors fitted as well as they did - they really should have been touching the ground on the rear edge. Gratifyingly the rest of the birdcage stayed absolutely rigid in the jig when the hinge post was removed. This will make refitting the hinge post much easier - one set of alignments and measurements that I won't have to worry about too much.
On the bench the damage was assessed and there were five main areas of repair required:
1) The bottom six inches of the rear section (with the hole to access the body mount) was badly corroded and some of it missing altogether. The other three sides in this area were badly perforated and the remaining metal was very thin.
2) There was a hole in the top by the windscreen corner and 3) There were multiple holes along the seam with the corner frame. The metal in this area was also quite thin from corrosion so needed to be replaced.
4) The brace at the top of the hinge post had rotted away completely and 5) A missing section at the front of the top of the post.
The basic principle to repair each area was to make a cardboard template of the area to be replaced, then cut out a metal replacement piece, check the fit, cut out the old metal and then weld in the new section.
First assess the damage and do some basic measurements
Make a cardboard template based on the measurements
Cut out the old metal
Weld in the new...
Then after a little trimming and fettling check the fit.
This was done in all four areas, keeping a close eye on dimensions throughout.
To be continued....
Attachments
... from my previous post..
Here the hole and thin section of metal (area 2) has been resolved but area 3 is still to be done

The upper part of the rear panel was replaced. Here shown before the old metal was cut out.

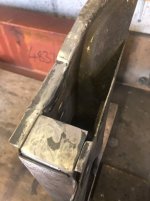
The bottom of the hinge post is being repaired in three sections - one for each side and the raised area for the hinge to bolt onto. You will also see in this picture the drill circles where I have drilled out the spot welds that hold the reinforcing 'boot' to the side of the hinge post. It is interesting to note the random positioning of the 6 welds which seem to be concentrated into quite a small area - not the strongest arrangement but probably good enough.
Here is the first side, cut out and formed being checked for fit ....

and then welded into place

The other side was done in exactly the same way and then the lower part of the hinge mounting plate was cut out and replaced with new metal

The top of the hinge post (area 4 and 5) was in pretty poor shape. There is a reinforcement bracket on the inside of the hinge post that wraps over the top and is welded to the underside of the top section of the hinge post back.
All the rusty metal was cut out and a new top piece was made as a replacement.

and replaced with a new section welded on two sides (as per the original)
This was then reinforced with a further sheet of metal to provide a weld point for the hinge post back top section (not yet in place). The heavily pitted and holed seam at the left (area 3) and front of the hinge post (area 5) have also been replaced in this picture

This just leaves the top section to be formed and welded to the new seam on the left hand side.
Then after a quick coat of primer to stop it corroding whilst I work on something else the fit is checked to make sure that nothing has gone out of alignment.

The upper seam will also certainly need to be adjusted to fit the new corner frames so have been left a bit rough for now.
Incidentally, the red primer I-beam girder seen in the background of some of the previous photographs is something I bought to help form the curved steel sections. It's one metre long, very heavy and each leg of the 'I' can be filed down to a set profile or curve. A 4mm radius was used to match the internal curvature of the hinge post bend. The metal is carefully clamped to the I beam with the required bend position just on the edge of the I-beam leg. The sheet metal is then carefully hit with a large panel beater's hammer to bend the section to the appropriate angle. Primitive, but it works quite well - and is a cheap solution to a common need. I will have to replace the bottom of the doors at some point and I will use the same girder but with a different section curvature to form the whole length of the replacement piece. Hence the 1 metre length.
(with pax hinge post now in matt black..)

Next task is to fabricate the structure that joins the hinge post to the windscreen corner and passenger side windscreen frame. That should be a couple of weeks.
Here the hole and thin section of metal (area 2) has been resolved but area 3 is still to be done
The upper part of the rear panel was replaced. Here shown before the old metal was cut out.
The bottom of the hinge post is being repaired in three sections - one for each side and the raised area for the hinge to bolt onto. You will also see in this picture the drill circles where I have drilled out the spot welds that hold the reinforcing 'boot' to the side of the hinge post. It is interesting to note the random positioning of the 6 welds which seem to be concentrated into quite a small area - not the strongest arrangement but probably good enough.
Here is the first side, cut out and formed being checked for fit ....
and then welded into place
The other side was done in exactly the same way and then the lower part of the hinge mounting plate was cut out and replaced with new metal
The top of the hinge post (area 4 and 5) was in pretty poor shape. There is a reinforcement bracket on the inside of the hinge post that wraps over the top and is welded to the underside of the top section of the hinge post back.
All the rusty metal was cut out and a new top piece was made as a replacement.
and replaced with a new section welded on two sides (as per the original)
This was then reinforced with a further sheet of metal to provide a weld point for the hinge post back top section (not yet in place). The heavily pitted and holed seam at the left (area 3) and front of the hinge post (area 5) have also been replaced in this picture
This just leaves the top section to be formed and welded to the new seam on the left hand side.
Then after a quick coat of primer to stop it corroding whilst I work on something else the fit is checked to make sure that nothing has gone out of alignment.
The upper seam will also certainly need to be adjusted to fit the new corner frames so have been left a bit rough for now.
Incidentally, the red primer I-beam girder seen in the background of some of the previous photographs is something I bought to help form the curved steel sections. It's one metre long, very heavy and each leg of the 'I' can be filed down to a set profile or curve. A 4mm radius was used to match the internal curvature of the hinge post bend. The metal is carefully clamped to the I beam with the required bend position just on the edge of the I-beam leg. The sheet metal is then carefully hit with a large panel beater's hammer to bend the section to the appropriate angle. Primitive, but it works quite well - and is a cheap solution to a common need. I will have to replace the bottom of the doors at some point and I will use the same girder but with a different section curvature to form the whole length of the replacement piece. Hence the 1 metre length.
(with pax hinge post now in matt black..)
Next task is to fabricate the structure that joins the hinge post to the windscreen corner and passenger side windscreen frame. That should be a couple of weeks.
Attachments
Many thanks! Although I did a Mechanical Engineering Degree I only did a year or so of related work moving on to IT (or Data Processing as it used to be calledTop effort there, you’re pretty skilled with the fab work, did you train to be metalworker?
) fairly quickly. In that time I did about 3 weeks or so Trumpf CNC programming on a punch press but that's about it. There's an ATC console bracket on the Type 22 frigates which is all mine.My main inspiration and guides are two YouTube channels: Fitzee's Fabrications (where I borrowed the idea of using a girder section to bend sheet metal) and Soup Classic Motoring both of which are really informative and terrific to watch.
Mad4slalom
CCCUK Member
Fantastic Tim!
Having got the hinge post into some sort of serviceable condition I ran out of excuses for not sorting out the area where the hinge post joins the windscreen frame side. I have been putting off thinking about this area - I hadn't got a clue how to do it - but I need to get it sorted now. The passenger side had completely disintegrated and the drivers side is recognisable but in poor shape.

First job was to complete the flat area at the top of the hinge post...

and then prepare the seam around the side of the windscreen....

I had already replaced the middle section of the lower windscreen surround carefully keeping the driver's side lower inner windscreen corner in place and whole. This enabled me to put the new section in exactly the right place and evaluate the fit of all the new bits. I am using '73 lower outer corner pieces that are different from '72 - it's amazing how many detail changes there are between years without seemingly much outward change or benefit. These will be modded to resemble and fit like '72 items in due course.

So far so good ..
The first item to fabricate and fit was the triangular piece at the front of the hinge post.

and (as expected) then it all got a bit difficult. Visualising the multiple curvatures of the sheet metal in this area was a little tricky and I failed to create a working template to make the steel pieces I needed but I had an idea.... I bought some plasticine and made a mock up of what it should look like.... in lurid purple.

This worked really well as I could also check the fitment of the lower outer windscreen corner and all the other pieces.
Covering the plasticene in masking tape, marking out the shape and then transferring the tape to a sheet of card allowed me to make a template...

which I could then check against the original....

and then use this to cut out and bend the correct metal shape out of 2mm sheet...

Doing this on both sides and with a little fettling resulted in the two pieces that I needed to complete this area (here seen loosely resting on top).....

I'm going to leave this area without being welded up for the time being because I need to replace the lower front to back rail (joy of joys) and this will be much easier without the hinge post in place so completing the fabrication will wait until the rail has been replaced and the hinge post is ready for permanent fitment. It's not identical to the factory finish which was a single pressing - but it should function in the same way and will be strong/rigid enough to do what it needs to do. I also need to make the insert for the bottom of the hinge post but that should be relatively straightforward,
First job was to complete the flat area at the top of the hinge post...
and then prepare the seam around the side of the windscreen....
I had already replaced the middle section of the lower windscreen surround carefully keeping the driver's side lower inner windscreen corner in place and whole. This enabled me to put the new section in exactly the right place and evaluate the fit of all the new bits. I am using '73 lower outer corner pieces that are different from '72 - it's amazing how many detail changes there are between years without seemingly much outward change or benefit. These will be modded to resemble and fit like '72 items in due course.
So far so good ..
The first item to fabricate and fit was the triangular piece at the front of the hinge post.
and (as expected) then it all got a bit difficult. Visualising the multiple curvatures of the sheet metal in this area was a little tricky and I failed to create a working template to make the steel pieces I needed but I had an idea.... I bought some plasticine and made a mock up of what it should look like.... in lurid purple.
This worked really well as I could also check the fitment of the lower outer windscreen corner and all the other pieces.
Covering the plasticene in masking tape, marking out the shape and then transferring the tape to a sheet of card allowed me to make a template...
which I could then check against the original....
and then use this to cut out and bend the correct metal shape out of 2mm sheet...
Doing this on both sides and with a little fettling resulted in the two pieces that I needed to complete this area (here seen loosely resting on top).....
I'm going to leave this area without being welded up for the time being because I need to replace the lower front to back rail (joy of joys) and this will be much easier without the hinge post in place so completing the fabrication will wait until the rail has been replaced and the hinge post is ready for permanent fitment. It's not identical to the factory finish which was a single pressing - but it should function in the same way and will be strong/rigid enough to do what it needs to do. I also need to make the insert for the bottom of the hinge post but that should be relatively straightforward,
Many thanks! The jig/bracing is an absolute must - there's no way I could do this without it. The trick is (as I have painfully found out) is to build and install a comprehensive and rigid jig/brace that still allows you to do what you need to do. ie not getting in the way all the time.This is some really impressive metalwork. Your foresight in fitting bracing before tackling the decayed birdcage must be paying dividends. Nevertheless avoiding the distortion such comprehensive welding could incur demands real skill. Amazing job!
Again - many thanks. I wanted a project that kept me busy - just goes to show that you have to be careful what you wish for.The complexity of the project , the skills involved and attention to detail just blows me away ! And I have have an engineering background !
Here's one I completed yesterday. I have a feeling the other one will take a little longer.....

The good news is that my car is now registered. Just 4 weeks from sending off the forms (admittedly by a third party) to the DVLA.
What I found quite interesting was going into the detail of the documents I had been given when the car was imported. I probably should have done this 2 years ago when I only checked that everything required for registration had been provided but was too excited (sad but true) to look any further. My car was bought by the previous owner in Florida in 1993 and at that time had the same mileage on the clock as it does today. The speedo was connected when it arrived so I can only assume that this car probably hasn't turned a wheel under it's own power in 28 years.
Probably why my latest birdcage challenge looks like this.....

... and yes there are 2 22mm sockets holding the sill reinforcement to a makeshift jig.
More to follow in a couple of weeks....
Just 4 weeks from sending off the forms (admittedly by a third party) to the DVLA. What I found quite interesting was going into the detail of the documents I had been given when the car was imported. I probably should have done this 2 years ago when I only checked that everything required for registration had been provided but was too excited (sad but true) to look any further. My car was bought by the previous owner in Florida in 1993 and at that time had the same mileage on the clock as it does today. The speedo was connected when it arrived so I can only assume that this car probably hasn't turned a wheel under it's own power in 28 years.
Probably why my latest birdcage challenge looks like this.....
... and yes there are 2 22mm sockets holding the sill reinforcement to a makeshift jig.
More to follow in a couple of weeks....