Cruise Control/Active handling

plastic orange

CCCUK Member
My cruise control dropped out today whilst cruising at 70 and the active handling message flashed briefly. I tried it again several times and it kept doing it. When I turned off the traction control, cruise worked just fine. I also noticed a pulsing of brakes (abs) once or twice when braking prior to turning off switch. I've recently fitted Hel braided lines and flushed the brake fluid, but did 150 miles just after doing this with no issues. I've seem some threads where folk say fitting braided lines has caused issues, but I'm sceptical about this. The only thing I can think of is that when I was cleaning the underside of the car and spraying protective wax on steel parts that this has compromised either the wiring to the wheel sensors or body earths. My job tomorrow is to jack it up and check these. Incidentally, only codes were historic, so I cleared these and after a test drive which produced the brake pedal vibration and active handling message, no codes were found when I checked. Any suggestions?

Pete
 

Oneball

CCCUK Member
Something with the wheel speed sensors would be my guess, but I’d have kinda expected a fault code. Worth giving everything a clean though.
 

teamzr1

Supporting vendor
Pete
This may not be the problem, but YES, GM found those owners installing braided brake hoses to cause brake issues
With enough problems from this, GM began to void warranty if the owner had sudden brake issues and the OEM hoses were not installed

As you know, each wheel hub has a speed sensor and what the findings by GM tech engineers is the end connectors to the hoses
was not making a good ground connection through the braided hose
That with the fluid pulsing in braided hose can cause EMI or RFI which Fs up the speed sensors
Which causes the ETBCM to go wacko and can apply ABS, traction control and that forces to shut down cruise control

So it can be bad mating of the connectors at the end of the hoses that kills off the ground, which would breed the noise out

You could take a multimeter in Ohms scale and put the 2 probe leads on each end of the hose connectors and should
show zero resistance and not a OPEN to know if each wheel's braided hose is carrying a good ground

IF that is your problem than if insisting to using braided hoses you have to change the hose connections that maintains a good ground
for each wheel

The OEM brake hoses have a good copper ground that runs through the hose

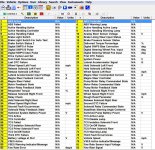
You again would have to use a good OBD scanner that supports the GM PIDS that reports each wheel speed sensors
reported speed and that the speed matches on all 4 wheels
Or using the GM Tech-II scanner
Of course, it could be working on the hubs/brakes that the wiring connector to a speed sensor came off
Or the wire is broke somewhere along suspension

There is a question then when you bleed the brake fluid was the ABS for each wheel using OBD tool commanded the ABS on for each wheel when
flushing the fluid

IF not doing that then it is possible there were some air bubbles then at ETBCM and that air has worked through the system now
and causing a problem

I have never used braided hoses, always the OEM ones and even in hot weather racing have never had brake fade
If the hose is not leaking or bulging, then the OEM is just fine

You need to see what controller is bitching and if and what DTCs are being reported
 
Last edited:

plastic orange

CCCUK Member
Thanks for that info. I only realised there was a problem reported with braided lines after i'd bought them. In the UK, braided lines are the usual brake upgrade, especially when originals are 21 years old. The problem only started after my cleaning of the underside as I'd done around 150 miles with the braided lines installed in the week previous. As it's a sunny day, I'll jack the car up for an investigation.

Pete
 

plastic orange

CCCUK Member
Zero resistance on all lines, earth at rear cleaned (looked very good) and all speed sensor connections cleaned. Other earths look as new. and still no codes, but cruise dropped out and brakes pulsed when applied lightly a couple of times. No issue with hard braking.

Pete
 

plastic orange

CCCUK Member
I went out again for a test drive and brakes pulsed whilst driving in a straight line at 50 mph and did it once on hard braking, plus cruise dropping out after a short time. No probs if traction turned off. Still no codes. I'll bleed brakes again, but they seem fine really.

Pete
 

teamzr1

Supporting vendor
Have you checked if any of the calipers/pads are sticking or a rotor has warped ?
Really need to use a scanner and see if any of the speed sensors is reporting differently than the others

But maybe bleeding the brake fluid, including the ABS is the issue ?
 

plastic orange

CCCUK Member
All calipers are good, plus discs and pads are relatively new. Rain on now, so bleeding brakes will be next week. I may just run car with TC turned off. I'm used to no driver aids on my Morris Minor which is LS powered, so should be fine, but i hate things not working as they should. My Corvette has only just turned 33,000 miles, so everything is pretty fresh, but obviously aged. I don't have a scanner, although a mate does, so i'll see if it works on the vette. It certainly read my Minor's PCM through it's OBD2 port, but that is only for the engine/box.

Cheers,

Pete
 

plastic orange

CCCUK Member
I had a run out last night in the car and front left brake came on momentarily whist travelling in a straight line at 30 mph and got the active handling message. I turned off handling switch and continued without any further problems and cruise working fine. I checked for codes on return and the dreaded C1288 - steering position sensor came up. I'll go over all the connections again, but looks like a new sensor is on the horizon.

Pete
 

plastic orange

CCCUK Member
All connections cleaned again and earths checked. It took a bit longer to come on this time, but on it came and temporarily braked the front left again. Got back home and checked for codes and all clear - very strange. I'll just forget about active handling for now and leave it off.

Pete
 

teamzr1

Supporting vendor
When the front wheels are pointing straight forward, is the steering wheel exactly straight ?
Is it possible someone in the past had pulled the steering wheel or shaft and did not assure the above and was misaligned ?
Common is the SWPS wiring connector does not have enough slack and the wires pull on the wiring connector causing loss of signal
and of course connector pins are dirty or loose ground

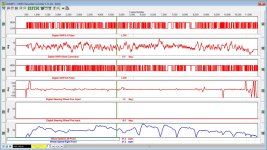
Using OBD scanner could monitor the SWPS signals and voltage to see if the sensor is faulty and debug the problem in a few minutes

swpspid.jpgswpsebcm.jpg

DTC C1287 or C1288
Circuit Description
The vehicle stability enhancement system (VSES) is activated by the electronic brake control mdoule (EBCM) calculating the desired yaw rate and comparing it to the actual yaw rate input. The desired yaw rate is calculated from measured steering wheel position, vehicle speed, and lateral acceleration.
The difference between the desired yaw rate and actual yaw rate is the yaw rate error, which is a measurement of oversteer or understeer.
If the yaw rate error becomes too large, the EBCM will attempt to correct the vehicle's yaw motion by applying differential braking to the left or right front wheel.

The amount of differential braking applied to the left or right front wheel is based on both the yaw rate error and side slip rate error.
The side slip rate error is a function of the lateral acceleration minus the product of the yaw rate and vehicle speed.
The yaw rate error and side slip rate error are combined to produce the total delta velocity error. When the delta velocity error becomes too large and the VSES system activates, the driver's steering inputs combined with the differential braking will attempt to bring the delta velocity error toward zero.

The VSES activations generally occur during aggressive driving, in the turns or bumpy roads, without much use of the accelerator pedal.
When braking during VSES activation, the brake pedal will feel different from the ABS pedal pulsation.
The brake pedal pulsates at a higher frequency during VSES activation.

Conditions for Running the DTC
The ignition is ON.

Conditions for Setting the DTC
C1287
One of the following conditions exists:

The steering wheel position sensor is synchronized and the steer rate (speed that the steering wheel appears to be turning) is greater than 1100 degrees/second.
The steer rate is less than 80 degrees/second and the difference in the phase angle between Phase A and Phase B is greater than 20 degrees.
The 2 steering sensor signals (Phase A and Phase B) do not agree for 1 second.
Under this condition, this DTC will set along with DTC C1281.

C1288
One of the following conditions exists:

Both Phase A and Phase B are greater than 4.9 volts for 1.6 seconds.
Both Phase A and Phase B are less than 0.2 volts for 1.6 seconds.
The difference in the changes in Phase A and Phase B is greater than 35.2 degrees for 9.76 milliseconds.
Action Taken When the DTC Sets
The EBCM disables the VSES for the duration of the ignition cycle.
The Traction Control and Active Handling indicator turns ON.
The DIC displays the Service Active Handling message.
The ABS remains functional.

Here are some things to check:
Make sure ground points are clean and free of corrosion.

Test the 5 volt reference circuit of the steering wheel position sensor (SWPS) for the following conditions:

An open
A short to ground
A high resistance

Test the signal A circuit of the steering wheel position sensor (SWPS) for the following conditions:

An open
A short to ground
A high resistance

Test the signal B circuit of the steering wheel position sensor (SWPS) for the following conditions:

An open
A short to ground
A high resistance

Inspect for poor connections at the harness connector of the steering wheel position sensor (SWPS).

Inspect for poor connections at the harness connector of the EBCM.
 

teamzr1

Supporting vendor
Here is 1 C5 owner replacing the SWPS
I just changed my sensor out after receiving the usual 1287 and 1288 DIC messages that anyone reading this thread has seen, and here are my tips. The job took me about 4 hours (working and watching the wall-mount TV in the garage) but I could do it in 90 minutes now that I know exactly what to do and what the nut sizes are. It's technically very simple, but a real pain-in-the-*** as far as working under the dash area.

1. In my opinion, you should make it easy on yourself and remove the left front wheel and the black plastic access panel that is just behind it. That panel is held on by 8 or 9 sheetmetal screws that take a 7mm socket. It only takes minute to remove this panel, and it provides easy access to the otherwise extremely difficult-to-reach steering shaft bolt/nut. You'll drop the nut or the bolt and have to remove this panel anyway to find it, so do it now. You know how to remove a dang wheel, and you know how to unscrew a handful of sheetmetal screws, so do it!! You can see the head of the bolt thru the wheelwell in this picture.

[IMG alt="Name: Viewthruwheelwell.jpg
Views: 6687
Size: 67.9 KB"]https://www.corvetteforum.com/forum...l-position-sensor-viewthruwheelwell.jpg[/IMG]

2. The nut gets removed with a 15mm socket. You don't have to hold the head of the bolt, as it has a locking tang that prevents it from turning. You can see this tang in the above photo. You have to turn the steering wheel to get the nut pointing at you for easy removal.

3. If you have Column Lock Bypass, you MUST reverse it to prevent a horrible disaster of having the wheel turned when it's disconnected from the car. Horrible.
nono.gif

The reversal 's easy to do, since you have to remove all the dashboard stuff anyway, which allows ultra-easy access to the CLB connector. The reversal method is to turn the key to On, remove fuse 25, remove the CLB, reattach the original Column Lock connector, reinstall fuse 25, turn key Off and remove it. You should hear the lock do it's little buzz noise (you probably forgot what it sounded like). But wait until you do the two steps I've listed belowto make it super easy on yourself. Pull fuse 16 (airbag) while you're in the fuse block. In fact, do it early in the process to be safe. I'm not going into the airbag disarming procedure here, but you've been warned.

4. This has not been clearly mentioned in this thread so far: After you remove the knee bolster panel, you then have to remove the black plastic "tray" that is under the column. This tray contains the footwell light. To remove, you pull down gently on the front corners to extract the plastic trim fasteners holding those corners in place. It's easy to do, just pull straight down gently and firmly.
Then, there is a third fastener in the back, and it's one of those flat metal retainers, very similar to what holds a brake rotor onto one wheel stud. I stuck a VERY large screwdriver between the plastic tray and the metal above it and twisted the screwdriver to force the clip down the stud a little ways.
Then once it was a little loose, I could grab it with a needlenose and twist it off.
This is a really dumb place for such a fastener, and as Indy300 has already mentioned, it's about the hardest thing to this whole job!
mad5.gif
The light unclips from behind and goes downward thru the tray. You can then manuver it out of the tray and get the tray completely out of your way. Or leave the the light in place and the tray on the floor, your choice.

5. Now you have to remove the metal frame that holds the white styrofoam plastic knee bolster thingy. The column will not move rearward far enough or come out of the car without removing this thing. This is quickly done by removing the two small black screws on each side with the same 7mm socket you used to remove that wheelwell panel. The bolster drops out of the way and stays attached to the wires that are clipped to it, like this:

[IMG alt="Name: Dashexplosion.jpg
Views: 8113
Size: 95.8 KB"]https://www.corvetteforum.com/forum...wheel-position-sensor-dashexplosion.jpg[/IMG]

6. Now you can easily do the CLB reversal job with this stuff out of the way.

7. I recommend that you plan on taking the entire column out. It is MUCH easier to replace the sensor with the column out of the car. The sensor is a very tight fit to the steering shaft (by design) and would really be difficult to get it of the bottom of the shaft when it's in the car, IMO.
All you have to do is detach the 5 or 6 electrical connectors (including the sensor connector down at the firewall) before you go to remove the column. Trust me on this--remove the connectors now so you can easily remove the entire wheel/column assembly when you get it unbolted.

8. The four nuts that hold the column in place are a 13mm socket. Remove the firewall nuts first, then one of the upper nuts, and then remove the final upper nut while you keep the column from dropping with your other hand. It's no heavy and won't come crashing down, but you'll want to support it.

9. Set a towel on the concrete so when you remove the column, you can set it down on the wheel without damaging anything.

10 After you get that last upper nut off, the whole column comes right out if you've gotten all the electrical connectors detached. Nothing to it. Super easy. Don't scratch your car with the end of the shaft as you triumphantly carry your column assembly to the towel!!

11. Replacing the sensor takes about 30 seconds.

As removed from car, looking at the dust seal:

[IMG alt="Name: Asremovedfromcar.jpg
Views: 7207
Size: 39.3 KB"]https://www.corvetteforum.com/forum...el-position-sensor-asremovedfromcar.jpg[/IMG]

Dust seal is easily removed, showing sensor:

[IMG alt="Name: Dustsealremoved.jpg
Views: 7012
Size: 36.6 KB"]https://www.corvetteforum.com/forum...eel-position-sensor-dustsealremoved.jpg[/IMG]

Sensor is held very snugly on the shaft by those many copper fingers that can be seen in the inside diameter, and by the green housing. This snug fit is why many of us are advising you to remove the column instead of working under the dash. You just lift a retainer tab or two on the green housing and it wiggles right up and off.

[IMG alt="Name: Removingsensor.jpg
Views: 6733
Size: 52.4 KB"]https://www.corvetteforum.com/forum...heel-position-sensor-removingsensor.jpg[/IMG]

Pop the new sensor in. You'll know where it goes, so don't worry about screwing this up. It's ultra-obvious. Foolproof.

[IMG alt="Name: Newsensorinplace.jpg
Views: 6862
Size: 44.4 KB"]https://www.corvetteforum.com/forum...el-position-sensor-newsensorinplace.jpg[/IMG]

Now remove the pin. It's totally safe to do so at this point. It just pulls out with a little twist. Voila! Toss the famous pin in the trash....it's done its job.

[IMG alt="Name: Pinremoved.jpg
Views: 7149
Size: 41.7 KB"]https://www.corvetteforum.com/forum...ng-wheel-position-sensor-pinremoved.jpg[/IMG]

Pop the dust seal back on and you're done with this operation.

[IMG alt="Name: Dustsealbackon.jpg
Views: 6658
Size: 48.1 KB"]https://www.corvetteforum.com/forum...heel-position-sensor-dustsealbackon.jpg[/IMG]
 

teamzr1

Supporting vendor
12. So, now you put the column back in the car. You WILL dislodge the big grommet in the firewall, but don't worry about that at all. Use one of the upper nuts to loosely hold the column in place while you worry about getting the shaft joint to engage with the lower shaft stuff that's still in the car. It's easy, but a PITA. A second pair of hands would be great as you feed the shaft thru the firewall, but not mandatory.

13. Once you have the grommet on the shaft and that joint reengaged, loosely install the other three nuts that hold the column in place. Now you can get that grommet back into the firewall, all lined up. It just pushes in, nice and snug. I used a wood paint stirrer to work it all around from various directions, because even with the wheelwell opened up it's still difficult to get to. And THAT is why I think you should remove the wheel and the panel, as it's very difficult to see and reach from above. To me, that means it's very difficult to properly get it back in place.

14. At this point, it's a reversal of your work. If you damaged that damn tray retainer to get it off, you can either bend it back into shape, or use a washer with a piece of tubing on that stud to hold the tray in place. I straightened and salvaged the retainer, no problem, and the two front trim clips can be reused, no problem.

15. The shaft bolt likes to drop out of place when you turn the wheel to get the threads facing you to put the nut on. Ask me how I know.
cryin.gif
I used some duct tape to hold that bolt in place when I turned the wheel 180 degrees to get the nut on.

16. Don't go wild with tightening that shaft nut or the 4 nuts under the dash. They don't need to be some high torque value, just "tight". I didn't bother to look up the torque values in my manual because I noted during disassemby that they weren't very tight to begin with.
 

plastic orange

CCCUK Member
Many thanks for your input on this. My car had a new harmonic balancer about 6 months before i got the car, so probably a year ago. It's just strange that this problem happened after i'd jacked up the rear of the car and cleaned things up. I checked earths today with meter and all seem good, and used contact cleaner on all connections under the car - again. Steering wheel seems pretty straight to me. I sorted the ECBM not long after i got the car and it's been fine since. I'll print off your information and visit my mate with a reader to hopefully pinpoint the problem. I'm sure my car has the steering lock bypass fitted, so I'll have to familiarise myself with locking the column if that's the route i have to go.

cheers,

Pete
 

plastic orange

CCCUK Member
Over the last few days I've had codes C1287 and C1288, so I've ordered a new sensor from rockauto. I also had a momentary front left wheel lockup at 70 mph. I've checked out as many 'How to's' as I've found to prepare me for replacing it. Only issue I've got is ensuring the steering wheel doesn't turn as I'm reluctant to mess with the lock bypass that's fitted ( I never fitted it). I presume the use of tie wraps should hold it enough. I'll report back when it's done. As my car is very low mileage I'm picking up now what most people have had to do over 10 years ago. I'm just waiting for what's next on the list.

Pete
 

plastic orange

CCCUK Member
Here's an update:
I finally got round to replacing the steering wheel sensor - waited for a cooler day. It's a reasonably straightforward job and I took the advice from the info above and removed the inner wheel arch protector to reach the bolt on the coupling. First issue I had - and this was my fault for not wearing my reading glasses - I just couldn't see how to remove the knee bolster under the column as the small 7mm bolts didn't look like bolts to me, well until I put a good light on them. This wasted a good amount of time, and lesson learned. I intended to take the entire column out, but the addition of the Toad alarm fitted to EU models scuppered this due to the way it was wired. The wires had been soldered (I presume) then taped into the column wiring and I didn't want to go down the disconnecting route. However, with the assistance of a fellow C5 owner who wanted to see what he may have to do in the future, we managed to free enough wires to pull the column back and then turn it enough for the sensor to be pointing outside the car. Changeing this was straightforward, and with 2 of us working popped the column back in place. There was a bit of a faff with the bulkhead grommet involving a pull back and re install, but that was it. Incidentally I'd pulled fuse 16 (Air Bag) and disconnected battery, and tie wrapped the wheel so it wouldn't move. All in all, not a huge job, but best done with 2 folk for ease of getting column back in. Having done one now, I'd say 2 hours would get the job done, and best of all - no more codes.

Pete
 

D4cars

Regular user
Hello Pete, Could you tell me where you purchased the steering wheel sensor from as I occasionally get the c1287 code on my 2002 c5....
Thanks Simon
 
Top