72 Corvette - Restoration Updates

Roscobbc

Moderator
I understand that the handbrake is a bit of a weak point on C3's - strangely enough the handbrake on my car was the only thing that was working when it arrived at my house - presumably somebody at The Beverley Hills Car Club had fixed it to stop the car from rolling away because the gearbox wasn't going to stop it.....:rolleyes:
I recall completely replacing the handbrake mechanism (so shoes, springs cable...the lot) and adjusted it-up ready for the MOT test.......when the MOT guys put it on the rollers the guage read nearly as high as the foot brake (not, perhaps too much to go on being non-power assist) and really worked well......for a few months.....and gradually deteriorated after that to much what we all expect from C3 handbrake........close to useless!
 

CaptainK

CCCUK Member
It takes me ages to get around to reading magazines and stuff, so only recently finished the latest Vette News. I went to put it away with my others in the collection, but decided to have a reorganise of them - and found TWO editions I hadn't read yet (still in covers).

Earliest one I found that I am now reading is December 2020, which has a certain white Corvette on the front of it, and an article about a Retirement Project penned by "Tim P". I wonder what that is about? I guess I'll find out when I read it later.....
 

TimP

CCCUK Member
I recall completely replacing the handbrake mechanism (so shoes, springs cable...the lot) and adjusted it-up ready for the MOT test.......when the MOT guys put it on the rollers the guage read nearly as high as the foot brake (not, perhaps too much to go on being non-power assist) and really worked well......for a few months.....and gradually deteriorated after that to much what we all expect from C3 handbrake........close to useless!
Strangely enough my handbrake, when rebuilt, worked pretty well too - much better than expected!
 

TimP

CCCUK Member
It takes me ages to get around to reading magazines and stuff, so only recently finished the latest Vette News. I went to put it away with my others in the collection, but decided to have a reorganise of them - and found TWO editions I hadn't read yet (still in covers).

Earliest one I found that I am now reading is December 2020, which has a certain white Corvette on the front of it, and an article about a Retirement Project penned by "Tim P". I wonder what that is about? I guess I'll find out when I read it later.....
... the article probably says that I should have finished it about 2 years ago. The best laid plans of mice and ......:)
 

TimP

CCCUK Member
.. which reminds me I should be getting a move on with the gearbox and stuff.

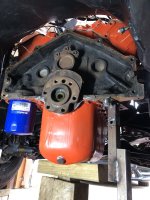
So.... with the back of a rather grubby engine propped up with a welded up stick bolted on to the starter motor mount....Engine Bay 26.jpg

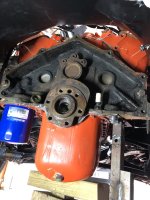
The first step was to get the old pilot bearing out using the usual method. I say usual like I do this every day. Actually this is a first for me so .... packing the area behind the pilot bearing with grease and then finding a suitable bolt (seen on the right of the crank) packed out to roughly the same diameter as the pilot bearing inner I knocked out the old one. The process works a lot better than I expected and it duly popped out as the advice said it would. The pilot bearing, was actually quite worn and a sloppy fit on the nose of the input shaft. You can see it here on the left of the crank. Grease gets everywhere, as you can probably see.

Engine Bay 27.jpg

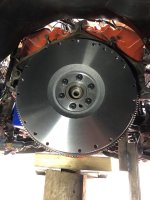
The back of the engine was then cleaned with brake cleaner and a new pilot bearing and flywheel fitted. New ARP bolts were used with the supplied thread/head locker and torqued to the 85 lbsft that ARP recommend.... The flywheel has the correct number of teeth - unlike me.Engine Bay 28.jpg

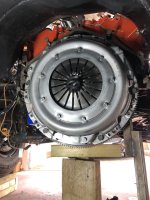
The flywheel and pressure plate surfaces were carefully cleaned with brake cleaner and a new clutch and pressure plate were fitted, again with new bolts. The clutch alignment tool, that came with the clutch, is still in situ.
Engine Bay 29.jpg

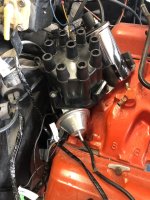
Whilst I was about it I fitted the rebuilt distributor..
Engine Bay 30.jpg
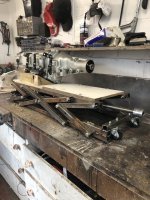
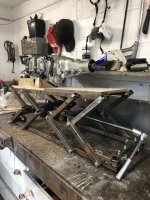
Now, fitting the gearbox presents me with a problem. I don't have a pit or lift. The engine is now in the car and the gearbox will have to go in from underneath. There's not a lot of room down there and there's just me. I need some help so I decided to build a simple trolley lift. Didn't quite turn out that way ....

With the gearbox loaded on it, the trolley had to be less than 43cm high to get underneath the chassis rail but needed to lift the gearbox vertically about 20-25 cm to align it with the clutch etc. once under the car. I also wanted to build it from scrap I had lying around because I am cheap like that, as it's only going to be used once. I'm sure this could have been a lot easier - spending perhaps a little longer with pen and paper might have cut down the complexity but, strangely enough and to my surprise, it does seem to work.

Transmission 4.jpg Transmission 5.jpg
The top of the gearbox is 40cm from the floor when the trolley is fully lowered. Turning the large threaded rod lifts/lowers the top bed parallel to the ground. It's on wheels so I can slide it under the car and manoeuvre it into position. Seems to work ok - time will tell.

I need to wait for a new slip yolk as the old one is very worn so this will wait in the corner of the workshop until the new yolk arrives.

I will continue with the spark plug leads and the engine wiring so that, once the transmission is fitted, it shouldn't be too long until first crank with the starter.

Happy days!
 

TimP

CCCUK Member
I forgot to mention that the flywheel wouldn't initially fit on the end of the crank. At first I thought I had the wrong crank but I checked various US GM forums and it would seem that this is quite common with various makes of flywheel. With some very careful and even dressing of the flywheel hole it eventually mounted on the crank with a fairly tight fit. The process took about an hour in total..
 

TimP

CCCUK Member
Whilst waiting for the slip yolk to arrive I have been working on a few areas that need to be resolved before the engine can be started and the transmission fitted.

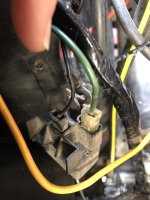
The first of these was the horn relay. The horn relay sits on the drivers side of the engine bay tucked up under the lip for the front wing just in front of the vacuum reservoir. It consists of a relatively simple relay to operate the horn, an electrical distribution stud for the wiring (which is largely unrelated to the horn) and an integrated plastic bracket that is used to mount it to the fibre glass inner wing. A lot of C3 owners are probably now scratching their heads wondering what I am talking about. That's because this arrangement was only used on the '72 and '73 models. Unfortunately that makes these relays rather expensive and a new one, together with it rubber grommet fitting kit, works out at about £100 - which is pretty steep for a relay. The stud is fed power from the starter motor terminals. Bizarrely one of the feeds goes back to the air conditioning system so the cable crosses the engine bay twice to feed something that is only a couple of feet from the starter in the first place.

My relay seems to work ok but the plastic bracket is broken.
Electrical 7.jpg

I decided to fabricate a new mounting plate and attach it to the stub of the bracket that remained.... The rubber grommets provide a weatherproof seal for the attachment point.
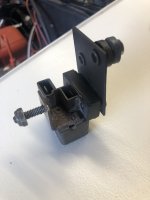
Electrical 8.jpg
The stud is (I think - will confirm) unfused, unshielded and unswitched ie always live. If this is correct and the relay doesn't work I will be tempted to separate the functions of horn relay and distribution point, put the power stud in some sort of insulated housing and buy a relatively standard 12v relay for the horn. Should find out if it works soon.

Having completed that, the next problem is the transmission shifter hole in the floor. I had bought a new rubber boot and integrated upper reinforcement plate/seal for a manual gearbox and had thought nothing of it. However, my car was originally an automatic and the reinforcement plates (one below the glass fibre floor and one above, riveted together) for an auto shifter are much bigger. Not a lot of people know that.
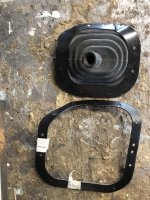

Transmission 6.jpg

Doing a little bit of research I found that in the US these auto-to-manual conversions are not uncommon and the owners/converters have mostly used a blanking plate to bridge the gap. This is what had been done in my car.....,
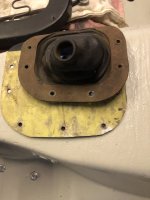
Transmission 7.jpg

Having (documented in a previous instalment) rebuilt the hole in the floor to the correct size for a manual transmission I then had to make the decision as to whether to build a new bridging plate or buy a new manual-sized reinforcement. New ones are available and relatively cheap but probably taking a month to get to me. Wanting to get a move on (and whilst I had everything open might as well spend a little time on it) I couldn't wait so I took one of the auto sized reinforcement plates and shrank it to a manual size...
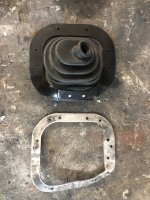
Transmission 8.jpg

This will now be fitted at the same time as the gearbox to help ensure that I drill the holes for the boot in the floor in the right place so that the gear lever comes through the rubber shroud without putting anything under undue strain.

Lastly, I wanted to fit some insulation underneath the floor to minimise heat soak into the cabin and (possibly more importantly) to protect the glass fibre floor from gearbox and exhaust pipe heat. I found some engine bay insulation for a boat that is water and heat resistant, and with the help of a template, cut out a shape of the right size. The insulation is self adhesive and is also secured by the original bent-metal fittings and by the 4 positive battery cable clips. (actually those are not shown here - hadn't refitted the cable at the time the photo was taken). This, together with the wrapped exhaust, will hopefully keep things fairly cool.
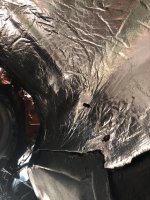
Body Reinf 47.jpg

Next up: Spend some time checking the engine bay wiring and getting everything electrical labelled, tested and ready for an engine start. Onwards and upwards!
 

johng

CCCUK Member
Tim, what's insulation you used? It might come in useful for my exhaust covers if heat turns out to be a problem.
 

TimP

CCCUK Member
Hi John,

I think it was this one....
Glassmat Insulation

I can vouch for the stickiness and quality seems OK. I haven't tested it to temperature (not even sure how I could) but will be keeping an eye on it to check that it is as resistant to high temperature as they claim (180C). It's eBay so you have to be a little circumspect - time will tell. Hope that helps.

Any thoughts on what sort of temperature it gets to under there or in an engine bay?
 

johng

CCCUK Member
Hi John,

I think it was this one....
Glassmat Insulation

I can vouch for the stickiness and quality seems OK. I haven't tested it to temperature (not even sure how I could) but will be keeping an eye on it to check that it is as resistant to high temperature as they claim (180C). It's eBay so you have to be a little circumspect - time will tell. Hope that helps.

Any thoughts on what sort of temperature it gets to under there or in an engine bay?
Hi Tim, I don't know yet how hot my covers are going to get, as I've had a bit of a delay in fitting them. However, after returning from a run out to the Essex area meeting last night I measured around the engine bay and didn't find anything above 60C (apart from the engine, exhaust, radiator and hoses).
 

TimP

CCCUK Member
Many thanks - that's good to know! I will be keeping an eye on temperatures under the car just to make sure this insulation doesn't melt and cause a real mess. It is reflective so that should help reflect some of the heat.
 

TimP

CCCUK Member
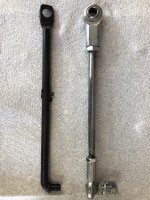
One of the posts on the forum by Mad4slalom concerned rattling noises coming from the clutch mechanism. Digging out my clutch rod (z-arm to bell housing) and having a closer look at brought home a few realities having previously thought it was quite serviceable..... It did get me thinking.....

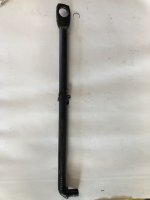
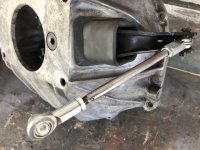
The hole for the clutch release bearing lever was very egg shaped, but more importantly the loops for the anti-rattle springs were in poor shape. One had disappeared and one was on the verge of going the same way. The PO had drilled a hole through the middle of the rod and put a split pin in place to retain one of the springs. Quite innovative to get you home but not something I wanted to put back on the car. So I took some measurements and bought some tie rod ends. I then welded a 3/8" and a 5/16" bolt on each end to a piece of scrap 10mm rod (an old motorcycle handle bar mirror mount, I think) that was cut to the right size. As it's a prototype I have used budget rod ends but I think it proves the principle and will use this one until I need to replace the rod ends with quality items - shouldn't be a long job.

I had to reshape the female rod end outer diameter a bit to enable it to fit the release bearing lever as its a tight fit - I didn't want to change anything on the car so that it can be returned to original if needs be but otherwise it was pretty straightforward. The mechanism now works with no play and the anti rattle springs should be redundant.

Transmission 13.jpg Transmission 11.jpgTransmission 12.jpg

I'm not able to try it our for real yet as I'm still waiting for a slip yolk before installing the transmission but I can't see why it shouldn't work.

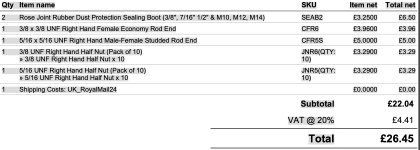
If anybody is interested in the part numbers I used or anything let me know. Total cost for the parts shown is just under £12 (2 imperial rod ends plus some locking nuts). I have bought two rubber covers for the rod ends which should make the bearings last a little longer - they were about £15.00 for the pair
 

Roscobbc

Moderator
Nice job Tim - interesting thing the 'Z' bar assembly - a lot of the 'septics seem to make a big deal of very precise measurements and angles etc.....presumably for a more engineered 'feel' to the clutch operation - me? I'm happy that mine is all a bit worn (probably like yours was) and that it all moves freely. I'm guessing for racing you'll have considered drilling an additonal lower pivot point on that 'Z' bar for a shorter, quicker (but heavier) clutch action?
 

TimP

CCCUK Member
Thanks! I agree the 'Z' bar is an interesting design - it seems odd (but nice and simple) to have a solid linkage that's location depends on the frame at one end and on a vibrating engine at the other. The anti-rattle springs are also a nice simple solution to taking out any slack in the linkage as the rod only ever operates in compression. I tried making this replacement as I was going to have to replace the rod anyway and it just seemed a relatively straightforward (but I haven't tried it yet!) and quick task to put one together out of off-the-shelf components. I'll never be doing any racing - for me that's a very enjoyable spectator sport rather than a participation activity - and having just had my knees replaced I need a clutch that is as light as possible.:)

It will be interesting to see if the solid rod (ie with rod ends) transmits more vibration through to the clutch pedal, or less or perhaps no difference at all - not sure which way that will go.

The good news is that the slip yolk should be arriving by the end of the week. Happy Days.
 

Roscobbc

Moderator
Of course the opposite applies - lengthen the 'Z' bar arms and make action lighter (albeit longer travel). Ford USA held on to heavier action Long style clutches for quite a while. They use a 'helper' spring if I recall correctly on the clutch pedal - it was biased to reduce pedal pressure at the centre of its 'throw' - worked quite well I remember.
 

Mad4slalom

CCCUK Member
One of the posts on the forum by Mad4slalom concerned rattling noises coming from the clutch mechanism. Digging out my clutch rod (z-arm to bell housing) and having a closer look at brought home a few realities having previously thought it was quite serviceable..... It did get me thinking.....

The hole for the clutch release bearing lever was very egg shaped, but more importantly the loops for the anti-rattle springs were in poor shape. One had disappeared and one was on the verge of going the same way. The PO had drilled a hole through the middle of the rod and put a split pin in place to retain one of the springs. Quite innovative to get you home but not something I wanted to put back on the car. So I took some measurements and bought some tie rod ends. I then welded a 3/8" and a 5/16" bolt on each end to a piece of scrap 10mm rod (an old motorcycle handle bar mirror mount, I think) that was cut to the right size. As it's a prototype I have used budget rod ends but I think it proves the principle and will use this one until I need to replace the rod ends with quality items - shouldn't be a long job.

I had to reshape the female rod end outer diameter a bit to enable it to fit the release bearing lever as its a tight fit - I didn't want to change anything on the car so that it can be returned to original if needs be but otherwise it was pretty straightforward. The mechanism now works with no play and the anti rattle springs should be redundant.

View attachment 25786 View attachment 25785View attachment 25787

I'm not able to try it our for real yet as I'm still waiting for a slip yolk before installing the transmission but I can't see why it shouldn't work.

If anybody is interested in the part numbers I used or anything let me know. Total cost for the parts shown is just under £12 (2 imperial rod ends plus some locking nuts). I have bought two rubber covers for the rod ends which should make the bearings last a little longer - they were about £15.00 for the pair
Interesting post Tim, and good work in sourcing the ends. My old rod was worn too , the new one seems to have cured my rattle but only had two short test runs, , soooooo wet in cornwall these last few weeks. Be intersted to see if the rod with ends and no springs is rattle free, the good thing is you can adjust any slack out to keep it tight so hopefully it will work well . Would be interested in the rod end numbers, I could add them to my old rod as an experiment 👍
 

TimP

CCCUK Member
Here are the part numbers that I used. They were sourced on eBay from a company called McGill Motorsport.
Please note that I only should have bought 1 sealing boot as the studded rod end only uses 1 hole so fitting a rubber boot with two holes won't really help keep the dirt out much.
Also there is only room for a 24mm diameter rod end in the clutch release bearing lever end so if you decide to go for a higher quality rod end try and get as close to this as possible - my budget rod ends are 26mm in diameter so I had to shave off just over a mm from the rod end critical area with a hand file to make it fit comfortably. Some, but not all, quality rod ends (like SKF) are 28mm in diameter so would be a bit more work or possibly not work at all if the bearing was breached.

I bought two sets of nuts although I probably didn't need them - only one locknut each end is used and if I had tried I could probably find one of each lying around in the workshop so I didn't include them in the costs.

Not included in the list below
There is a bolt with the head removed welded on either side of the 10mm rod (1 3/8 UNF and 1 5/16 UNF) - I did have those lying around :) - so these aren't included in the list below. You will also need a short section of 10mm(3/8") steel rod.

Hope this helps.

Screenshot 2024-04-03 at 08.20.10.png
 

TimP

CCCUK Member
Just a quick post...... on trying to fit the bell housing and gearbox this afternoon I noticed that I made a fairly elementary error in my replacement clutch rod design. :oops: The rod actually pointed the wrong when installed - the release bearing lever has a slot that the lever goes through. The 'cup' faces the rear rather than the front - my error due to trying to figure this out on the bench rather than on the car. Doh. I am going to have to rethink this. More later in the week.
 

Mad4slalom

CCCUK Member
Just a quick post...... on trying to fit the bell housing and gearbox this afternoon I noticed that I made a fairly elementary error in my replacement clutch rod design. :oops: The rod actually pointed the wrong when installed - the release bearing lever has a slot that the lever goes through. The 'cup' faces the rear rather than the front - my error due to trying to figure this out on the bench rather than on the car. Doh. I am going to have to rethink this. More later in the week.
I did many jobs building a beach buggy two or three times 😵‍💫🤣👍
 
Top