Next task after filling the box with EP85/90 was to get the gearbox fitted and here it is on the jack, ready to go in...

...taking aim.....

... and getting some help from guiderails

..... then with a few anglo saxon words of encouragement, it's in. The transmission crossmember goes next and then comes off again when you realise that the gear lever has to go in first.

The gear lever installation is tricky, because the rods flop around and go where they shouldn't, and it helps if you have arms about 4 feet long, which fortunately I don't. I could not find any pictures or diagrams of this style of lever in any Corvette documentation but it can be found in a Chevelle manual, so perhaps that's where the box came from. (My corvette was originally built as an auto.)

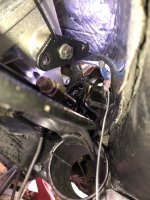
Once the gear lever is installed the selector rods need to be adjusted. To do this the gear lever needs to be in the neutral position with a gauge in a slot (see arrow in pic) in the lever base to hold everything still whilst the rods are adjusted to length. It's not a fun job and can't be done off the car (I think) because the gear lever attaches to the transmission cross member. It's a tight fit and I ended up welding a length of stiff wire to the gauge to allow me to get into the slot. It's a tight fit. You can also see the reverse lever (in moving forward position) waiting for the selector rod to be inserted in the hole. (rod just below the hole).

Next: fit the starter motor, attach the gear lever surround, check the wiring, start the engine.
...taking aim.....
... and getting some help from guiderails
..... then with a few anglo saxon words of encouragement, it's in. The transmission crossmember goes next and then comes off again when you realise that the gear lever has to go in first.
The gear lever installation is tricky, because the rods flop around and go where they shouldn't, and it helps if you have arms about 4 feet long, which fortunately I don't. I could not find any pictures or diagrams of this style of lever in any Corvette documentation but it can be found in a Chevelle manual, so perhaps that's where the box came from. (My corvette was originally built as an auto.)
Once the gear lever is installed the selector rods need to be adjusted. To do this the gear lever needs to be in the neutral position with a gauge in a slot (see arrow in pic) in the lever base to hold everything still whilst the rods are adjusted to length. It's not a fun job and can't be done off the car (I think) because the gear lever attaches to the transmission cross member. It's a tight fit and I ended up welding a length of stiff wire to the gauge to allow me to get into the slot. It's a tight fit. You can also see the reverse lever (in moving forward position) waiting for the selector rod to be inserted in the hole. (rod just below the hole).
Next: fit the starter motor, attach the gear lever surround, check the wiring, start the engine.
 ps like the home built tranny lift
")