2000 C5 parasitic battery drain from a BCM module

PhilHarris

CCCUK Member
Hello,
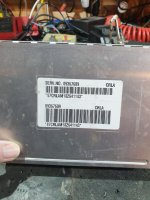
after much advice from a number of your good selves (thanks again!) I may have traced the fault to one of the BCM Modules (in that when I disconnect it most of the current drain goes away), I'm now looking for a supplier who can supply a unit that is pre-configured for my C5 (correct mileage etc). Any suggestions please?

Phil
 

Attachments

  • Corvette C5 BM Module.jpg
    Corvette C5 BM Module.jpg
    212.6 KB · Views: 0

teamzr1

Supporting vendor
Are you sure it is the BCM or some function of the C5 that plugs into the BCM ?
Many times it can be a stuck relay as they are small and over time degrades and the BCM is what controls them
Before yanking BCM move things around, or take a relay out and put back in to force a stuck relay to change states
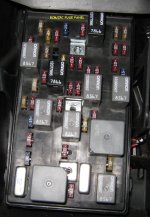
There is a fuse panel above the BCM which has relays,
With BCM still connected you could pull relays in fuse box, make sure the male connectors of relay are clean,
Also check that the A/C did not leak water into the fuse box or wiring around it

Most of the relays are the same type so could swap them in location and see if the draw goes away

IF replacing the BCM

Before doing the swap, IF the radio has been set with an alarm code, either remove that or know what the code is as
replacing BCM the new one would not know what the code is and now your radio is LOCKED and would not function
I turned that code off in my 1999 C5 many years ago but if I recall if a code security code was set then there is a red LED that goes
on front of radio panel

Replacing BCM, more security, as to VATS
The BCM and PCM share a security code they must match or PCM will refuse to start engine

You will need to do a BCM to PCM relearn process to get new BCM to sync code with PCM
If you do not have that process I can post it

Last if replacing BCM, someone with a GMTech-II willl need to turn on or off what options your C5 has or doe not have
so reason I say be real clear if it is BCM or is it relays, etc

If testing

Diagnosing a parasitic draw can be a labor-consuming challenge.
The complaint is frequently that the engine won’t start after a couple of days of sitting because of a dead battery.
Often the battery has already been changed, but the problem remains the same: The engine won’t start after sitting for a few days and needs to be either charged or boosted.

Basics

Before we start a parasitic draw diagnostic, we need to ensure that the vehicle’s battery is fully charged and in a state of good health and that the charging system is functioning correctly. We need to verify that the correct battery is installed and that it will meet or exceed the vehicle’s reserve capacity (RC).
We need to verify that the customer’s driving habits aren’t to blame. Frequently driving short trips or a vehicle that sits for days or even weeks before being started can easily cause a battery charge to be depleted.

We also need to verify that all the customer’s plugged-in accessories are removed from any power ports or audio/video ports and that there aren’t any devices plugged into the diagnostic link connector (DLC). A good visual inspection and a customer debrief are important.
Once we have verified that nothing appears to have been left on or plugged in, the customer’s driving habits aren’t to blame, the charging system is fully functional, the correct battery is installed, and it has a proper state of charge, we can begin the process of checking and diagnosing a parasitic draw.

What is a parasitic draw?

A parasitic draw is when an electrical component continues to consume energy from the battery when it shouldn’t, even after it and the vehicle have been shut off. Some battery draws are acceptable and are required to retain memory, settings, security and other functions on the vehicle, but these are designed into the system and the proper battery will be able to maintain and deal with these.

What is an acceptable mA battery draw and how do we test for it?

General Motors suggests 40 mA as the maximum normal reading.

If you can’t find a published specification, there is a rule of thumb that we can use to determine a maximum mA value. It involves using the factory-recommended battery’s RC value and dividing it by four to come up with an mA battery draw value. If the RC of the factory battery was 140, then using the math: 140 divided by 4 equals 35. Using this formula, the rule of thumb value for this battery would be a maximum 35 mA draw.

There are two common methods used to detect a parasitic draw: disconnection and voltage drop.

The disconnection method involves the installation of a digital volt ohm meter (DVOM) set to the mA scale installed in series between the disconnected negative battery terminal and the negative battery cable end.
The excessive draw is then located by slowly removing one fuse at a time until the circuit that was causing the draw was identified. Using this method, though, can hide the issue because the interruption of power (battery disconnected) could cause the module, relay or device that is the cause of the excessive current draw to shut off, release or go to sleep. This could mask the issue until it acts up again.

The voltage drop parasitic draw detection method allows all the circuits, modules and communications networks to remain functional, powered and intact because the battery is not disconnected for this test.

A voltage drop is created by the internal resistance of a circuit when the current flows through it and the material that the fuse is made of causes some resistance and creates a small but detectable voltage drop when current flows through it. We can measure this voltage drop using a DVOM set to millivolt (mV) and use it to identify the circuit that might be the cause of our excessive current draw.

There are many different types, sizes and ratings of fuses being used on the modern vehicle, and there are charts that can be found online or in our information systems to display what the voltage drop across each type of fuse will translate to as an mA reading.
The modern-day parasitic draw testing procedure that I follow is a combination method. This procedure is a multi-phase blended approach that is effective at finding and identifying a parasitic draw on modern vehicles.

The Combination Method

Phase 1: Start with proper vehicle preparation and the use of an inductive amp clamp.

Step 1. Prepare the vehicle; perform the needed battery tests and verify that the issue is not caused by a customer driving pattern. Perform a full module scan and note any codes. Many European vehicles can set codes for parasitic draws. BMW offers a diagnostic “Energy Management test” that may identify the area of concern.
Remove the scanner and verify there are no aftermarket accessories connected to the auxiliary power ports, audio/video ports or the DLC.
Open your information system and note the location of all the fuse blocks on the vehicle being tested.

Step 2. Road test the vehicle and activate as many accessories and devices as possible from the infotainment systems, HVAC, power windows, etc. The idea is to operate as many components as possible, to verify the proper operation and to observe if anything doesn’t function as designed.

Step 3. Return to the shop after the road test and turn the ignition off, open all the doors, hood, liftgate and manually close all the latches and ajar switches. Using the key fob (if equipped), lock and set the vehicle’s alarm. Ensure the vehicle’s transmitter key fob is taken away from the vehicle so that the security system won’t detect it and possibly wake up the systems, or not allow them to fully power down.

Step 4. Attach an inductive amp clamp capable of reading down to 1 mA to the negative battery cable. Set the amp clamp to the mA scale and note the reading.
Step 5. Allow the vehicle to go to sleep. Most vehicles will start to go to sleep after about 10 minutes, with periodic wake-up cycles as the vehicle powers down. Falling fully asleep may take as long as two hours and will be different for each make and model. Typically, the vehicle will have less than a 75 mA draw during this falling asleep period.

Note: An engine-off natural vacuum evaporative test can occur during this time and cause a draw. Some vehicles may be equipped with an HVAC afterblow that may power the HVAC fan to blow for a specified length of time. These conditions are normal.

Step 6. After everything has gone to sleep, the expected mA draw displayed by the amp clamp should be less than the max mA draw that the manufacturer specifies or if no specification is available, less than the RC calculated value.
• If the value is less than the vehicle specification mA draw or the RC calculated mA draw, the issue isn’t present at this time or the issue is intermittent. You may have to reinitiate the test again to see if you can duplicate the problem.
• If the value is above the vehicle specification mA draw or the RC calculated mA draw, then we will need to continue testing using Phase 2.
 

teamzr1

Supporting vendor
Phase 2: Voltage Drop Testing

Step 7. Using our DVOM, set to the mV scale, perform a voltage drop test across each fuse, one at a time to determine which fuse has the parasitic draw or excessive current flow (you can ignore negative readings).
Start by first testing all the smaller Micro2, Micro3, Low Profile, Mini, Regular and Maxi blade fuses.
You can look up the mV to mA conversion charts online to aid in diagnosing how much current is flowing across each fuse, but a simple like vs. like comparison (10-amp mini vs. 10-amp mini, for example) should point out the larger current draw quickly.
We will be leaving the larger J-Case type fuses (the ones with the plastic covers) for Phase 3.

Note. If the vehicle is equipped with a battery junction block that provides access to mega fuses that feed other fuse blocks, start a voltage drop testing here first. The mega fuse with the highest voltage drop indicates the fuse block to start our fuse-by-fuse voltage drop testing looking for the fuse that is supplying the power to the parasitic draw circuit.

Note. If the vehicle is using J-Case type fuses, I don’t recommend prying off the plastic covers to perform a voltage drop test. Move on to voltage drop testing all the smaller fuses in all the fuse boxes first, and if that doesn’t yield results, we will have to move on to Phase 3.

Note. When testing the Micro3 fuses that have three legs, the center pin is the common voltage supply, so remember to test both sides of these fuses.

Note. Some fuses may have an initial voltage drop that fades away, and some fuses may always have a nominal draw that is supplying power for memory retention. This is normal.

If during Step 7, we find a single fuse that has an excessive voltage drop, do not remove the fuse, as it might cause the draw to go away and it might not return. Locate the fuse in your wiring diagram to identify the component or components to which the fuse supplies power.

If the fuse is supplying multiple devices, disconnect them one at a time until the draw is gone. If all the devices in the wiring diagram are disconnected and the draw remains, be suspicious of an aftermarket device being installed somewhere in the circuit. If individual fuse testing doesn’t identify a voltage drop, go to Phase 3.

Phase 3. The old method last

Step 8. If we haven’t located the parasitic draw yet by using the voltage drop test, we will use our previously installed inductive amp clamp in the final step. We will start removing all the J-Case fuse(s), circuit breaker(s) and relay(s), one at a time while monitoring the mA draw on the inductive amp clamp, to verify if it drops down to or below our vehicle specification mA draw or RC-calculated mA draw.

Many of these J-Case fuses will supply high power to individual devices, for example, the anti-lock brake system (ABS) module. When the excessive draw is removed after a J-Case fuse or other device is removed, a careful review of the wiring schematic will show which fuse or device is supplying power.
Disconnecting these device(s) one at a time should identify the probable cause of the excessive draw.

Note: Before removing anything from the fuse block under inspection, take a quick photo with a cell phone to ensure stuff gets plugged into the correct spot and correctly oriented to the original position.

Step 9. Many times, the actual fuse block itself can be a module and have components, relays and processors that are integrated internally. If the previous steps have isolated the parasitic draw to one fuse block and all the other testing has failed to show or produce the device that is causing the parasitic draw, the final step is to remove/unplug the suspected fuse block. If the draw is now gone, the issue is likely in the fuse block itself.
 

PhilHarris

CCCUK Member
A draw, then we will need to continue testing using Phase 2.
Many thanks, as you state the fault could be a relay on the BCM, however if I pull the fuse for the BCM supply the currents drops, presumably this fuse (F25?) is the supply fuse for the BCM electronics board rather than for an item it supplies. I'm not sure how I can access the radio code, unless it is hidden in the documentation I have with the car. Please post BCM to PCM relearn process to get new BCM to sync code with PCM.
 

teamzr1

Supporting vendor
IF after replacing the BCM,
when opening drivers door the security light will be flashing if BCM and PCM have the same code and thus the engine should start and run fine

IF when door opened the security light stays hard on, no flashing then it is telling you the PCM and BCM need the relearn process below

When replacing the BCM or PCM then the security seed code relearn process must be done, or the engine will not start
I suggest you have the battery fully charged or have a battery tender hooked up
Do this with all other electronics turned OFF and even doors closed so less voltage drain as this will take about 33 minutes
GM made it this long, so crooks have no easy time of stealing the car unless this process is done
I would use a stop watch or a timer, so times below are done correctly

Any time a PCM or PCM is replaced, it may require a relearn process to be done so that the security seeds are swapped between the 2,
and you need to do this process if after the swap and engine will not start
Never try to start the engine until the process has been completed

Turn ON the ignition, leaving the engine OFF for 10 minutes.
Turn OFF the ignition for 30 seconds.
Turn ON the ignition, leaving the engine OFF for 10 minutes.
Turn OFF the ignition for 30 seconds.
Turn ON the ignition, leaving the engine OFF for 10 minutes or until DTC P1630 sets.
Turn OFF the ignition for 30 seconds.
Turn ON the ignition, leaving the engine OFF and wait 30 seconds.


Attempt to start the engine. If the engine does not start, Refer to the Powertrain On Board Diagnostic (OBD) System Check in Engine Controls.

Important:

Performing this procedure may cause a DTC P1630 to set.
If a DTC P1630 sets, turn OFF the ignition for 30 seconds, then turn ON the ignition.
If the DTC P1630 does not clear, Refer to Powertrain On Board Diagnostic (OBD) System Check in Engine Controls.
 
Last edited:

teamzr1

Supporting vendor
Many thanks, as you state the fault could be a relay on the BCM, however if I pull the fuse for the BCM supply the currents drops, presumably this fuse (F25?) is the supply fuse for the BCM electronics board rather than for an item it supplies. I'm not sure how I can access the radio code, unless it is hidden in the documentation I have with the car. Please post BCM to PCM relearn process to get new BCM to sync code with PCM.

As to radio, the only way to know if a past owner set an alarm security code to protect the radio is there should be a
read colored LED light up on front panel of radio
If no light, then owner never set the code (owner's manual should show you that process)
There was a process a GM dealer could do to unlock a radio when code owner set is lost but must dealers I see
do not know what the process is and again this was to prevent radio stolen as crooks know if code is set then stealing
radio is useless as it is locked to every being used again

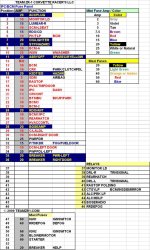
Here I break down the fuse panel by the BCM
Notice the relays in that fuse panel, you might want to see before going with another BCM is seen if one of those relays is stuck closed or
faulty by pulling one at a time and see if the voltage drain stops
You could swap relay (those with the same part numbers at the top) locations to see if you could pinpoint which one is an issue

Notice I labeled which fuse location, what they are for and then same for relays
To the right I color coded what the max fuse amp is, so just looking at fuse color you know the amp size

C5IPFusePanel.jpgBCMFUSEPANEL.jpg
 
Last edited:

Mike W

Busy user
Phil,
I have A 1998 Convertible and have had a similar issue. In my case it happens if the interior gets damp (a feature of Corvettes it seems), the electric passenger seat constantly tries to move forward, and I hear a click/thud noise from the passenger footwell area on the bulkhead. It's the relay being activated. Disconnect the electrical plug under the seat and it stops. Once properly dried out I can reconnect with no issues. Only happens occasionally, and a recent new convertible top seems to have improved the damp issue, fingers crossed.
 

teamzr1

Supporting vendor
Phil,
I have A 1998 Convertible and have had a similar issue. In my case it happens if the interior gets damp (a feature of Corvettes it seems), the electric passenger seat constantly tries to move forward, and I hear a click/thud noise from the passenger footwell area on the bulkhead. It's the relay being activated. Disconnect the electrical plug under the seat and it stops. Once properly dried out I can reconnect with no issues. Only happens occasionally, and a recent new convertible top seems to have improved the damp issue, fingers crossed.

FYI
There is a A/C drain, looks like an udder tit on right side near firewall
It only has a slit in it for water to drain out but dirt, leaves, etc plug that up and when it does then the water drains
down and gets into the electronics like the BCM, wiring, etc
There is another one also on left side
Always best to make sure it is not clogged and to clean it out

Or some just take udder out and let water drain on the outside of firewall
 

PhilHarris

CCCUK Member
Phil,
I have A 1998 Convertible and have had a similar issue. In my case it happens if the interior gets damp (a feature of Corvettes it seems), the electric passenger seat constantly tries to move forward, and I hear a click/thud noise from the passenger footwell area on the bulkhead. It's the relay being activated. Disconnect the electrical plug under the seat and it stops. Once properly dried out I can reconnect with no issues. Only happens occasionally, and a recent new convertible top seems to have improved the damp issue, fingers crossed.
Hello Mike, my car rarely sees rain as I don't bring it out when it's wet but I will try this, many thanks. Phil
 

PhilHarris

CCCUK Member
FYI
There is a A/C drain, looks like an udder tit on right side near firewall
It only has a slit in it for water to drain out but dirt, leaves, etc plug that up and when it does then the water drains
down and gets into the electronics like the BCM, wiring, etc
There is another one also on left side
Always best to make sure it is not clogged and to clean it out

Or some just take udder out and let water drain on the outside of firewall
I'll take a look, I did see this on YouTube. Many thanks. Phil
 

PhilHarris

CCCUK Member
As to radio, the only way to know if a past owner set an alarm security code to protect the radio is there should be a
read colored LED light up on front panel of radio
If no light, then owner never set the code (owner's manual should show you that process)
There was a process a GM dealer could do to unlock a radio when code owner set is lost but must dealers I see
do not know what the process is and again this was to prevent radio stolen as crooks know if code is set then stealing
radio is useless as it is locked to every being used again

Here I break down the fuse panel by the BCM
Notice the relays in that fuse panel, you might want to see before going with another BCM is seen if one of those relays is stuck closed or
faulty by pulling one at a time and see if the voltage drain stops
You could swap relay (those with the same part numbers at the top) locations to see if you could pinpoint which one is an issue

Notice I labeled which fuse location, what they are for and then same for relays
To the right I color coded what the max fuse amp is, so just looking at fuse color you know the amp size

View attachment 16248View attachment 16249
Wow! this is gold dust for me, I've copied it into a word document and saved it. Many thanks. Phil
 

PhilHarris

CCCUK Member
Hello all, many thanks for your advice. One more thing please, I'd like to get my hands on a Tech2 communicator, is this something that is readily available? - I've looked in ebay and there are GM Tech2's listed but it says for Vauxhall, Saab etc and I thought they may be the wrong type (OBD port). Where does the Tech2 connect into the vehicle, so far I have not found an OBD port and assume the Tech2 must plug directly into the BCM module, or somewhere else. Any ideas please?
 

teamzr1

Supporting vendor
Phil Your welcome

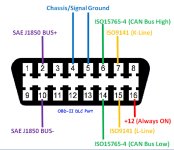
The DLC port is attached to the bottom front edge of the dash kick panel (below the steering wheel) and faces downward to the floor
It is black, D shaped and is 16 pins
All connections to the controllers such as OBD-II scanner or Tech-II plug into the DLC (diag port)

You might find a used tech2, but you would need to know if it is loaded with GM software that would also cover your C5
Some functions of using this requires you pay GM a monthly fee

You can find products that work as Tech2, I have never used one like below, so I have no clue if good or bad product
It is very complex to installing the software on a laptop that must have either MSwindow 7 or 10
Review their website closely
Vxdiag
DLC.jpg
 

PhilHarris

CCCUK Member
Phil Your welcome

The DLC port is attached to the bottom front edge of the dash kick panel (below the steering wheel) and faces downward to the floor
It is black, D shaped and is 16 pins
All connections to the controllers such as OBD-II scanner or Tech-II plug into the DLC (diag port)

You might find a used tech2, but you would need to know if it is loaded with GM software that would also cover your C5
Some functions of using this requires you pay GM a monthly fee

You can find products that work as Tech2, I have never used one like below, so I have no clue if good or bad product
It is very complex to installing the software on a laptop that must have either MSwindow 7 or 10
Review their website closely
Vxdiag
View attachment 16298
Many thanks!
 

Mike W

Busy user
FYI
There is a A/C drain, looks like an udder tit on right side near firewall
It only has a slit in it for water to drain out but dirt, leaves, etc plug that up and when it does then the water drains
down and gets into the electronics like the BCM, wiring, etc
There is another one also on left side
Always best to make sure it is not clogged and to clean it out

Or some just take udder out and let water drain on the outside of firewall
Thanks for the advice, but I'm aware of the rubber udders and I cleared them out some time ago. My problem was the switch on the seat. The new roof appears to be doing a better job of keeping the inside dry, so far anyway.
 

PhilHarris

CCCUK Member
Hello,
after much advice from a number of your good selves (thanks again!) I may have traced the fault to one of the BCM Modules (in that when I disconnect it most of the current drain goes away), I'm now looking for a supplier who can supply a unit that is pre-configured for my C5 (correct mileage etc). Any suggestions please?

Phil
Hi,
following a parasitic current drain issue on my C5 that I had which was traced to the BCM module, I ordered a replacement from Vette Source. I fitted it today, initially the car would not engage the starter so I went through the learning sequence. The security light on the dash now flashes when I open a door suggesting the code learning process was successful, however when I try to start the car it fires up then immediately stops. Checking the codes I have AO-LDCM and A1-RDCM, resetting them does not cure the problem. Any ideas please because I'm stumped at the moment.
Phil
 

teamzr1

Supporting vendor
The DTCs tripped are for both door controllers.

Are the doors switches working ?

As to that BCM was it new and was it programmed for your model year C5 ?
Could when doing the swap maybe loosen the wiring connectors that are connected to the Starbus network, which is by the BCM ?
What are the DTC code values like Bxxxx ?
 

PhilHarris

CCCUK Member
The DTCs tripped are for both door controllers.

Are the doors switches working ?

As to that BCM was it new and was it programmed for your model year C5 ?
Could when doing the swap maybe loosen the wiring connectors that are connected to the Starbus network, which is by the BCM ?
What are the DTC code values like Bxxxx ?
Hello, thanks for replying, yes the door controls are fine, I'm certain the issue is with the replacement BCM, I say this because I've re-fitted the original BCM and the car starts and drives fine (apart from the original parasitic current drain). The BCM is a used item supplied by Vette Source in the States, I used them because they have a YouTube video about Corvette BCM's, having said that when I asked about programming he said it should be fine, in fact he was right about the mileage not being stored as when I checked the mileage did not change with the replacement BCM. When I contacted them I told them what the car was and the serial number of my old BCM and that was that. If the BCM is not correctly configured do you know if there is anyone in the uk that offers this service? Regards Phil
 

teamzr1

Supporting vendor
I guess it was used and replaced by someone else for a reason :(

Did they change the VIN # to yours ?
And only then use a GM Tech-II to load the correct software off that VIN # and then set the options your C5 has ?

Either this one is faulty or is programmed incorrectly
As just an example :
1999 GM came out with the "Billybob" this was before the C5 Z06 came out
This was a stripped C5 with a hard roof, no targa tops and had lighter glass and was 100 pounds lighter than a coupe
Had no electric seats, nor HUD, even a radio delete.

I cannot recall, but it may not have come with electric windows controlled by the door controllers
This meant the BCM was programmed differently and would not work correctly for a base coupe

You need to find someone that has a Tech-II that could properly flash BCM to your VIN #, and set the correct options being on
Since GM no longer use the Tech-II there are clones that can be bought in the USA that are around $300 US

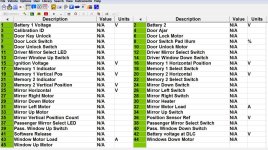
Here is what each door controller looks for

C5doorcontrol.jpg
 

PhilHarris

CCCUK Member
I guess it was used and replaced by someone else for a reason :(

Did they change the VIN # to yours ?
And only then use a GM Tech-II to load the correct software off that VIN # and then set the options your C5 has ?

Either this one is faulty or is programmed incorrectly
As just an example :
1999 GM came out with the "Billybob" this was before the C5 Z06 came out
This was a stripped C5 with a hard roof, no targa tops and had lighter glass and was 100 pounds lighter than a coupe
Had no electric seats, nor HUD, even a radio delete.

I cannot recall, but it may not have come with electric windows controlled by the door controllers
This meant the BCM was programmed differently and would not work correctly for a base coupe

You need to find someone that has a Tech-II that could properly flash BCM to your VIN #, and set the correct options being on
Since GM no longer use the Tech-II there are clones that can be bought in the USA that are around $300 US

Here is what each door controller looks for

View attachment 16833
Hello,
many thanks, I think the first way forward will be contact Vette Source and see what they say, the item was supplied under the pretext that it was more or less 'fit and use' which is not the case. Once again many thanks for your advice!
 
Top