Radiator removal - tips and tricks

trevbeadle

CCCUK Member
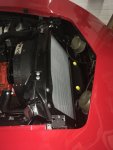
I'm removing the rad from my '80 C3. Reason?....leak from the base of the 'filler' tank(Passenger side). The aim is to get it to a local rad specialist to see if it can be welded/re-cored. It sounds like the most cost effective way and knowing that it will fit when reinstalled.
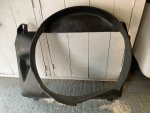
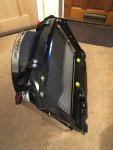
I have disconnected the shroud. 1 piece item, 2 bolts at top and 2 'tongues' at bottom. It will lift free but not come out. Fan and clutch and smog removed and there seems a good gap to lift the rad out when that's freed from the mounts and tranny cooling pipes. Top and bottom hoses are removed from the rad and look in OK condition.
IMG_2183.JPG.


Q1. Is there enough room to lift the rad out with the shroud moved rearwards and remove the shroud after? Lift the rad and the shroud out together? Would be nice to inspect/re-rustproof the cross member and metal under he rad/shroud.

I'm concerned about removing the tranny cooling lines with the rad in situ. It looks like the rad has been removed before as the pipe lines have rubber hose joiners/clips (or was this standard?)

IMG_2182.JPGIMG_2180.JPGIMG_2173.JPG


I am tempted to cut through the hose connections with tin-shears to free the lines and when the rad and shroud are removed and the rad is on the workbench, remove the remaining metalwork piping and clean up/replace all the rubber hose/clips! Likewise the remaining tranny cooling line pipework on the car.
Q2. Is this a good idea/optional way of doing things? Will I and the car get covered in transmission fluid??

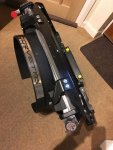
Q3.The rad mountings themselves are easy to remove. (I think!). Just the top 2 and the freed rad should lift straight up now released. I will buy new rad mount cushions when I have confirmed sizing.

Have I missed anything?....alternative courses of action?...Thanks for inputs......................
 

Oneball

CCCUK Member
I don’t reckon you’ll get it out with out disconnecting the trans cooler.
I’ve also found the bottom outlet catches on the chassis so you have to lift the drivers side a couple of inches to get it to clear the top lip of the chassis.
 

Vetman

CCCUK Member
I replaced the radiator on my 1975 . I did it single handed and it was hard work. I removed the clutch fan and the two piece shroud. Radiator removal is made difficult by the bottom hose radiator pipe which clashes with the front suspension lower A bracket. Eventually I got it out. All quite heavy and awkward to handle. Two people recommended. I did not want to repeat this struggle for installation of the new radiator to prevent damage to it.

At some point I decided to remove the hood and then the radiator support frame. I managed to remove the hood using straps to the garage rafters. I left it suspended for storage.

I bought a Champion alloy radiator for my year of Corvette. If you buy one then make sure it is correct for manual or auto transmission, ie has the auto pipe connections.

I repaired the already damaged shroud with plastic bumper repair filler. I then assembled the frame, radiator, and shroud to ensure all fitted. I had to modify the rubber support spacers to suit the radiator. While I had good access I fitted an oil cooler to the radiator frame.

For re-installation I removed the section of shroud nearest to the engine and the oil cooler to make the piece lighter and smaller. I then wrestled this assembly back into the car. This was still difficult but was done with only minor scratches.

I then re- fitted the shroud, fan, and hood. The hoses and auto cooler pipes went back on.

I had replaced the hood as precIsely as I could. When I closed it it would not re- open, but that is another story.

Some photos.
 

Attachments

  • C2551A68-47A7-4DCA-AEC1-FD38AF2E2078.jpeg
    C2551A68-47A7-4DCA-AEC1-FD38AF2E2078.jpeg
    238.3 KB · Views: 20
  • 212AB92F-A717-4814-9144-F518804104C0.jpeg
    212AB92F-A717-4814-9144-F518804104C0.jpeg
    226 KB · Views: 20
  • 888E0307-A72F-4F16-B478-23426F278EAB.jpeg
    888E0307-A72F-4F16-B478-23426F278EAB.jpeg
    134.2 KB · Views: 19
  • AEFB0490-5D43-4B23-8A04-47B34F31CD00.jpeg
    AEFB0490-5D43-4B23-8A04-47B34F31CD00.jpeg
    171.4 KB · Views: 19

Oneball

CCCUK Member
I replaced the radiator on my 1975 . I did it single handed and it was hard work. I removed the clutch fan and the two piece shroud. Radiator removal is made difficult by the bottom hose radiator pipe which clashes with the front suspension lower A bracket. Eventually I got it out. All quite heavy and awkward to handle. Two people recommended. I did not want to repeat this struggle for installation of the new radiator to prevent damage to it.

At some point I decided to remove the hood and then the radiator support frame. I managed to remove the hood using straps to the garage rafters. I left it suspended for storage.

I bought a Champion alloy radiator for my year of Corvette. If you buy one then make sure it is correct for manual or auto transmission, ie has the auto pipe connections.

I repaired the already damaged shroud with plastic bumper repair filler. I then assembled the frame, radiator, and shroud to ensure all fitted. I had to modify the rubber support spacers to suit the radiator. While I had good access I fitted an oil cooler to the radiator frame.

For re-installation I removed the section of shroud nearest to the engine and the oil cooler to make the piece lighter and smaller. I then wrestled this assembly back into the car. This was still difficult but was done with only minor scratches.

I then re- fitted the shroud, fan, and hood. The hoses and auto cooler pipes went back on.

I had replaced the hood as precIsely as I could. When I closed it it would not re- open, but that is another story.

Some photos.

is that an engine oil cooler?
 

Vetman

CCCUK Member
Yes, later I ran hoses to it from a thermostatic adaptor plate between block and oil filter. All went well. Probably not needed but I wanted it anyway. I fitted an oil temperature sender and gauge to check operation.
 

Alben78

Well-known user
Changed the rad on the ‘78 ages ago but I don’t remember any particular problems other than releasing the pipe clips on the auto
trans cooler pipes to the rad as they seemed to be almost impossible to access. I think I changed the rubber pipe back to the hard lines after cutting them off and plugging them with suitable bolts. I would strongly recommend replacing all the foam seals around the rad and support once it’s all out as it’s almost impossible to do once it’s all back together.
I had the rad re cored by a local repair shop as the side tanks were ok.
 

kentvette

CCCUK Member
As far as I remember, you should be able to lift the shroud out if you have removed the fan assembly. The lift out the rad. But, I think it is also possible to remove the rad without the shroud on the later cars (post '78).

The fittings you have on the trans cooler lines are stock and yes, they are a pain to get free. After removing and replacing one end I ended up fitting new rubber pipes when one "let go" on the road - a messy business! :mad: But you won't loose much fluid if you change them. Remember that you will need the correct high pressure hose - ordinary stuff will not last more than a few months! Unless you really need to, don't bother removing the metal outlets from the rad - they can easily snap!

Last time I looked it was hard to find the correct rubber cushions for the rad, but that may have changed now. Beware with a re-core - the dimensions of the rad between the two side "tanks" is absolutely crucial if it is to fit properly back in the brackets.

There is a knack to re-fitting teh trans cooler lines - but I've forgotten it! :rolleyes: :D
 

Roscobbc

Moderator
The radiator 'frame' is structural component - if you remove it alignment issues re. mounting holes can be 'challenging' when re-installing. I had to jack each side of the front end up to align respective bolt holes.
 

Vetman

CCCUK Member
Interesting point you make. Fortunately my car was static between removal and replacement of the radiator frame and I had no problem in putting the bolts back in.
 

trevbeadle

CCCUK Member
Rad and shroud out! B%&"*! Whoever said you can get a post '79 rad or shroud out on its own......? Now cleaning up ready to receive new/refurbished rad. Rad frame carries A/C rad which means very little available forwards movement of rad support as up against headlight actuators!!
sIMG_2185.JPGIMG_2187.JPG

Wouldn't it be much simpler to have a fan shroud in 2 parts? Then the rad and mounts would go back in first and then the shroud. Has anyone cut the shroud top to bottom and made joining plates so can be rejoined in situ?

IMG_2189.JPGIMG_2188.JPG
 

Attachments

  • IMG_2188.JPG
    IMG_2188.JPG
    229.5 KB · Views: 7
Last edited:

trevbeadle

CCCUK Member
vettfixr;1996592 said:
Hi TK
I had the same problem and cut my shroud at the bottom. Once you do this you can bend the shroud and get it out without removing the radiator. I also got a piece of thin sheetmetal about 2 inches wide and as long as the bottom of the shroud and riveted it to one side of the cut. I attach the other side with sheetmetal screws directly into the shroud. This makes it one piece again when you reinstall it. I've had it that way for years and it's worked out OK. Good luck.


or just cut the bottom rear to front like this guy so it will twist out?????
 

Alben78

Well-known user
Is the ‘78 shroud somehow different as I don’t recall any problems removing the rad when I did mine, but is was somewhile ago. I just removed the fan and viscous drive then the brackets then the shroud and finally the rad. The support was never touched or the air conditioner rad. I do remember painting the support, not sure if the support rubbers were replaced or not.
 

kentvette

CCCUK Member
Apologies if I mislead you Trev! I'm afraid the removal of the '78 rad is apparently a lot easier - when we swapped the ghastly re-cored thing for a "proper" exact fit item a few years ago, my wife and I did the complete job in two hours.
 
Top