It might seem a strange place to start a restoration but as the front end of the car needed some urgent work these had to be removed fairly quickly. Having spent many hours reading the Factory Assembly Manual these seemed to be one of the more complicated aspects of the Corvette and I reasoned that, as a beginner, if I could do these then I could probably do much more.
Initial Condition
As can be seen from the photos of the car as delivered, the front end is drooping by at least an inch (notice the gap at the front of the hood) and both headlights are sitting below the bodywork height, the passenger side quite markedly.

On closer inspection the front cross member, the lower transverse part of the radiator core support, the hood surround reinforcement and the header bar had all pretty well dissolved leaving just a few traces of their previous existence. The GRP bodywork was actually holding most of the front end in place - hence the droopy stance. Getting some weight off here was a priority and the housings are fairly heavy.
Access & Removal
The face trim, hood, the three front grilles, one side louver (more on that later) and any remaining internal structures were carefully removed for later assessment, refurbishment or replacement. This gave access to the headlamp housing bolts and wiring. The wiring connections were removed and placed to one side and those housing bolts still clinging on to the car were removed with a Dremel. All bolts and fixings were well past the point where a spanner would have been any use.

On the passenger side I removed the actuator and springs on the car in situ to give some more room but even then the housings were only removed with a struggle and a few squashed fins on the radiator.
This possibly makes it sound like it all went fairly smoothly but in reality it took over 2 weeks to get this far - being unfamiliar with the design/layout and not wanting to break anything meant moving deliberately and carefully - opening the hood alone took 3 days as the hood mechanism was completely seized! (Hence the need to remove the driver side louver)
Assessment & Strip Down
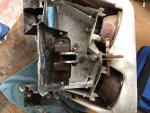
On the bench the damage could be assessed - a full rebuild and paint was going to be required on both sides. The mechanisms were badly corroded and had seized, and very little could be re-used. Plus Gas was sprayed on anything likely to be undone - which helped a lot. The rusted stubs of bolts were filed or ground down to give better purchase with a spanner or mole grips. Failing this a blow lamp was (very carefully) used to provide some additional incentive.

And stripped down a bit further with major parts ready for inspection...

There was a small vacuum leak from the actuator. Can you spot it?

Rebuild
Fortunately, the bezel, housing and support were able to be refurbished.
A long list of new parts was ordered from Corvette Kingdom including a major rebuild kit which contained most of the smaller items required. A few of the larger steel components could also be refurbished but pretty well everything else other than the 3 items mentioned above were replaced.
The plastic bezel was sanded, repaired where necessary and painted. The housing was refurbished, which was a little more complicated as a) it's (I think) an aluminium casting, b) some of the retainer bracket screws had sheared off and c) it was heavily pitted. Any sheared off bolts or screws were drilled out, the holes filled with JB Weld and then drilled and tapped. I thought that there was a good chance this would not work as the headlight retainer springs are pretty fierce but (turning the clock forward for a moment) having completed the assembly this has worked really well and they have stayed put. JB Weld - it's amazing stuff.
Both the support and the housing were de-greased (all that Plus Gas), sanded down and painted. The housing is probably supposed to remain as bare metal but as corrosion resistance is something I am trying to build in where possible it was coated with a special metals primer, then a tie coat and then primer and top coat. In total it's quite thick and hopefully will stand up well for the long term.
Headlamp conversion
The original sealed beam headlamps are no longer available and were LHD oriented. Thus it was necessary to convert to a halogen replaceable bulb style. A headlamp conversion kit (originally intended for a Pontiac GTO) was purchased from Vintage Warehouse 65. There was a small element of risk with this as although the supplier said it should fit with a few modifications, there might be some unexpected issues. This kit also came with the parking lights for the outer lamps which I believe are required for a UK MoT (although probably not required in this case). These will need new connections and a modification to the wiring at a later date.
Fitting the parking light required a modification to the outer bulb retainer cups as the standard retainers do not have provision for this. Masking tape was applied to the appropriate areas, an outline was drawn on the tape of the area of metal to be removed and then a new profile was carefully carved out in the retainer with a junior hack saw blade. Sharp edges were dressed down and the shape was cleaned up to make it look as if it might be original. After a few test fits the shape was finalised and then it was noticed that another modification was required to enable the headlamp to fit properly on the retainer cup - the glass projections on the headlight outer rim did not match the recesses on the carrier so new recesses were marked out on the retainer cup,. Two cuts on the retainer periphery were made with a hacksaw for each recess and then the appropriate area was carefully bent into shape with a hammer and a suitably shaped drift. Again some final fettling was required and eventually the headlamps fitted snugly in the retainer. The same process was carried out on the other outer retainer cup and when they were both finished they were sanded, primed and painted with satin black paint. It sounds a little messy but the end result didn't look too bad.
All bushes and bearings were lubricated with white lithium grease and this made the mechanism run very smoothly without sticking.
Results
Although the Factory Assembly Manual was really useful I had deliberately left the driver side housing undisturbed until the passenger one was finished to help with putting it back together correctly and this was really helpful. The driver side housing rebuild was then completed in the same way but a bit quicker.
I have attached a few comparison before and after photographs. You may notice that the bezel is now GM Targa Blue (979) rather than Classic White (972). I am not sure if I will keep the original colour and thus took the opportunity to do some experimentation. The interior is red (202) which the blue works really well with. Still not sure about which way to go but I don't need to make that decision yet......
With such a lot replaced, which was not quick (over 4 months or spare time), easy or cheap to do you may wonder why I didn't buy new fully built housings but if I had gone down that route I wouldn't have learned anything and it's way more interesting to do the build.
Comments, questions and feedback all welcome!
The driver side housing assembly before rebuild ....


The passenger side housing assembly after rebuild without bezel....

The passenger side housing assembly after rebuild with bezel.... you can just see the parking light socket and cut out on the outer retainer.

If anybody would like additional photos then please let me know.
Initial Condition
As can be seen from the photos of the car as delivered, the front end is drooping by at least an inch (notice the gap at the front of the hood) and both headlights are sitting below the bodywork height, the passenger side quite markedly.
On closer inspection the front cross member, the lower transverse part of the radiator core support, the hood surround reinforcement and the header bar had all pretty well dissolved leaving just a few traces of their previous existence. The GRP bodywork was actually holding most of the front end in place - hence the droopy stance. Getting some weight off here was a priority and the housings are fairly heavy.
Access & Removal
The face trim, hood, the three front grilles, one side louver (more on that later) and any remaining internal structures were carefully removed for later assessment, refurbishment or replacement. This gave access to the headlamp housing bolts and wiring. The wiring connections were removed and placed to one side and those housing bolts still clinging on to the car were removed with a Dremel. All bolts and fixings were well past the point where a spanner would have been any use.
On the passenger side I removed the actuator and springs on the car in situ to give some more room but even then the housings were only removed with a struggle and a few squashed fins on the radiator.
This possibly makes it sound like it all went fairly smoothly but in reality it took over 2 weeks to get this far - being unfamiliar with the design/layout and not wanting to break anything meant moving deliberately and carefully - opening the hood alone took 3 days as the hood mechanism was completely seized! (Hence the need to remove the driver side louver)
Assessment & Strip Down
On the bench the damage could be assessed - a full rebuild and paint was going to be required on both sides. The mechanisms were badly corroded and had seized, and very little could be re-used. Plus Gas was sprayed on anything likely to be undone - which helped a lot. The rusted stubs of bolts were filed or ground down to give better purchase with a spanner or mole grips. Failing this a blow lamp was (very carefully) used to provide some additional incentive.
And stripped down a bit further with major parts ready for inspection...
There was a small vacuum leak from the actuator. Can you spot it?
Rebuild
Fortunately, the bezel, housing and support were able to be refurbished.
A long list of new parts was ordered from Corvette Kingdom including a major rebuild kit which contained most of the smaller items required. A few of the larger steel components could also be refurbished but pretty well everything else other than the 3 items mentioned above were replaced.
The plastic bezel was sanded, repaired where necessary and painted. The housing was refurbished, which was a little more complicated as a) it's (I think) an aluminium casting, b) some of the retainer bracket screws had sheared off and c) it was heavily pitted. Any sheared off bolts or screws were drilled out, the holes filled with JB Weld and then drilled and tapped. I thought that there was a good chance this would not work as the headlight retainer springs are pretty fierce but (turning the clock forward for a moment) having completed the assembly this has worked really well and they have stayed put. JB Weld - it's amazing stuff.
Both the support and the housing were de-greased (all that Plus Gas), sanded down and painted. The housing is probably supposed to remain as bare metal but as corrosion resistance is something I am trying to build in where possible it was coated with a special metals primer, then a tie coat and then primer and top coat. In total it's quite thick and hopefully will stand up well for the long term.
Headlamp conversion
The original sealed beam headlamps are no longer available and were LHD oriented. Thus it was necessary to convert to a halogen replaceable bulb style. A headlamp conversion kit (originally intended for a Pontiac GTO) was purchased from Vintage Warehouse 65. There was a small element of risk with this as although the supplier said it should fit with a few modifications, there might be some unexpected issues. This kit also came with the parking lights for the outer lamps which I believe are required for a UK MoT (although probably not required in this case). These will need new connections and a modification to the wiring at a later date.
Fitting the parking light required a modification to the outer bulb retainer cups as the standard retainers do not have provision for this. Masking tape was applied to the appropriate areas, an outline was drawn on the tape of the area of metal to be removed and then a new profile was carefully carved out in the retainer with a junior hack saw blade. Sharp edges were dressed down and the shape was cleaned up to make it look as if it might be original. After a few test fits the shape was finalised and then it was noticed that another modification was required to enable the headlamp to fit properly on the retainer cup - the glass projections on the headlight outer rim did not match the recesses on the carrier so new recesses were marked out on the retainer cup,. Two cuts on the retainer periphery were made with a hacksaw for each recess and then the appropriate area was carefully bent into shape with a hammer and a suitably shaped drift. Again some final fettling was required and eventually the headlamps fitted snugly in the retainer. The same process was carried out on the other outer retainer cup and when they were both finished they were sanded, primed and painted with satin black paint. It sounds a little messy but the end result didn't look too bad.
All bushes and bearings were lubricated with white lithium grease and this made the mechanism run very smoothly without sticking.
Results
Although the Factory Assembly Manual was really useful I had deliberately left the driver side housing undisturbed until the passenger one was finished to help with putting it back together correctly and this was really helpful. The driver side housing rebuild was then completed in the same way but a bit quicker.
I have attached a few comparison before and after photographs. You may notice that the bezel is now GM Targa Blue (979) rather than Classic White (972). I am not sure if I will keep the original colour and thus took the opportunity to do some experimentation. The interior is red (202) which the blue works really well with. Still not sure about which way to go but I don't need to make that decision yet......
With such a lot replaced, which was not quick (over 4 months or spare time), easy or cheap to do you may wonder why I didn't buy new fully built housings but if I had gone down that route I wouldn't have learned anything and it's way more interesting to do the build.
Comments, questions and feedback all welcome!
The driver side housing assembly before rebuild ....
The passenger side housing assembly after rebuild without bezel....
The passenger side housing assembly after rebuild with bezel.... you can just see the parking light socket and cut out on the outer retainer.
If anybody would like additional photos then please let me know.