C3 wiper door

antijam

CCCUK Member
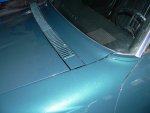
The wipers and their cover door work perfectly on my '71 except that in the closed position the door sits too high against the screen.....

P1320168.JPG

The error is slightly less on the passenger side but that seems to be because the door actually sits a bit low relative the the wing. The problem seems to be that the angle in the closed position is wrong. The fit with the grille is fine and the rear stop adjustment screws are already screwed right in. Any suggestions on how to correct the fit would be most welcome.
 

Roscobbc

Moderator
Looks as though the hood is perhaps sitting too far back towards the screen and too high at the rear?
 

antijam

CCCUK Member
The hood fit is actually pretty good, with equal gaps all round - including with the wiper door grille. This wider shot may show the problem a little more clearly ....

P1320171.JPG

The door itself seems canted up at the rear. I'm wondering if there's an adjustment that allows the door to be rotated downwards relative to the mechanism?
As I mentioned, the rear stops are already fully screwed in and in fact don't actually seem to contact the plastic stop pads.
 

Corvetteville

CCCUK Member
The hood fit is actually pretty good, with equal gaps all round - including with the wiper door grille. This wider shot may show the problem a little more clearly ....

View attachment 3387

The door itself seems canted up at the rear. I'm wondering if there's an adjustment that allows the door to be rotated downwards relative to the mechanism?
As I mentioned, the rear stops are already fully screwed in and in fact don't actually seem to contact the plastic stop pads.
I don't have this feature on my C3, but I believe that the wiper door is vacuum operated(?).I've just had similar issues with my headlights not going up/ down properly due to vacuum leak. Could be worth checking. Some vids on YouTube to help.
 

antijam

CCCUK Member
An update. Having studied the built in means of door adjustment, none seemed likely to cure my problem, so I decided to remove the door for a better assessment. The online advice on door removal always seemed to start with "DO NOT TRY TO REMOVE THE DOOR ATTACHMENT SCREWS - THEY ARE LOCTITED IN AND WILL SHEAR AT THE SLIGHTEST PROVOCATION !!" ( usually written in letters of fire - or more probably, blood ). The alternative of removing the entire door actuation system was rendered unattractive by the fact that some previous owner had coated the whole wiper housing with a thick coat of underseal that had hardened to the consistency of fossilised pitch. So, nothing daunted, I decided to attempt extraction of the screws. Having prepared the ground with two days of liberal applications of Plus Gas, my tentative attempts at unscrewing were met with immediate success. This, it turned out, was both good news and bad news. The good news was that all four screws removed easily with minimal torque, the bad news was that, as our american friends would say, 'Bubba' had been there before me. He'd obviously removed the door in the past and had success with three screws but the fourth had sheared. This he'd decided to recover by drilling out the remains and re-tapping to accept a 1/4" NF screw. He'd obviously been unable to centre his drill over the remains of the sheared screw and it had wandered off line. So this new hole was out of position and the error was responsible for the misalignment of my door.

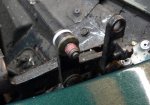
OK, I have three original screws plus Bubba's 'replacement' ( you can see why the originals shear so easily during removal, the actual thread is
10 -24 NC and the undercut at the shoulder is just 1/8" diameter! ).....

7655

I decide to recover Bubba's bodge with an original screw and an appropriate thread insert, so buy 2 ( in case I lose one ) 10-24 NC's with an external thread of 5/16-18 NC.
7656
New screws are usually available only as a set of 4 at 30 quid and long delivery, but Scott at CK comes up trumps with a second-hand one.
I don't have the fixturing necessary to correct the misplaced position of Bubba's hole, so instead of screwing in the insert I decide to make an oversized hole to accept it with enough clearance to set the position after the door is re-assembled and then bond it in.. My Dremel mills a large hole in roughly the right position......

7659

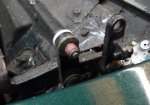
I assemble the insert and new screw to the operating linkage...

7666

.....hook the door over it and replace the other three screws ( Fitting these with the sausage fingers I have is a very fiddly job. I actually tied a length of cotton under the head of the screw in order to retrieve it if dropped during assembly - when it would disappear down the drainage ducts, never to be seen again :confused: )

With the door reassembled I adjust the alignment for best panel fit, wedge the insert in position and bond it in place with epoxy putty......

7667

I relax and give the epoxy an hour to cure.........

7661

......before operating the door up and down. Hooray! down position is now much improved.....

Before...
7662

....and After
7663

Perhaps not quite perfect ( but then, how many C3's are? ) but good enough. Just have to fill and touch up the paint on the epoxy and my 'Vette has one more improvement. :)

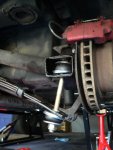
Now, when it stops raining, I've got a ( very heavy! ) spring to fit......

7664
 

Attachments

  • insert.JPG
    insert.JPG
    218.9 KB · Views: 2
R

Rogueone

Guest
An update. Having studied the built in means of door adjustment, none seemed likely to cure my problem, so I decided to remove the door for a better assessment. The online advice on door removal always seemed to start with "DO NOT TRY TO REMOVE THE DOOR ATTACHMENT SCREWS - THEY ARE LOCTITED IN AND WILL SHEAR AT THE SLIGHTEST PROVOCATION !!" ( usually written in letters of fire - or more probably, blood ). The alternative of removing the entire door actuation system was rendered unattractive by the fact that some previous owner had coated the whole wiper housing with a thick coat of underseal that had hardened to the consistency of fossilised pitch. So, nothing daunted, I decided to attempt extraction of the screws. Having prepared the ground with two days of liberal applications of Plus Gas, my tentative attempts at unscrewing were met with immediate success. This, it turned out, was both good news and bad news. The good news was that all four screws removed easily with minimal torque, the bad news was that, as our american friends would say, 'Bubba' had been there before me. He'd obviously removed the door in the past and had success with three screws but the fourth had sheared. This he'd decided to recover by drilling out the remains and re-tapping to accept a 1/4" NF screw. He'd obviously been unable to centre his drill over the remains of the sheared screw and it had wandered off line. So this new hole was out of position and the error was responsible for the misalignment of my door.

OK, I have three original screws plus Bubba's 'replacement' ( you can see why the originals shear so easily during removal, the actual thread is
10 -24 NC and the undercut at the shoulder is just 1/8" diameter! ).....

View attachment 7655

I decide to recover Bubba's bodge with an original screw and an appropriate thread insert, so buy 2 ( in case I lose one ) 10-24 NC's with an external thread of 5/16-18 NC.
View attachment 7656
New screws are usually available only as a set of 4 at 30 quid and long delivery, but Scott at CK comes up trumps with a second-hand one.
I don't have the fixturing necessary to correct the misplaced position of Bubba's hole, so instead of screwing in the insert I decide to make an oversized hole to accept it with enough clearance to set the position after the door is re-assembled and then bond it in.. My Dremel mills a large hole in roughly the right position......

View attachment 7659

I assemble the insert and new screw to the operating linkage...

View attachment 7666

.....hook the door over it and replace the other three screws ( Fitting these with the sausage fingers I have is a very fiddly job. I actually tied a length of cotton under the head of the screw in order to retrieve it if dropped during assembly - when it would disappear down the drainage ducts, never to be seen again :confused: )

With the door reassembled I adjust the alignment for best panel fit, wedge the insert in position and bond it in place with epoxy putty......

View attachment 7667

I relax and give the epoxy an hour to cure.........

View attachment 7661

......before operating the door up and down. Hooray! down position is now much improved.....

Before...
View attachment 7662

....and After
View attachment 7663

Perhaps not quite perfect ( but then, how many C3's are? ) but good enough. Just have to fill and touch up the paint on the epoxy and my 'Vette has one more improvement. :)

Now, when it stops raining, I've got a ( very heavy! ) spring to fit......

View attachment 7664
I hope you have new spring bolts
 

antijam

CCCUK Member
I hope you have new spring bolts
If you mean the bolts attaching the spring to the diff, they're in the bag in front of the spring in the above pic. If you mean those attaching the spring to the trailing arm, they're already on the car.....

P1320270.JPG

....I should have changed the spring at the same time.....:oops:
 
Top