antijam
CCCUK Member
Prior to fitting a new soft top on my '71 I'm in the process of overhauling the frame. A few bent bows were straightened, some non-original welds removed, new tack strips fitted and the header and rear bows removed for individual attention. The fit of the frame to the screen was less than perfect so I decided to attempt some adjustment to the mounting brackets.
This is where I come up against one of Chevy's less impressive pieces of design. The hood frame is fixed to the 'B' pillar with two 3/8" UNF bolts each side - arrowed red....
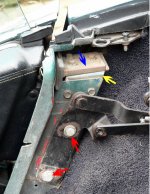
These bolts pass through the pillar and screw into floating 'S' shaped plates. Bolt holes in the frame bracket are slotted horizontally and those in the pillar vertically to allow adjustment - which is why the 'S' plate needs to float. This is shown as 4 below and it's held captive by a strap 3 welded to the inside of the pillar.
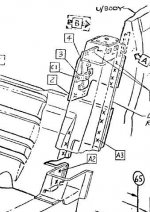
I start to undo the bolts,which turn surprisingly easily but don't relax their hold. Aha!- yet again, Bubba has been there before me - the threads in the 'S' plate are stripped, but by pulling on the bolts while unscrewing, I get them out. Posts on various 'Vette forums suggest I'm not the first to encounter this problem. The perceived wisdom seems to be either to tap the 'S' plate in situ to accept a thread insert or to simply tap it 7/16" to accept larger bolts. Neither of these options is attractive; the 'S' plate is not very thick (I later discover it's 5/32" which means there are less than 4 full threads of engagement) and without a more robust fixing, the problem is simply going to recur - torqueing up a 3/8-24 UNF bolt with only 4 threads of engagement is asking for trouble....nice one Chevrolet!
So, I decide to remove the 'S' plate and try to engineer a better solution. The only access to the plate is from the top of the 'B' post - and this is covered firstly by a bracket (arrowed yellow in the piccie above) on which sits the door guide receiver (arrowed in blue). The receiver comes off easily enough but the bracket is attached to the pillar and the bodywork with six small screws. Access to four of these is not easy and two of them are screwed through the bodywork into the wheelarch .....
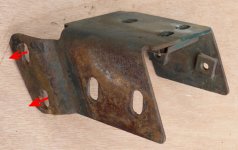
.....where they've been exposed to 50 years of rain, salt and general sh1t. However after a thorough dousing in Plus-Gas and some one-flat-at-a-time spanner work they all come free and I remove the bracket to expose the 'S' plate's hidey-hole. A brutal attack with a lump hammer and an old screwdriver breaks the welds holding the retaining strap and the plate drops to the bottom of the pillar, where I retrieve it with my 'magnet on a stick' tool....
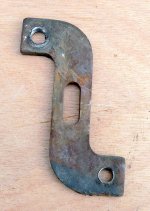
I could weld nuts to the back of the plate to provide better thread engagement, but this gives me the problem of how to restrain the plate when back in position, since I have seriously marmalised the retaining straps. I decide instead to reverse the attachment and weld bolts to the plate instead ....
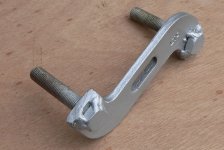
......(I know, I'm not the tidiest welder).
With bolts attached and the plates cleaned up I lower them down inside the pillar on my trusty magnet tool and winkle the bolts through their slots.....
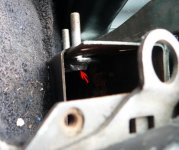
I have to hand a slab of semi-rigid plastic foam that was lying around the garage which I cut to shape and force down behind the 'S'.....
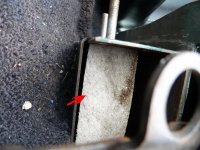
This allows movement for adjustment but prevents the bolts pushing back into the pillar.
It is but the work of several hours to reinstall the bracket and receiver to the top of the pillar (I have to admit to commandeering the petite hand of my wife to install one of the more inaccessible screws) and I'm ready to refit the frame. There is a sort of checkerboard patch between the bolts that you are meant to engage with a similar patch on the frame bracket to prevent rotation before tightening up.....
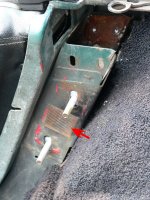
.....( no idea how you know if you've achieved this) and with the frame re-attached with nuts and washers on the bolts I'm ready to adjust without worrying about more stripped threads......
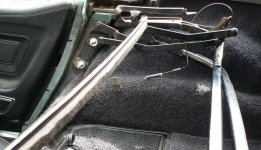
When adjustment is complete I'll crop the bolts to length to tidy them up. All I need now is some warm weather to fit the top!
This is where I come up against one of Chevy's less impressive pieces of design. The hood frame is fixed to the 'B' pillar with two 3/8" UNF bolts each side - arrowed red....

These bolts pass through the pillar and screw into floating 'S' shaped plates. Bolt holes in the frame bracket are slotted horizontally and those in the pillar vertically to allow adjustment - which is why the 'S' plate needs to float. This is shown as 4 below and it's held captive by a strap 3 welded to the inside of the pillar.

I start to undo the bolts,which turn surprisingly easily but don't relax their hold. Aha!- yet again, Bubba has been there before me - the threads in the 'S' plate are stripped, but by pulling on the bolts while unscrewing, I get them out. Posts on various 'Vette forums suggest I'm not the first to encounter this problem. The perceived wisdom seems to be either to tap the 'S' plate in situ to accept a thread insert or to simply tap it 7/16" to accept larger bolts. Neither of these options is attractive; the 'S' plate is not very thick (I later discover it's 5/32" which means there are less than 4 full threads of engagement) and without a more robust fixing, the problem is simply going to recur - torqueing up a 3/8-24 UNF bolt with only 4 threads of engagement is asking for trouble....nice one Chevrolet!
So, I decide to remove the 'S' plate and try to engineer a better solution. The only access to the plate is from the top of the 'B' post - and this is covered firstly by a bracket (arrowed yellow in the piccie above) on which sits the door guide receiver (arrowed in blue). The receiver comes off easily enough but the bracket is attached to the pillar and the bodywork with six small screws. Access to four of these is not easy and two of them are screwed through the bodywork into the wheelarch .....

.....where they've been exposed to 50 years of rain, salt and general sh1t. However after a thorough dousing in Plus-Gas and some one-flat-at-a-time spanner work they all come free and I remove the bracket to expose the 'S' plate's hidey-hole. A brutal attack with a lump hammer and an old screwdriver breaks the welds holding the retaining strap and the plate drops to the bottom of the pillar, where I retrieve it with my 'magnet on a stick' tool....

I could weld nuts to the back of the plate to provide better thread engagement, but this gives me the problem of how to restrain the plate when back in position, since I have seriously marmalised the retaining straps. I decide instead to reverse the attachment and weld bolts to the plate instead ....

......(I know, I'm not the tidiest welder).
With bolts attached and the plates cleaned up I lower them down inside the pillar on my trusty magnet tool and winkle the bolts through their slots.....

I have to hand a slab of semi-rigid plastic foam that was lying around the garage which I cut to shape and force down behind the 'S'.....

This allows movement for adjustment but prevents the bolts pushing back into the pillar.
It is but the work of several hours to reinstall the bracket and receiver to the top of the pillar (I have to admit to commandeering the petite hand of my wife to install one of the more inaccessible screws) and I'm ready to refit the frame. There is a sort of checkerboard patch between the bolts that you are meant to engage with a similar patch on the frame bracket to prevent rotation before tightening up.....

.....( no idea how you know if you've achieved this) and with the frame re-attached with nuts and washers on the bolts I'm ready to adjust without worrying about more stripped threads......

When adjustment is complete I'll crop the bolts to length to tidy them up. All I need now is some warm weather to fit the top!
Last edited:

