You are using an out of date browser. It may not display this or other websites correctly.
You should upgrade or use an alternative browser.
You should upgrade or use an alternative browser.
What have YOU being doing or are you planning to do with your Vette?
- Thread starter Daytona Vette
- Start date
teamzr1
Supporting vendor
Thanks! I've got a bit of time now, at least – the next event isn't until March – to think about the next steps...
Great to see another top ender like me, and congrats in getting your feet wet and the itch to go faster !
I plugged your C4 into my simulator (my GM guys tested it and says better than the one they use)
If knowing what your elevation, weather and gas used I could then do a D/A correction for max speeds over distance and time
Also need type of tranny, rear end gear and wheel/tire sizes
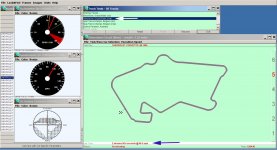
First I selected a track Silverstone in the UK that you might know and here are the results as totally stock (again no D/A correction)
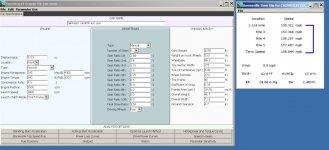
Then I ran your C4 for maximum speed without D/A correction to find the max stock speed and distance to get there
Once I know your D/A corrections, I could then baseline max speed over distance
If you have a way to burn tunes into an E-prom I do custom tuning via emails
Best is you really need to get a OBD-I scanner that records while you drive, if you need to know of a decent one for cheap cost
I could point you to the vendor, then that collected data can be analyzed and custom tune to match what engine and tranny need
Existing GM tune lacks goo WOT timing, esp at upper speed and RPMs
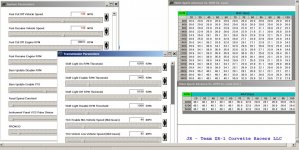
Rev limiter, fuel trims, timing and shift points (if you have auto tranny) clearly need changes in tune to get better top end for stock and
then if you add other mods good custom tune changes
Once you get this bug in your blood, it is hard to stop doing it
I did until my C5 ran over 237 MPH in Open Road Racing
James Vette
CCCUK Member
Awesome C4!I had a fantastic day out on Monday with the Straightliners at Elvington. I've long wanted to get my '89 up there so I could establish a standing mile benchmark before I carry out more significant modifications; aside from some minor tweaks and its different wheels, the only real performance upgrades it has at the moment are a set of long-tube headers and a high-flow centre cat – so now's a good time to get some figures in.
Originally, when shiny and new, it would have topped out at some 153mph (as far as I'm aware), presumably after a few miles. I was consequently hoping it would do about 130mph in the standing mile but it ultimately clocked a best of 144.239mph, which I was very happy with. It also did ~144mph three times in a row – 143mph was the final pass, hence the sign – so it's also consistent!
At the end of the day, I'd racked up six passes and ~260 miles on the road, with no issues. I couldn't have asked for more, especially given that it's recently endured a 450-mile trip to Castle Combe and four sessions on track.
A big thanks to the Straightliners crew as well, as they couldn't have been more welcoming or helpful. Highly recommended, across the board.
Right, time to start shopping for more speed parts...


Lewis Kingston
Well-known user
Thanks for all of that – really interesting! Yes, it's something I've long wanted to have a go at. Great bunch of people, too, which makes all the difference.Once you get this bug in your blood, it is hard to stop doing it
I did until my C5 ran over 237 MPH in Open Road Racing
I'm probably going to change to a Haltech management system, to avoid having to deal with PROMs and get some more features (anti-lag, boost control, etc.), plus it'll just be nice to have that degree of flexibility. I'll keep you posted!
Funnily enough, I figured that it might max out at around the high 150 mark, if I had several more miles...
Thanks all, for the positive comments, too. Hope you all have a good week!
Chuffer
CCCUK Member
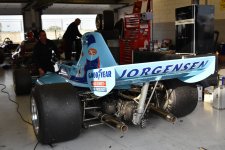
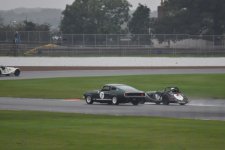
Took the Vette to Silverstone Circuit yesterday and today for the finals of the Historic Sports Car Club championship . Got freebie Competitors tickets from the guys who operate out of the workshop where the Vette lives so to good a chance to miss . Go anywhere pass and access to the British Racing Drivers Club stand . Some great racing both days and made more exciting today due to very damp conditions this morning . Plenty of V8 power in action with Chevrons , Mustangs , Gurney Eagles and F5000 cars .  My pals and entered three F2 / Atlantic / Formula Ford 2000 cars with two drivers but were blighted by problems yet again with the Torro Rosso car and new intried / tested BMW F2 . Narrowly missed out on a podium place in a gripping but red flagged Formula Ford 2000 finals .






Chuffer
CCCUK Member
antijam
CCCUK Member
Well, got it all back together and dry assembled into a new shift console to check fit prior to replacing it in the car, together with my overhauled radio and centre instrument console (that now includes a working clock!).
View attachment 13723
Now I'll find out if I can remember where all those wires go......
View attachment 13721
Incidentally, I had to buy a new shifter console as my original was split in practically every place it could be......
embarrassed faceembarrassed faceView attachment 13722
I have to say I'm not impressed with the quality of the replacement - but that seems to be the case with a lot of 'new' parts these days.
After much profanity and at the cost of multiple cuts and abrasions I have finally got the overhauled instrument and shifter consoles back in place and (nearly) everything working. This was a surprisingly difficult task but the reward is the sight that greets the driver - a great improvement over the tired 50 year old original! To brighten it up further I've fitted new dash ventilation 'balls' too, since the originals had lost their chrome.
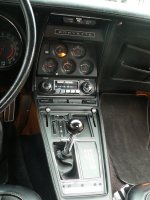
The thing that annoyingly doesn't work is the seat belt warning light. Despite the fact that on removal the only failing was a dud bulb, that when replaced restored full functionality, when retested just before refitting the unit stubbornly refused to extinguish on a button press. Obviously being restored to life after probably many years of inactivity was such a shock to the module that it chucked in the towel and said 'no more'! After removing the bulb I replaced the unit it as it was anyway and I've no doubt I should really be grateful for the lack of the 'idiot' reminder.
Anyway, with everything back in place, yesterday was fine and sunny so I happily leapt aboard and went for a fill up prior to a more extensive airing. It was at the fuel station that I discovered an unfortunate - and potentially very dangerous - re-assembly error on my part. As part of the 'face lift' I'd fitted a replacement leather shifter boot. This boot is assembled to the shifter console plate and slid over the shifter as the plate is refitted. Obviously to do this the shifter knob and (on the manual) the reverse lock-out 'T' handle and rod are removed, and this leaves a step on the shifter over which the boot needs to be pulled down.
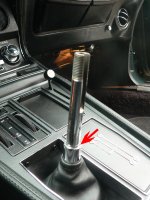
I neglected to do this and left the (tight) collar of the new boot sitting on top of the step,.....
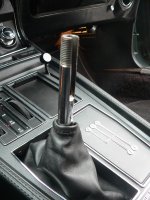
....so when I refitted the lock-out handle and rod it was sitting on top of the collar rather than the step - meaning the reverse lock-out rod was always pulled out of engagement and therefore ineffective!
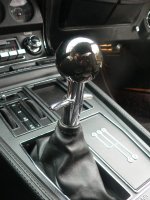
This I discovered on leaving the forecourt, when having engaged what should have been first gear, I let out the clutch and took off smartly in reverse. Very fortunately there was no car immediately behind but had there been the result could have been 'embarrassing'. I didn't immediately realise what had happened but since obviously something was wrong I drove home carefully - fortunately avoiding a down change from second to reverse on the way! Having eventually deduced the nature of my folly I refitted the boot correctly....
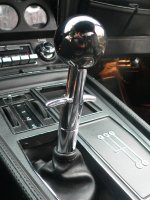
........and now all is well, so went for the celebratory drive today - but in rain rather than sunshine!
CaptainK
Administrator
That console looks really nice now - much better than mine.
Chuffer - good photos and really fab you did a single seater, that's on my to do list too. Any photos of you driving the Vette around the circuit?
And to add to the "what have we done with our Vettes recently, well, I've changed out all the chrome work at the rear of my Vette. The licence plate bezel just looked awful like someone had shot it continuously with a really weak shotgun or ball bearing gun. It wasn't dented, but just awfully pitted etc. The bumpers have been replaced too with new shiny ones as they were bubbling and starting to rust. I did look into re-chroming them, but it seemed that was far more expensive than getting new ones. Sad but true. I'm not fussed though, as looking at my old bumpers they don't look like they are original ones and like they have been replaced before.
Chuffer
CCCUK Member
Oh joy un confined ! It`s a huge relief innit ? Mine sailed through the MOT two weeks ago .MOT this morning - passed with no advisories yet again so I'm happy!
Chuffer
CCCUK Member
Cheers Captain , you really must do a single seater day it is huge fun / challenge and absolutely nothing like driving any other kind of car . The grip , handling and acceleration is phenomenal ! Even with just Ford Duratec power . When the instructor during the morning tutorial session said you can take the chicane `flat out` , I thought " no way man" I am not up for that but after a few practice laps you realise that the car can far exceed your skills with its point and squirt abilities . After the tutorial it was practice sessions then group races in the afternoon . The day was a present from my wife and daughter and was a scorching hot summer day . I was soaked in sweat inside the race suite , balaclava and helmet . I came away with huge respect for F1 drivers and their ilk . No wonder they loose so much weight during a race .That console looks really nice now - much better than mine.
Chuffer - good photos and really fab you did a single seater, that's on my to do list too. Any photos of you driving the Vette around the circuit?
And to add to the "what have we done with our Vettes recently, well, I've changed out all the chrome work at the rear of my Vette. The licence plate bezel just looked awful like someone had shot it continuously with a really weak shotgun or ball bearing gun. It wasn't dented, but just awfully pitted etc. The bumpers have been replaced too with new shiny ones as they were bubbling and starting to rust. I did look into re-chroming them, but it seemed that was far more expensive than getting new ones. Sad but true. I'm not fussed though, as looking at my old bumpers they don't look like they are original ones and like they have been replaced before.
 We were only playing at it !!
 Only shot I have of the Vette on Silverstone Circuit is blasting down the start / finish straight of the Grand Prix circuit past the` Wing ` International Pits at the Classic in 2018.
Chuffer
CCCUK Member
lt was only a few parade laps with CCCUK at the Silverstone Classic but good to have a drive on the iconic Grand Prix circuit and have a bit a blast here and there if you hung back and let the `traffic` clear . I did get to do several quick laps of the full circuit with the Marcos Owners Club when I had my Mantara V8 Spyder although I came worrying close to the kitty litter at Copse Corner on the first lap when I got my line all wrong .
  One member had a truely awesome Marcos Mantis with twin supercharged Chevy LS1 power that was insanely rapid and sounded fantastic . Also did a couple of track days at Curborough Sprint Circuit plus Rockingham in it a couple of times and Prescott Hill Climb in it too which was fun .

antijam
CCCUK Member
Today I changed the thermostat on my 350. Not a particularly logical decision but the temperature gauge has always barely staggered off the pin and I'm just going through all possible sources of a low reading. Although the sender and the gauge check out as functional I suspect the likeliest source of error is the sender resistance not being a match to the gauge. I've changed the sender once with no effect on the reading but it seems a common problem that modern replacements are incorrectly calibrated against the gauge. Temperature checks around the engine show the 'stat is working but since I've no idea what stat may have been fitted by a previous owner, a change to a guaranteed stock 160° can do no harm.
I disconnect the top hose and have some towels to hand to mop up any coolant spill, although it turns out there is very little. The housing bolts take some shifting and when they do come out are covered with a lot of rust, but they clean up OK with wire wheel. I remove the old 'stat and gasket and suck out some coolant to bring the level below the manifold face.
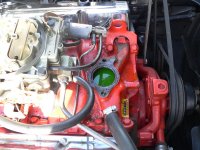
The faces of the manifold and the housing show some corrosion pitting after cleaning so although the new gasket has moulded on polymer sealing rings on both faces.....
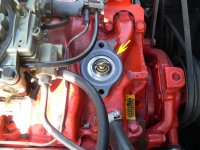
........I give both the housing and manifold faces a light smear of Blue Hylomar to make sure of a seal and fit the new 'stat.
After respraying the housing GM orange I re-assemble with plenty of Copaslip on the bolts, re-connect the top hose, top up the coolant with Mannol AG 13 antifreeze diluted 50/50, start it up and look for leaks......
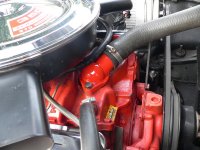
No leaks and the 'stat works fine; temp checks show it opening when it should, but the gauge reads exactly as before. So no change, but at least I now know what 'stat I have and the gauge problem is almost certainly calibration.
I disconnect the top hose and have some towels to hand to mop up any coolant spill, although it turns out there is very little. The housing bolts take some shifting and when they do come out are covered with a lot of rust, but they clean up OK with wire wheel. I remove the old 'stat and gasket and suck out some coolant to bring the level below the manifold face.

The faces of the manifold and the housing show some corrosion pitting after cleaning so although the new gasket has moulded on polymer sealing rings on both faces.....

........I give both the housing and manifold faces a light smear of Blue Hylomar to make sure of a seal and fit the new 'stat.
After respraying the housing GM orange I re-assemble with plenty of Copaslip on the bolts, re-connect the top hose, top up the coolant with Mannol AG 13 antifreeze diluted 50/50, start it up and look for leaks......

No leaks and the 'stat works fine; temp checks show it opening when it should, but the gauge reads exactly as before. So no change, but at least I now know what 'stat I have and the gauge problem is almost certainly calibration.
Oneball
CCCUK Member
Today I changed the thermostat on my 350. Not a particularly logical decision but the temperature gauge has always barely staggered off the pin and I'm just going through all possible sources of a low reading. Although the sender and the gauge check out as functional I suspect the likeliest source of error is the sender resistance not being a match to the gauge. I've changed the sender once with no effect on the reading but it seems a common problem that modern replacements are incorrectly calibrated against the gauge. Temperature checks around the engine show the 'stat is working but since I've no idea what stat may have been fitted by a previous owner, a change to a guaranteed stock 160° can do no harm.
I disconnect the top hose and have some towels to hand to mop up any coolant spill, although it turns out there is very little. The housing bolts take some shifting and when they do come out are covered with a lot of rust, but they clean up OK with wire wheel. I remove the old 'stat and gasket and suck out some coolant to bring the level below the manifold face.
View attachment 13934
The faces of the manifold and the housing show some corrosion pitting after cleaning so although the new gasket has moulded on polymer sealing rings on both faces.....
View attachment 13936
........I give both the housing and manifold faces a light smear of Blue Hylomar to make sure of a seal and fit the new 'stat.
After respraying the housing GM orange I re-assemble with plenty of Copaslip on the bolts, re-connect the top hose, top up the coolant with Mannol AG 13 antifreeze diluted 50/50, start it up and look for leaks......
View attachment 13937
No leaks and the 'stat works fine; temp checks show it opening when it should, but the gauge reads exactly as before. So no change, but at least I now know what 'stat I have and the gauge problem is almost certainly calibration.
Do you want the sender out of my original engine? I’m imagining in modern parlance it’d be called pre-loved vintage.
teamzr1
Supporting vendor
Today I changed the thermostat on my 350. Not a particularly logical decision but the temperature gauge has always barely staggered off the pin and I'm just going through all possible sources of a low reading. Although the sender and the gauge check out as functional I suspect the likeliest source of error is the sender resistance not being a match to the gauge. I've changed the sender once with no effect on the reading but it seems a common problem that modern replacements are incorrectly calibrated against the gauge. Temperature checks around the engine show the 'stat is working but since I've no idea what stat may have been fitted by a previous owner, a change to a guaranteed stock 160° can do no harm.
I disconnect the top hose and have some towels to hand to mop up any coolant spill, although it turns out there is very little. The housing bolts take some shifting and when they do come out are covered with a lot of rust, but they clean up OK with wire wheel. I remove the old 'stat and gasket and suck out some coolant to bring the level below the manifold face.
View attachment 13934
The faces of the manifold and the housing show some corrosion pitting after cleaning so although the new gasket has moulded on polymer sealing rings on both faces.....
View attachment 13936
........I give both the housing and manifold faces a light smear of Blue Hylomar to make sure of a seal and fit the new 'stat.
After respraying the housing GM orange I re-assemble with plenty of Copaslip on the bolts, re-connect the top hose, top up the coolant with Mannol AG 13 antifreeze diluted 50/50, start it up and look for leaks......
View attachment 13937
No leaks and the 'stat works fine; temp checks show it opening when it should, but the gauge reads exactly as before. So no change, but at least I now know what 'stat I have and the gauge problem is almost certainly calibration.
Take a Ohm meter and take the wire off the sensor located in block
Using both probes of meter, one goes to ground and other to the output connector of sensor
Match that measured resistance value to this GM chart to convert to what the sensor is reporting
will quickly determine if the ECT sensor is at fault or not
Could also then is connecting the wiring connector back on and go to the temp gauge in dash and see if the same resistance values are reported
So in this example if ECT is assumed to be 160 Deg F then resistance should be measured at 467 Ohms
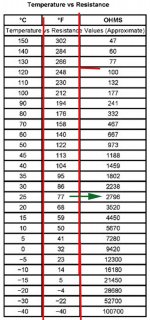
antijam
CCCUK Member
If it was probably an original sender it would certainly be worth a try Tim, thanks. I'll PM you.Do you want the sender out of my original engine? I’m imagining in modern parlance it’d be called pre-loved vintage.
antijam
CCCUK Member
My '71 has exhibited a clunk when changing gear ever since I bought it three years ago. There are obviously several possible sources of play in the drive train but one likely one is the differential front mount snubber. This comprises two rubber bushings that limit and damp the up and down motion of the front of the diff under driving loads.The snubber assembly is circled in this pic...
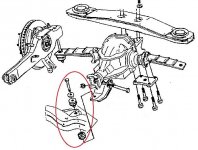
The active components are rubber and I doubt they've been changed in the cars 50 year life, so even if they're not the source of my problem they're almost certainly worth changing. A problem in this area is readily detectable on automatics but less so on manuals (like mine) where it is easier for the driver to minimise a clunk by careful feathering of the gearchange. I arm myself with an overhaul kit ( in rubber rather than polyurethane; this is one pair of bushes that are better having the greater compliance of rubber ).....
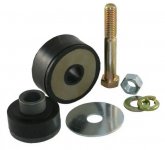
....hoist the car in the air on my trusty QuickJack....
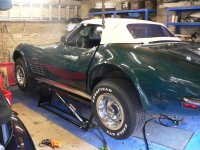
......and squirm underneath. The diff area is a bit damp (that's a problem for another day) but I locate the snubber nut - arrowed red ....
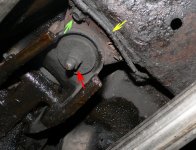
.....and attempt removal. I need to get a 5/8" spanner on the bolt head to react the nut torque but the very limited access beats any of my spanners so I give a good haul on the nut anyway to see if anything comes loose. Nothing does so I revert to my impact wrench and eventually both nut and bolt break free and rotate. I cut the nut off with a grinder and extract the bolt upwards, rotating the propshaft by hand to optimise clearance. With the bolt out I need to prise the the diff mount bracket down to extract the lower bush. Unfortunately The ideal place to react a lever is right on top of a brake line - arrowed yellow, so I remove the securing clip - arrowed green, gently ease the brake line clear and with leverage applied with a robust tyre iron, winkle out the bush. The upper bush parts I extract through the small clearance between the bracket and the prop shaft.

Upper row is the old parts, lower the new ones
The lower bush is in reasonable condition but the upper - arrowed red, is toast - in two parts - so providing no restraint on upward movement of the diff nose. This seems to bear out the possibility of this being the source of the clunk. In forward gear the drive torque reaction applies a downward thrust to the front of the diff. During a gear change the torque is momentarily released and the diff nose will lift. The degraded upper bush provides no resistance - hence a clunk.
So, levering down the bracket again I squeeze the new lower rubber in place. Fitting the new upper is more of a problem. Try as I might I cannot find a way to squeeze the rubber fitted to it's metal 'top hat' bush through the gap between the frame bracket and the prop shaft. The bush and the 'top hat' will go through separately but his gives me the problem of how to reassemble them in a blind space with very limited finger access, not helped by the rubber being a tight fit on the 'top hat'.
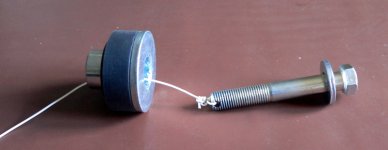
There is actually a large clearance between the mounting bolt and the top hat and rubbers, so I drill a small hole in the end of the bolt and after fitting the top washer, attach a length of cable. I lube the bore of the top rubber and the shank of the top hat with silicone grease and slide them over the cable (still assembled together in this shot)......
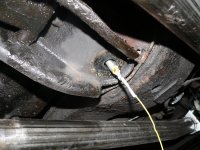
With the free end of the cable fed down and through the lower bush and bracket, I pull the parts into position and as the end of the bolt appears through the bracket, a tug on the cable slides the top hat into the bush....
The cable removed, I can get my finger on the head of the bolt enough to prevent rotation while I fit the large clamp washer (I re-used the original - arrowed yellow in the row of parts - as it's far more robust than the replacement), spring washer and nut. With the nut screwed up above the hole in the bolt I can stick an appropriate rod ( in this case an Allen key).....
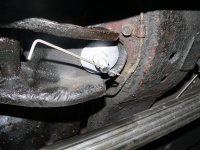
...... to hold the bolt while I tighten the nut. Just need to ease the brake line back into position and replace the clamp - et voila - job done!
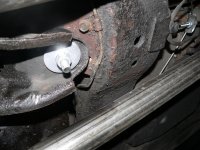
Down off the QuickJack and off for a test drive. Immediate improvement! Gear changes - even relatively clumsy ones - are now clunk free and even a judder when letting out the clutch from stationary ( that I'd mentally attributed to a misaligned clutch) is reduced.
The whole process was a bit of a pain - more than it should have been according to the clever-cuts on the internet - but it's turned out to be one of the more rewarding jobs I've done so far.

The active components are rubber and I doubt they've been changed in the cars 50 year life, so even if they're not the source of my problem they're almost certainly worth changing. A problem in this area is readily detectable on automatics but less so on manuals (like mine) where it is easier for the driver to minimise a clunk by careful feathering of the gearchange. I arm myself with an overhaul kit ( in rubber rather than polyurethane; this is one pair of bushes that are better having the greater compliance of rubber ).....

....hoist the car in the air on my trusty QuickJack....

......and squirm underneath. The diff area is a bit damp (that's a problem for another day) but I locate the snubber nut - arrowed red ....

.....and attempt removal. I need to get a 5/8" spanner on the bolt head to react the nut torque but the very limited access beats any of my spanners so I give a good haul on the nut anyway to see if anything comes loose. Nothing does so I revert to my impact wrench and eventually both nut and bolt break free and rotate. I cut the nut off with a grinder and extract the bolt upwards, rotating the propshaft by hand to optimise clearance. With the bolt out I need to prise the the diff mount bracket down to extract the lower bush. Unfortunately The ideal place to react a lever is right on top of a brake line - arrowed yellow, so I remove the securing clip - arrowed green, gently ease the brake line clear and with leverage applied with a robust tyre iron, winkle out the bush. The upper bush parts I extract through the small clearance between the bracket and the prop shaft.

Upper row is the old parts, lower the new ones
The lower bush is in reasonable condition but the upper - arrowed red, is toast - in two parts - so providing no restraint on upward movement of the diff nose. This seems to bear out the possibility of this being the source of the clunk. In forward gear the drive torque reaction applies a downward thrust to the front of the diff. During a gear change the torque is momentarily released and the diff nose will lift. The degraded upper bush provides no resistance - hence a clunk.
So, levering down the bracket again I squeeze the new lower rubber in place. Fitting the new upper is more of a problem. Try as I might I cannot find a way to squeeze the rubber fitted to it's metal 'top hat' bush through the gap between the frame bracket and the prop shaft. The bush and the 'top hat' will go through separately but his gives me the problem of how to reassemble them in a blind space with very limited finger access, not helped by the rubber being a tight fit on the 'top hat'.
There is actually a large clearance between the mounting bolt and the top hat and rubbers, so I drill a small hole in the end of the bolt and after fitting the top washer, attach a length of cable. I lube the bore of the top rubber and the shank of the top hat with silicone grease and slide them over the cable (still assembled together in this shot)......

With the free end of the cable fed down and through the lower bush and bracket, I pull the parts into position and as the end of the bolt appears through the bracket, a tug on the cable slides the top hat into the bush....

The cable removed, I can get my finger on the head of the bolt enough to prevent rotation while I fit the large clamp washer (I re-used the original - arrowed yellow in the row of parts - as it's far more robust than the replacement), spring washer and nut. With the nut screwed up above the hole in the bolt I can stick an appropriate rod ( in this case an Allen key).....

...... to hold the bolt while I tighten the nut. Just need to ease the brake line back into position and replace the clamp - et voila - job done!

Down off the QuickJack and off for a test drive. Immediate improvement! Gear changes - even relatively clumsy ones - are now clunk free and even a judder when letting out the clutch from stationary ( that I'd mentally attributed to a misaligned clutch) is reduced.
The whole process was a bit of a pain - more than it should have been according to the clever-cuts on the internet - but it's turned out to be one of the more rewarding jobs I've done so far.


