The old garage door is still fitted but in a slightly different place from the new one. The old one was an up-and-over type and the spring broke - I will remember that bang for a little while. I cut the door down the middle with a grinder, put cheapo hinges either side and welded a bar along the front with a padlock to keep it secure. It fits and looks as good as it sounds, so hopefully the new one won't be too long.I should think it's all cold if you don't have a garage door!
You are using an out of date browser. It may not display this or other websites correctly.
You should upgrade or use an alternative browser.
You should upgrade or use an alternative browser.
72 Corvette - Restoration Updates
- Thread starter TimP
- Start date
Mr. Cricket
Administrator
I just new garage doors and was going with roller type but when I asked how secure they were he said not very so I changed to steel swingersWhat are you replacing it with? I fitted a roller shutter which works very well and does a pretty good job of keeping the heat in.


Mr. Cricket
Administrator
I just had new garage doors and was going with roller type but when I asked how secure they were he said not very so I changed to steel swingers View attachment 24890View attachment 24891What are you replacing it with? I fitted a roller shutter which works very well and does a pretty good job of keeping the heat in.
Roscobbc
Moderator
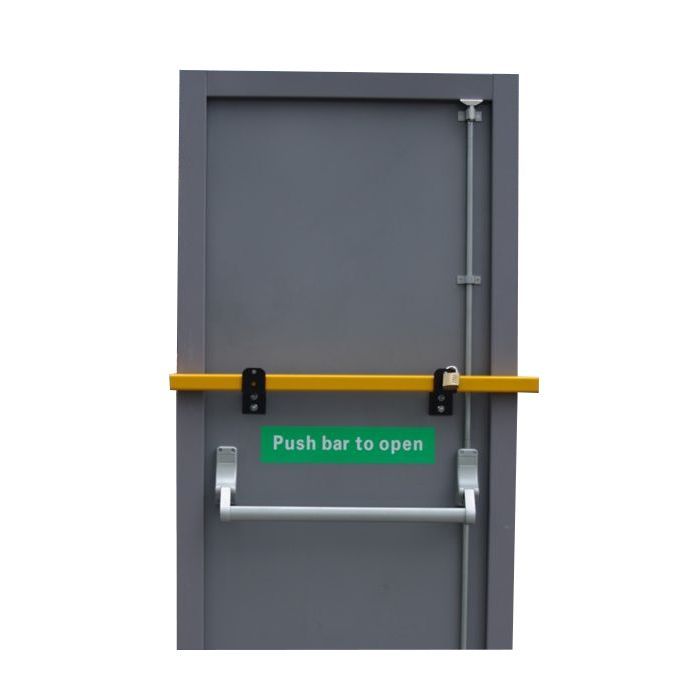
I see the three 'locking' bolts Stewart......do they positively 'lock' into the opposite door? - are external hinges protected against pins being knocked out or hinges ground off?.I just new garage doors and was going with roller type but when I asked how secure they were he said not very so I changed to steel swingers
The idea of steel doors is great if you have internal access as you'll be able to fabricate metal draw bars across the inside of both doors.
A pair of these fabricated top and bottom and welded inside should be very secure.

Mr. Cricket
Administrator
I see the three 'locking' bolts Stewart......do they positively 'lock' into the opposite door? - are external hinges protected against pins being knocked out or hinges ground off?.
The idea of steel doors is great if you have internal access as you'll be able to fabricate metal draw bars across the inside of both doors.
A pair of these fabricated top and bottom and welded inside should be very secure.
Yes all those bolts shoot into the slave door with two full tuns of the keys. I did specify two additional locks per door set but that info didn't get to the factory but when they installed the doors I said these will be ok so scrap the extra locks and knock off the additional charge. The hinges are protected by external attack (to some extent I guess) and they have top and bottom thresholds to prevent a ram raid type deal and the doors have beefed up strengthening inside the door section.
Very good company if anyone needs their info.
Roscobbc
Moderator
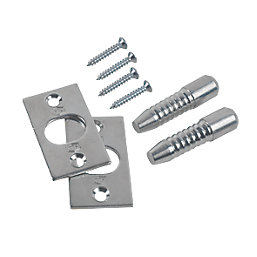
Irrespective of whether external hinges are used - with timber doors and frames there is always the option of hinge bolts......Yes all those bolts shoot into the slave door with two full tuns of the keys. I did specify two additional locks per door set but that info didn't get to the factory but when they installed the doors I said these will be ok so scrap the extra locks and knock off the additional charge. The hinges are protected by external attack (to some extent I guess) and they have top and bottom thresholds to prevent a ram raid type deal and the doors have beefed up strengthening inside the door section.
Very good company if anyone needs their info.
I decided to go with glass fibre barn door style insulated doors with built in stays - they should look nice and with a 5 bolt lock mechanism, like a double glazed door,What are you replacing it with? I fitted a roller shutter which works very well and does a pretty good job of keeping the heat in.
they should be reasonably secure, certainly much safer than what I had before. The dimensions of the garage opening would mean that an up-and-over door or a roller shutter door mechanism would end up being at about a 5ft 10 height - perfect for cracking my head on - like the original door. I wore a bump cap when working in the garage door because I got fed up with banging my head on the mechanism/raised door.
The garage door fitter also said that the locking mechanisms are a bit flimsy on an up-and-over and that sealed the decision. I tend to park my daily driver right up to the doors anyway which makes access that little bit more difficult.
They look really tough and look good too - must admit the idea of steel doors didn't occur to me, would have been a consideration if I had - probably think I have done enough with what I chose, and miles better than what I had before.I just new garage doors and was going with roller type but when I asked how secure they were he said not very so I changed to steel swingers View attachment 24890View attachment 24891
Roscobbc
Moderator
No matter what security you have whether electronic (so an alarm system or connection to 240v live supply), physical deterrent (so mechanical methods) the determined and resourceful thief will always overcome it......best to do whatever you can and make sure they'll be making a lot of noise and taking a long time to enter your garage (and your insurance covers all 'angles').
Whilst the weather has been a little rough I have been confined to the workshop where I have been doing something irrelevant (to getting the car back on the road) but fairly satisfying nevertheless. Maintaining focus on priorities has never been a strong point ....
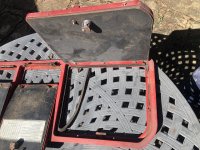
The rear compartment frame and doors were in fairly poor shape. The fibre board doors were water damaged, most of the screw and bolts were corroded and the hinges were unserviceable. All the chrome door catches/openers were seized. Otherwise they were just fine.


The plastic frame was cleaned, prepped and painted with an adhesion promotor and then some red gloss.

Same with the door frames. Two used hinges were purchased and then stripped, painted and lubricated. Two of the door catches/openers were cleaned up and painted where appropriate. A third will have to be bought - it was too far gone for rebuild.
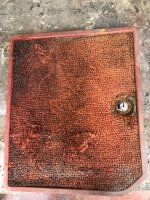
New compartment doors were made out of 3/8" ply which involves cutting it to shape, drilling a few holes and carving out a strip at the end for the hinge to fit. This last work being done with a chisel and mallet - two tools I wasn't expecting to use on this rebuild.

Resulting in the following assembly which looks ok. Two of the old unserviceable pieces can be seen here together with a rebuilt opener.

The other two doors have to be finished off. Although it looks alright in the picture the underside of the middle door does not look so good 'in the flesh' so I will redo this and finish the other two doors in the same way when I have worked out something better. A new door light switch and new carpet sections will complete the look. I haven't ordered the carpet yet so this assembly will be put somewhere safe until the appropriate time.
In the interim a Quadrajet needs to be rebuilt and fitted - my task for next week.
The rear compartment frame and doors were in fairly poor shape. The fibre board doors were water damaged, most of the screw and bolts were corroded and the hinges were unserviceable. All the chrome door catches/openers were seized. Otherwise they were just fine.
The plastic frame was cleaned, prepped and painted with an adhesion promotor and then some red gloss.
Same with the door frames. Two used hinges were purchased and then stripped, painted and lubricated. Two of the door catches/openers were cleaned up and painted where appropriate. A third will have to be bought - it was too far gone for rebuild.
New compartment doors were made out of 3/8" ply which involves cutting it to shape, drilling a few holes and carving out a strip at the end for the hinge to fit. This last work being done with a chisel and mallet - two tools I wasn't expecting to use on this rebuild.
Resulting in the following assembly which looks ok. Two of the old unserviceable pieces can be seen here together with a rebuilt opener.
The other two doors have to be finished off. Although it looks alright in the picture the underside of the middle door does not look so good 'in the flesh' so I will redo this and finish the other two doors in the same way when I have worked out something better. A new door light switch and new carpet sections will complete the look. I haven't ordered the carpet yet so this assembly will be put somewhere safe until the appropriate time.
In the interim a Quadrajet needs to be rebuilt and fitted - my task for next week.
Attachments
Hopefully I should have my gearbox back from overhaul very soon and will be able to get the engine (fingers crossed) started. I am trying to get everything ready for this so when it arrives I can install it straightaway.
Thus, I have repaired the started earth lead - something tells me that the old one wasn't going to pass a lot of current...

......and the carb, fan and fan clutch are now fitted.


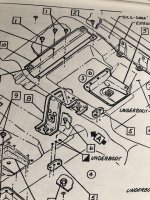
On the '68 to (I think) '73 models the floor is glass fibre so a steel reinforcement bracket is fitted underneath the transmission tunnel for the seatbelt receiver. This reinforcement is a u-shaped bracket that rivets to the underside of the floor - two cables attach the bottom of this bracket to the rear crossmember, thus resisting any forward movement should (heaven forbid) the seatbelts come into use in a front accident. You can see it here roughly in the middle of the picture.

As this is a fairly hostile environment - fully exposed to heat and the elements - you won't be surprised that the one on my car was fairly corroded. In fact it was in two pieces.

I haven't been able to find a new/good used one so the only option was to repair the old one. Not ideal - as this is a safety related bracket and it needs to be done fairly carefully...... (see next post)
Thus, I have repaired the started earth lead - something tells me that the old one wasn't going to pass a lot of current...
......and the carb, fan and fan clutch are now fitted.
On the '68 to (I think) '73 models the floor is glass fibre so a steel reinforcement bracket is fitted underneath the transmission tunnel for the seatbelt receiver. This reinforcement is a u-shaped bracket that rivets to the underside of the floor - two cables attach the bottom of this bracket to the rear crossmember, thus resisting any forward movement should (heaven forbid) the seatbelts come into use in a front accident. You can see it here roughly in the middle of the picture.
As this is a fairly hostile environment - fully exposed to heat and the elements - you won't be surprised that the one on my car was fairly corroded. In fact it was in two pieces.
I haven't been able to find a new/good used one so the only option was to repair the old one. Not ideal - as this is a safety related bracket and it needs to be done fairly carefully...... (see next post)
... A channel section of steel was found to be exactly the right width to replace the existing 'arm' of the bracket that had fallen off. A length of this was cut off and welded to the rest of the bracket... the lines on the masking tape show where the bend needs to start and finish.

The new section was then pie crusted (?) on each side to allow this section to be bent and then placed and bent over a jack handle which was just the right diameter...

After multiple iterations of fitting the bracket under the car to get the right fit, holes were then drilled in the right place to match up with the holes in the floor. The seat belt receiver nut was cut off the old section and welded on to the new 'arm' and a bold was welded to the new arm for the cable restraint.

The old 'arm' was very pitted...

So the pitted section was cut out and replaced... here shown just tacked and partially completed.


Once completed, more checks were done to make sure that the bracket had not distorted with the heat of welding. Then about 2 days of fettling to ensure all welds/joins were good....leaving a finished bracket

... and finally with some zinc rich primer to try and stave off further corrosion.. This will be painted with two coats of epoxy top coat (I have runout so will have to order more) and then fitted, probably using some non-setting butyl sealant to stop moisture getting trapped on it.

It has taken a couple of weeks to finish this and, to be honest I hadn't been looking forward to doing it, but I can now get onto fitting a new flywheel and starter motor, which should arrive from Real Steel this week.
The new section was then pie crusted (?) on each side to allow this section to be bent and then placed and bent over a jack handle which was just the right diameter...
After multiple iterations of fitting the bracket under the car to get the right fit, holes were then drilled in the right place to match up with the holes in the floor. The seat belt receiver nut was cut off the old section and welded on to the new 'arm' and a bold was welded to the new arm for the cable restraint.
The old 'arm' was very pitted...
So the pitted section was cut out and replaced... here shown just tacked and partially completed.
Once completed, more checks were done to make sure that the bracket had not distorted with the heat of welding. Then about 2 days of fettling to ensure all welds/joins were good....leaving a finished bracket
... and finally with some zinc rich primer to try and stave off further corrosion.. This will be painted with two coats of epoxy top coat (I have runout so will have to order more) and then fitted, probably using some non-setting butyl sealant to stop moisture getting trapped on it.
It has taken a couple of weeks to finish this and, to be honest I hadn't been looking forward to doing it, but I can now get onto fitting a new flywheel and starter motor, which should arrive from Real Steel this week.
Attachments
Progress continues with ...
A painted and installed seat belt reinforcement bracket.. although it's a bit dark up there, you can just about see it. The positive battery cable and handbrake cable need to be refitted with some heat/sound insulation prior to the gearbox going back in.


Exhaust pipes (first section anyway) wrapped...and with a new doughnut and refurbished sprung valve. Lookin at this now I have replaced the rather flimsy clamps with a proper jubilee clip which I think will be a bit more robust.

Then moving onto the hood... having got distracted as I was supposed to be focused on getting the gearbox installed....


And using the the remnants of the birdcage jig to make a support frame for the hood... started repairing the gouges, notches and scratches that have resulted from many years of neglect...

But the big news is that my gearbox is back from the overhaul shop and it looks fantastic - like I would imagine a new one would. It has taken a while (and then some) but the result looks sooooo good.

And here's a selection of parts to be fitted related (loosely in some cases) to it ....

If I get some decent weather and can get spend some time on this I hope to have it all installed by the end of the month...... As long as I don't get distracted... let's say March then....
A painted and installed seat belt reinforcement bracket.. although it's a bit dark up there, you can just about see it. The positive battery cable and handbrake cable need to be refitted with some heat/sound insulation prior to the gearbox going back in.
Exhaust pipes (first section anyway) wrapped...and with a new doughnut and refurbished sprung valve. Lookin at this now I have replaced the rather flimsy clamps with a proper jubilee clip which I think will be a bit more robust.
Then moving onto the hood... having got distracted as I was supposed to be focused on getting the gearbox installed....
And using the the remnants of the birdcage jig to make a support frame for the hood... started repairing the gouges, notches and scratches that have resulted from many years of neglect...
But the big news is that my gearbox is back from the overhaul shop and it looks fantastic - like I would imagine a new one would. It has taken a while (and then some) but the result looks sooooo good.
And here's a selection of parts to be fitted related (loosely in some cases) to it ....
If I get some decent weather and can get spend some time on this I hope to have it all installed by the end of the month...... As long as I don't get distracted... let's say March then....
A quick summary on the hood that I have been working on....
The release mechanism was fairly grubby but otherwise in good shape, so these were removed so that I could work on the hood glass fibre which, as previously reported, was in pretty poor shape.


So armed with some fibreglass and resin, various fillers, some glazing putty and an orbital sander started getting the hood back in shape and ready for some primer. (using some pipe insulation to keep it protected whilst in storage, just in case you were wondering ...)


And then some epoxy primer on top ....

Mechanisms repainted .... (a spring for the hand brake cable seems to have worked its way in there too)

And then re-assembled... with some lithium grease to make it nice and smooth. The cable that connects the two locking mechanisms on either side was suspended from a beam for a week with some oil trickling down inside until it came out the other end. Some minor fraying on each end of the cable outer was tidied up with some shrink fit tubing.

to give ......

This will be put to one side now so that I can fully concentrate on the gearbox installation. I haven't been neglecting this - have been working on both in parallel so more on that next week....
The release mechanism was fairly grubby but otherwise in good shape, so these were removed so that I could work on the hood glass fibre which, as previously reported, was in pretty poor shape.
So armed with some fibreglass and resin, various fillers, some glazing putty and an orbital sander started getting the hood back in shape and ready for some primer. (using some pipe insulation to keep it protected whilst in storage, just in case you were wondering ...)
And then some epoxy primer on top ....
Mechanisms repainted .... (a spring for the hand brake cable seems to have worked its way in there too)
And then re-assembled... with some lithium grease to make it nice and smooth. The cable that connects the two locking mechanisms on either side was suspended from a beam for a week with some oil trickling down inside until it came out the other end. Some minor fraying on each end of the cable outer was tidied up with some shrink fit tubing.
to give ......
This will be put to one side now so that I can fully concentrate on the gearbox installation. I haven't been neglecting this - have been working on both in parallel so more on that next week....
Mad4slalom
Well-known user
Great work TimProgress continues with ...
A painted and installed seat belt reinforcement bracket.. although it's a bit dark up there, you can just about see it. The positive battery cable and handbrake cable need to be refitted with some heat/sound insulation prior to the gearbox going back in.
View attachment 25335 View attachment 25336
Exhaust pipes (first section anyway) wrapped...and with a new doughnut and refurbished sprung valve. Lookin at this now I have replaced the rather flimsy clamps with a proper jubilee clip which I think will be a bit more robust.
View attachment 25337
Then moving onto the hood... having got distracted as I was supposed to be focused on getting the gearbox installed....
View attachment 25338 View attachment 25339 View attachment 25340
And using the the remnants of the birdcage jig to make a support frame for the hood... started repairing the gouges, notches and scratches that have resulted from many years of neglect...
View attachment 25341
But the big news is that my gearbox is back from the overhaul shop and it looks fantastic - like I would imagine a new one would. It has taken a while (and then some) but the result looks sooooo good.
View attachment 25342
And here's a selection of parts to be fitted related (loosely in some cases) to it ....
View attachment 25343
If I get some decent weather and can get spend some time on this I hope to have it all installed by the end of the month...... As long as I don't get distracted... let's say March then....
 you are methodically working through every system. You will be a font of knowledge on the c3 as few folk would have had one in so many bits and tackled so many issues as you. Btw, Who rebuilt the gearbox for you?
 Still have a front bumper if you are not going the new repro route. What is the postion of the motor? Has that been for overhaul as yet? Great to see the continuing progress on this project. I never really thought it would get very far when you first posted the pics of the state of the frame, but you just tackled every hurdle head on, great project

Just a thought while you are doing hood latches Tim, the PO of my 72 had added a spare hood pull T handle on a bowden cable connected to the hood release lever on the inner wing and left it hanging down inside of the fender vent . If a release cable breaks I can just reach up under the fender and pop the hood with the spare handle,A quick summary on the hood that I have been working on....
The release mechanism was fairly grubby but otherwise in good shape, so these were removed so that I could work on the hood glass fibre which, as previously reported, was in pretty poor shape.
View attachment 25501 View attachment 25502 View attachment 25505
So armed with some fibreglass and resin, various fillers, some glazing putty and an orbital sander started getting the hood back in shape and ready for some primer. (using some pipe insulation to keep it protected whilst in storage, just in case you were wondering ...)
View attachment 25506 View attachment 25507
And then some epoxy primer on top ....
View attachment 25508
Mechanisms repainted .... (a spring for the hand brake cable seems to have worked its way in there too)
View attachment 25504
And then re-assembled... with some lithium grease to make it nice and smooth. The cable that connects the two locking mechanisms on either side was suspended from a beam for a week with some oil trickling down inside until it came out the other end. Some minor fraying on each end of the cable outer was tidied up with some shrink fit tubing.
View attachment 25509
to give ......
View attachment 25510
This will be put to one side now so that I can fully concentrate on the gearbox installation. I haven't been neglecting this - have been working on both in parallel so more on that next week....
Hi Gary, Many thanks for your kind comments. I will probably know my '72 pretty well by the time I finish. I suppose like any large problem you have to break it down into a series of smaller ones to make it more manageable. It's probably been a longer series than I perhaps would have originally thought though. I haven't regretted doing it but any reasonably sane person would have just parted it out (and probably done quite well out of it) rather than trying to do a rebuild. Although as Raymond Chandler once wrote 'reasonably is a word you can stretch'.
There is light at the end of the tunnel - I had hoped to get the gearbox in this month but someone in the car's past used a selection of different bolt sizes and types to fix the clutch pressure plate in place. Must have done wonders for the flywheel balance. So just waiting for a new set to arrive now and with the purchase of a new slip yoke I should be able to join the gearbox to the prop shaft, at least temporarily, to see if it will move under its own steam. Well once the engine has been started anyway. I believe that this will be the first time since 1993 so that will be an interesting day. I haven't put the new/refurbished brakes on yet so if I forget to re-connect the hand brake cable it could be a really interesting day.
The Muncie was rebuilt by Alders Automotive in Upper Dicker in Sussex. It looks fantastic and I can see that there are new parts in all the right places so I am optimistic that this will work well. I have no reason at all to suspect otherwise but until I have the gear lever mechanism all installed and aligned and I have engaged some gears, I am a bit reluctant to give it my full blessing but the omens are really good. You might be aware that it took, ehem, a little while for the work to be done but I am very happy with what I have right now.
Re: The hood mechanism. That's a brilliant tip - when I was redoing this part I was concerned that this cable is only effectively clamped by a grub screw and it's vulnerable to coming loose. Having a second cable installed inside the hood is a really interesting idea and one that I will investigate. When I got the car, fresh from it swamp location, I only could open the hood by removing the driver side grille and reaching up inside. Something I really didn't want to do - although cars coming in from the US are sprayed for insects, spiders, wasps etc before they leave port I hadn't envisaged putting that's treatment's effectiveness to the test. And yes, I did find various cocoons (I think wasps) later on in various hiding places - fortunately either empty or with dead occupants.
The engine has a recorded mileage of about 57,000 - so relatively light use. I have stripped the top end and the heads (I believe to be non original LT1 heads, judging by the casting numbers, although I maybe wrong) have been fully rebuilt with new valves, springs, seals, collets and gaskets. The block and rotating assemblies look to be in good condition and there is no bore wear at all, so I have left that area alone apart from a new rear main seal and a rebuilt oil pump assembly (the while plastic tube that linked the distributor shaft to the oil pump was completely broken) . There are lots of new ancillary parts (rebuilt distributor, new alternator, water pump etc.) so I am hoping, fingers crossed, that overall the engine is ok. Once the new starter and gearbox are installed I will do a compression test as part of the set up, which should give me a more rigorous assessment of its overall condition.
Yes - I would still very much like front bumper if it is available. Wonderful!
Cheers!
johng
CCCUK Member
If your handbrake is as good as mine, it won't make much difference if you do forget to re-connect the cable.There is light at the end of the tunnel - I had hoped to get the gearbox in this month but someone in the car's past used a selection of different bolt sizes and types to fix the clutch pressure plate in place. Must have done wonders for the flywheel balance. So just waiting for a new set to arrive now and with the purchase of a new slip yoke I should be able to join the gearbox to the prop shaft, at least temporarily, to see if it will move under its own steam. Well once the engine has been started anyway. I believe that this will be the first time since 1993 so that will be an interesting day. I haven't put the new/refurbished brakes on yet so if I forget to re-connect the hand brake cable it could be a really interesting day.
I understand that the handbrake is a bit of a weak point on C3's - strangely enough the handbrake on my car was the only thing that was working when it arrived at my house - presumably somebody at The Beverley Hills Car Club had fixed it to stop the car from rolling away because the gearbox wasn't going to stop it.....If your handbrake is as good as mine, it won't make much difference if you do forget to re-connect the cable.
