.... I started replacing the covers using a glass fibre to effect a repair. I had taken (actually cut) them off to allow repairs to the birdcage sills and had chosen the cut locations to a) allow the repair and b) to be reasonably easy to repair afterwards. So starting with...
View attachment 22254
Then preparing the cover panel by grinding down the bonding edges and doing the same on the car...
View attachment 22255
Fitting and rust proofing the door switch brace...
View attachment 22256
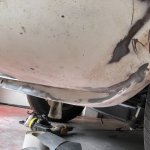
Inserting the insulator (presumably to stop the panel vibrating)
View attachment 22258
Final check for alignment..
View attachment 22257
Glued the cover in position on the lower edge..
View attachment 22259
Glass'd it in place...
View attachment 22260
A bit of sanding, filler and glazing putty later...
View attachment 22261
It looks finished at this point but I always add a bit of paint to highlight surface roughness as it normally ends up in reality looking like a lunar landscape. It's not bad but you can see a few craters here and there...
View attachment 22262
The door can now be checked...
View attachment 22263
Close enough for now from a fitting point of view so I can now concentrate on the front edge by the front wing. It does also highlight how much bodywork will be required on the doors - looking a bit rough. The blue line is the 'swage' line used to help align the height of the door.


 You will have your work cut out charging up Crowcombe bank on the way to Minehead , it`s about a 1 in 50 or 1 in 70 gradient from memory .