You are using an out of date browser. It may not display this or other websites correctly.
You should upgrade or use an alternative browser.
You should upgrade or use an alternative browser.
72 Corvette - Restoration Updates
- Thread starter TimP
- Start date
Probably hiding behind my sense of self-preservation.Where's your sense of adventure? That's one thing I thought you weren't lacking!
How's the car coming along?
") Update coming in a few minutes....
Update coming in a few minutes....After having bonded the bow back on I thought it would be nice to strip off the paint from the rear of the car and apply a protective coating of epoxy primer to keep the damp out...
My car was originally fitted with a luggage rack but I decided to delete this option and fill in all the holes. I made a template of the hole positions so that if I change my mind at a later date then I can re-drill and fix as required.

There was also some cracking in the rear passenger side quarter that needed to be dug out, repaired with glass fibre and filled...

Post fill and pre-sand ....

The cracked area is now pretty well invisible .... the paint hasn't got full depth so it's a little rough looking but it will act as a protective coating until I decide what to do as topcoat....

Then sand, paint a couple of coats and then refit parts as required....

Despite the lunar landscape protective paint it seems to look ok.
I have bought a new battery (the 'old' new one ended up in the C4) and the next step is to check that the rear lights all work ok, and slowly work forward testing the rest of the electrical system until everything checks out ready for an engine start. Hopefully that should be my next update... fingers crossed.
My car was originally fitted with a luggage rack but I decided to delete this option and fill in all the holes. I made a template of the hole positions so that if I change my mind at a later date then I can re-drill and fix as required.
There was also some cracking in the rear passenger side quarter that needed to be dug out, repaired with glass fibre and filled...
Post fill and pre-sand ....
The cracked area is now pretty well invisible .... the paint hasn't got full depth so it's a little rough looking but it will act as a protective coating until I decide what to do as topcoat....
Then sand, paint a couple of coats and then refit parts as required....
Despite the lunar landscape protective paint it seems to look ok.
I have bought a new battery (the 'old' new one ended up in the C4) and the next step is to check that the rear lights all work ok, and slowly work forward testing the rest of the electrical system until everything checks out ready for an engine start. Hopefully that should be my next update... fingers crossed.
Good question! Over the years I have done a lot of bodywork repairs in the glass fibre both at the front and rear ends, to the door post covers, and the bow. There is also an almost completely rebuilt birdcage.Looking good Tim, but why have you fitted the chrome bits before paint?


A decent paint job is going to be an expensive exercise and I need to find out if these repairs are 'good' by driving around for a while and hitting a few pot holes (plenty of those in Sussex). I have also modified various pieces (for example the exhaust/number plate panel at the rear) to get really good, consistent panel gaps. Finding cracks appearing soon after applying paint would be just too painful so I'm going to take a fairly cautious approach and enjoy the ride before final paint. I believe the repairs I have done are good and strong but I prefer not to take the risk.
The other thing is of course that I want to make sure that everything fits as they should.
I've been working forward on the electrics just rechecking that everything is working ok before trying to get the engine started. To finish this preliminary check off I have worked on the courtesy lights and the indicators.
The courtesy lights are fairly straightforward especially if you remember that the door opener circuits work on the front set of door switches rather than the rear set which are principally for the alarm. However it 's nice to know that the rear door pair will be all ready for when I start looking at the alarm arrangement. The courtesy light at the rear of the compartment is different from the front two in that it has two contact points and the bulb casing is not electrically active (ie not an earth). It's not a problem as these are easily available, you just need to know this to order the right one. Yes, i have one of the other ones spare if anybody would like one. I have replaced it with a bright white LED.

I have replaced all the lights with LEDs, although the indicators are a little bit more tricky as the relay has to be changed too as there isn't enough current in the circuit to operate the old style bimetallic strip in the relays that were originally fitted, like this one for the hazard flasher.

I had first tried this converting the indicators to LEDs with a relay with three connectors.. This can be made to work but it requires the connector on the Corvette to be rewired as the pin arrangement is different, or by using a rather clumsy adaptor.

Much better is the type shown below which has two prongs as shown in the pic below. These have been produced especially for classic cars.

As with the previous blue relay it fits quite nicely under the scuttle even though it is a little larger. It has an extra flying lead that needs to go to earth, in this case the hinge post. This (classic) flasher also has a more sedate flash than the modern equivalent which is a little frantic (although probably still legal) and has a reassuring 'click' when it flashes, which the modern three prong type doesn't. Whether this can be heard over a small block remains to be seen (or heard). You can also see the front courtesy light LED.

...and here is a quick video.
Plenty of other Corvette LED light conversion videos can be found on YouTube, but this is my set up so you can see how it ends up.....
The courtesy lights are fairly straightforward especially if you remember that the door opener circuits work on the front set of door switches rather than the rear set which are principally for the alarm.
However it 's nice to know that the rear door pair will be all ready for when I start looking at the alarm arrangement. The courtesy light at the rear of the compartment is different from the front two in that it has two contact points and the bulb casing is not electrically active (ie not an earth). It's not a problem as these are easily available, you just need to know this to order the right one. Yes, i have one of the other ones spare if anybody would like one. I have replaced it with a bright white LED.I have replaced all the lights with LEDs, although the indicators are a little bit more tricky as the relay has to be changed too as there isn't enough current in the circuit to operate the old style bimetallic strip in the relays that were originally fitted, like this one for the hazard flasher.
I had first tried this converting the indicators to LEDs with a relay with three connectors.. This can be made to work but it requires the connector on the Corvette to be rewired as the pin arrangement is different, or by using a rather clumsy adaptor.
Much better is the type shown below which has two prongs as shown in the pic below. These have been produced especially for classic cars.
As with the previous blue relay it fits quite nicely under the scuttle even though it is a little larger. It has an extra flying lead that needs to go to earth, in this case the hinge post. This (classic) flasher also has a more sedate flash than the modern equivalent which is a little frantic (although probably still legal) and has a reassuring 'click' when it flashes, which the modern three prong type doesn't. Whether this can be heard over a small block remains to be seen (or heard). You can also see the front courtesy light LED.
...and here is a quick video.
Plenty of other Corvette LED light conversion videos can be found on YouTube, but this is my set up so you can see how it ends up.....
Last edited:
Here's another job I have been putting off for a while but whilst we have some (very welcome) good weather forecasted I have no excuse not to get down to it.
It's body off the frame time ......
Starting with a piece of paper, pencil and a ruler I hashed out a design for a gantry to support the weight of the body. Ironic really because what I built looks nothing like what I designed but I suppose the important thing with a piece of paper is that you think things out first like lift heights and clearances etc..
Most of the wood used here was left over by a building job I had done a couple of years ago and I asked the builders to leave whatever they had over, supplemented by about £60s worth of new structural timber for the two uprights. Threaded rod was used for all the bolts as they were all going to be custom sizes. Two Hilka 1000kg chain hoists from Screwfix were used to do the lifting. It was test built in the back garden and then disassembled and rebuilt in front of the garage much to the amusement of my neighbours. It looks a bit Heath Robinson but it is absolutely rock solid.

The '72 was then pushed out and steered carefully underneath, and a bit further out than necessary so that I could remove the last remaining items prior to the lift: steering column, front body support rod and four rear bumper brackets that I forgotten to remove earlier. One final check was made on possible connections and any loose wiring was tied back. I also made the decision to remove the distributor at the last moment so that if the body did rock a bit on lift (which it did a little) then the distributor was out of the way. There is also a lateral support beam for the front end (the radiator support is still in place) to stop any unnecessary stress on the firewall bonding. The rear of the beam is tied down to the safety belt mounting points on the transmission tunnel that are well braced.

Hoists added and car in position. I used two hoists to make the lift easier and a bit more controllable - they are quite reasonably priced (about £60) each and when all is said and done can be put on eBay to recoup the costs. There is a balance bar at the lower end of each of the support chain to give some control over the weight distribution to stop it having a really bad rear or front bias.

Part way through the lift (with Corvette in off road config) you can see the balance bar a bit better. There are two hooks with load straps that fit on to the bird cage sill.

A bit further in (with a little wood added on the tail to help with the balance) there is clear daylight under the body.... A rope is attached to the chassis so that I can pull it out backwards without having to get under the body - which was my golden rule for the exercise. Lots of oily finger prints to be removed too - chain hoists are messy things.

With some help from my wife to help with the balance and stop any oscillations, the lift continues..... The trolley frame is ready to be slid under.

... and after another few minutes the body is at full height, the chassis is pulled back into the garage and the dolly goes in underneath.

After a few adjustments to the location of the mount supports the body is lowered onto the dolly..... As you can see it's a lovely day and being Sunday nobody was going to use the post box which if nothing else becomes a useful drinks location.

The chassis is now in the garage for some therapy looking shamefully dirty at the front and in need of some redecorating at the rear (beautifully spotlighted) .... I haven't had a detailed look - I was pretty tired after rebuilding the frame and lifting the body but at first glance it all seem to be in (strangely) good shape with the rust being fairly superficial rather than structural - I still can't reconcile the condition of the chassis with the condition of the birdcage. I know it isn't the original chassis - the car was built as an auto but was converted to manual at some point - but I'm not going to complain! More to come on this when I've had a closer look.

It all went pretty well - thankfully without any drama - and I now have a week or two of intense activity (remove corrosion, repaint, new fuel and brake lines etc..) on the chassis before I put the body back on. I don't want them gantry outside for any longer than I have to and it would be good to get the car back in one piece. More to follow.....
It's body off the frame time ......
Starting with a piece of paper, pencil and a ruler I hashed out a design for a gantry to support the weight of the body. Ironic really because what I built looks nothing like what I designed but I suppose the important thing with a piece of paper is that you think things out first like lift heights and clearances etc..
Most of the wood used here was left over by a building job I had done a couple of years ago and I asked the builders to leave whatever they had over, supplemented by about £60s worth of new structural timber for the two uprights. Threaded rod was used for all the bolts as they were all going to be custom sizes. Two Hilka 1000kg chain hoists from Screwfix were used to do the lifting. It was test built in the back garden and then disassembled and rebuilt in front of the garage much to the amusement of my neighbours. It looks a bit Heath Robinson but it is absolutely rock solid.
The '72 was then pushed out and steered carefully underneath, and a bit further out than necessary so that I could remove the last remaining items prior to the lift: steering column, front body support rod and four rear bumper brackets that I forgotten to remove earlier. One final check was made on possible connections and any loose wiring was tied back. I also made the decision to remove the distributor at the last moment so that if the body did rock a bit on lift (which it did a little) then the distributor was out of the way. There is also a lateral support beam for the front end (the radiator support is still in place) to stop any unnecessary stress on the firewall bonding. The rear of the beam is tied down to the safety belt mounting points on the transmission tunnel that are well braced.
Hoists added and car in position. I used two hoists to make the lift easier and a bit more controllable - they are quite reasonably priced (about £60) each and when all is said and done can be put on eBay to recoup the costs. There is a balance bar at the lower end of each of the support chain to give some control over the weight distribution to stop it having a really bad rear or front bias.
Part way through the lift (with Corvette in off road config) you can see the balance bar a bit better. There are two hooks with load straps that fit on to the bird cage sill.
A bit further in (with a little wood added on the tail to help with the balance) there is clear daylight under the body.... A rope is attached to the chassis so that I can pull it out backwards without having to get under the body - which was my golden rule for the exercise. Lots of oily finger prints to be removed too - chain hoists are messy things.
With some help from my wife to help with the balance and stop any oscillations, the lift continues..... The trolley frame is ready to be slid under.
... and after another few minutes the body is at full height, the chassis is pulled back into the garage and the dolly goes in underneath.
After a few adjustments to the location of the mount supports the body is lowered onto the dolly..... As you can see it's a lovely day and being Sunday nobody was going to use the post box which if nothing else becomes a useful drinks location.
The chassis is now in the garage for some therapy looking shamefully dirty at the front and in need of some redecorating at the rear (beautifully spotlighted) .... I haven't had a detailed look - I was pretty tired after rebuilding the frame and lifting the body but at first glance it all seem to be in (strangely) good shape with the rust being fairly superficial rather than structural - I still can't reconcile the condition of the chassis with the condition of the birdcage. I know it isn't the original chassis - the car was built as an auto but was converted to manual at some point - but I'm not going to complain! More to come on this when I've had a closer look.
It all went pretty well - thankfully without any drama - and I now have a week or two of intense activity (remove corrosion, repaint, new fuel and brake lines etc..) on the chassis before I put the body back on. I don't want them gantry outside for any longer than I have to and it would be good to get the car back in one piece. More to follow.....
Chuffer
CCCUK Member
Yeah , you could do two at a time on that to speeds things up !That’s exactly what I thought. A great hangman’s gallows.
That's exactly what my neighbours (and just about everyone else that walked past) have been saying....Very impressive Tim , and the up side is you can hire your gantry out as a gallows when the project is finished !
Unless anyone wants to borrow it (unlikely know but I thought I would ask anyway) it's probably going to be taken apart and turned into a planter.Mad4slalom
Well-known user
 Fantastic work as usual tim, heath robinson definitely not and like your metal repairs , “rock solid” ! .great pics for the album. Cant wait to see this formerly dead vette resurected.

Chuffer
CCCUK Member
My list of people deserving a long drop on a short rope gets longer by the day and would keep it gainfully employed for a long time !!!That's exactly what my neighbours (and just about everyone else that walked past) have been saying....
Nassau65
CCCUK Member
My list of people deserving a long drop on a short rope gets longer by the day and would keep it gainfully employed for a long time !!!

I did say that didn't I. I am still hoping to get the car on the road in July - it's a stretch target I know but I would like to get this car back on the road. It won't be finished but just being able to drive it around should be fairly motivational. With the weather cooperating as it is at the moment I might be able to get the body back on the chassis by mid-May. Most of the things I need for getting it ready have already been rebuilt so it 'should' just be case of re-assembling all the parts. They have all gone together before - I have tested all the wiring looms and nearly all the electrics, and the engine does fire (on starting fluid)..... so fingers crossed.Great stuff as always Tim. Are you still planning to be on the road by July? That looks a tall order.
Having committed myself to a somewhat optimistic on-the-road date I thought I'd better get a move on. This coincides with my general desire to get 'the gallows', as they are universally known as in the neighbourhood, (and on this forum, by all accounts) off my driveway.
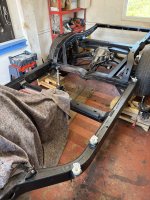
Having removed the body and put it to one side for a while I took a few minutes to take stock and see what needed to be done. My initial impression was that the overall condition was better than I had feared but there still was a lot to do. So starting with some pictures that show the initial state ....
Surface rust, lots of dirt and clay, and one of three body mounts that had given up and was seized solid.

working around the chassis there is more off the same: surface rust and lots of crud. The gearbox cross member, that was restored earlier gives a nice contrast. The front end of the prop shaft that attaches to the gearbox yoke was disconnected giving those scoring marks as it rubs on the rear cross member/snubber mount as it rotates.


After a few days with a wire brush it was staritng to look a little better...

One of the items that absolutely needed to fixed was the body mounts - this picture showing the corrosion that resulted in the cage for the lock nut being almost completely disintegrated. Partnered with a picture of another mount that had also given in to corrosion and needed to be cut off in order to raise the body.


To be continued....
Having removed the body and put it to one side for a while I took a few minutes to take stock and see what needed to be done. My initial impression was that the overall condition was better than I had feared but there still was a lot to do. So starting with some pictures that show the initial state ....
Surface rust, lots of dirt and clay, and one of three body mounts that had given up and was seized solid.
working around the chassis there is more off the same: surface rust and lots of crud. The gearbox cross member, that was restored earlier gives a nice contrast. The front end of the prop shaft that attaches to the gearbox yoke was disconnected giving those scoring marks as it rubs on the rear cross member/snubber mount as it rotates.
After a few days with a wire brush it was staritng to look a little better...
One of the items that absolutely needed to fixed was the body mounts - this picture showing the corrosion that resulted in the cage for the lock nut being almost completely disintegrated. Partnered with a picture of another mount that had also given in to corrosion and needed to be cut off in order to raise the body.
To be continued....
A liberal dosing of Fertan was applied to attack the rust, and after washing everything down things looked markedly better .....

Mounts were cut out (notice the missing nut) and replaced....


After a fairly epic battle the differential crossmember cushions were liberated from their home of 53 years. On inspection they were cracked, hard and definitely needed replacing.


The differential was spray painted with a VHT cast iron paint and the chassis received a coat of Rustbuster EM135 (I think that's right) and it starts to look quite good. The new body mount hardware are added to ensure that everything was in place


To be continued .....
Mounts were cut out (notice the missing nut) and replaced....
After a fairly epic battle the differential crossmember cushions were liberated from their home of 53 years. On inspection they were cracked, hard and definitely needed replacing.
The differential was spray painted with a VHT cast iron paint and the chassis received a coat of Rustbuster EM135 (I think that's right) and it starts to look quite good. The new body mount hardware are added to ensure that everything was in place
To be continued .....
..... and finally...
New disks were added after the diff crossmember was re-attached. The rear suspension was cleaned and in some areas repainted for better corrosion protection.

The prop shaft was added with new U/J's and a new manual gearbox yoke. Two new fuel lines were added on the passenger frame rail - here the old vapour return is being sized up for replacement. Surprisingly, the old U/Js came out without two much of a fight but they had been had been sprayed with Plus Gas for about 2 years...


Whilst the body was off I added the reinforcement for the gear level hole that I repaired a year or so ago....

And with the addition of the remaining lines on the drivers side - I made my own vapour line and had bought the brake pipe a few years ago - and a refurbished (again) cleaned and sealed (another Rustbuster product that worked very well) fuel tank assembly. The forward end of the pipes aren't don't have the clips in place at the moment so they look a little sloppy at the front but I have been concentrating on those clips that are hidden/covered by the body which are mainly at the rear. Two further coats of black epoxy primer were added (as well as spraying all the insides of the box sections with Dinitrol) to try and make the chassis last as long as possible.

Lots of other things have been done too: the gearbox lever alignment was checked - it's so much easier with the body off - and loads of other stuff too.
There are still a couple of small jobs to do: hoses to add and brake unions to do up but generally speaking it's about ready for the body and chassis to be reunited. I have summarised quite a bit but I think you get the gist... Hopefully, if the weather holds, and it looks like it will, it should all be back together by Sunday evening. Fingers crossed.....
New disks were added after the diff crossmember was re-attached. The rear suspension was cleaned and in some areas repainted for better corrosion protection.
The prop shaft was added with new U/J's and a new manual gearbox yoke. Two new fuel lines were added on the passenger frame rail - here the old vapour return is being sized up for replacement. Surprisingly, the old U/Js came out without two much of a fight but they had been had been sprayed with Plus Gas for about 2 years...
Whilst the body was off I added the reinforcement for the gear level hole that I repaired a year or so ago....
And with the addition of the remaining lines on the drivers side - I made my own vapour line and had bought the brake pipe a few years ago - and a refurbished (again) cleaned and sealed (another Rustbuster product that worked very well) fuel tank assembly. The forward end of the pipes aren't don't have the clips in place at the moment so they look a little sloppy at the front but I have been concentrating on those clips that are hidden/covered by the body which are mainly at the rear. Two further coats of black epoxy primer were added (as well as spraying all the insides of the box sections with Dinitrol) to try and make the chassis last as long as possible.
Lots of other things have been done too: the gearbox lever alignment was checked - it's so much easier with the body off - and loads of other stuff too.
There are still a couple of small jobs to do: hoses to add and brake unions to do up but generally speaking it's about ready for the body and chassis to be reunited. I have summarised quite a bit but I think you get the gist... Hopefully, if the weather holds, and it looks like it will, it should all be back together by Sunday evening. Fingers crossed.....