Thanks. I can believe it - mine took almost a whole day to remove. They're a tight fit at the best of times and over 50 years of corrosion and dirt don't help. A few days of Plus gas probably eased it but I ended up (very carefully) using a die grinder to weaken the outer steel wall of the cushion and then separating that from the crossmember with a chisel. The only odd thing was that the nuts that mount on the studs that go through the cushions were very loose. I'm pretty sure I had'nt undone them but perhaps somebody else started before.Looking good Tim. Those crossmember cushions were easily the most difficult thing to remove on my restoration.
You are using an out of date browser. It may not display this or other websites correctly.
You should upgrade or use an alternative browser.
You should upgrade or use an alternative browser.
72 Corvette - Restoration Updates
- Thread starter TimP
- Start date
Chuffer
CCCUK Member
Super impressive amount of work Tim . The devil`s in the detail and you have got it nailed !..... and finally...
New disks were added after the diff crossmember was re-attached. The rear suspension was cleaned and in some areas repainted for better corrosion protection.
View attachment 30210
The prop shaft was added with new U/J's and a new manual gearbox yoke. Two new fuel lines were added on the passenger frame rail - here the old vapour return is being sized up for replacement. Surprisingly, the old U/Js came out without two much of a fight but they had been had been sprayed with Plus Gas for about 2 years...
View attachment 30212 View attachment 30214
Whilst the body was off I added the reinforcement for the gear level hole that I repaired a year or so ago....
View attachment 30213
And with the addition of the remaining lines on the drivers side - I made my own vapour line and had bought the brake pipe a few years ago - and a refurbished (again) cleaned and sealed (another Rustbuster product that worked very well) fuel tank assembly. The forward end of the pipes aren't don't have the clips in place at the moment so they look a little sloppy at the front but I have been concentrating on those clips that are hidden/covered by the body which are mainly at the rear. Two further coats of black epoxy primer were added (as well as spraying all the insides of the box sections with Dinitrol) to try and make the chassis last as long as possible.
View attachment 30215
Lots of other things have been done too: the gearbox lever alignment was checked - it's so much easier with the body off - and loads of other stuff too.
There are still a couple of small jobs to do: hoses to add and brake unions to do up but generally speaking it's about ready for the body and chassis to be reunited. I have summarised quite a bit but I think you get the gist... Hopefully, if the weather holds, and it looks like it will, it should all be back together by Sunday evening. Fingers crossed.....

CaptainK
Administrator
Snipped your post a bit for clarity, but these two bits combined made me laugh a lot whilst reading the post.This coincides with my general desire to get 'the gallows' ... off my driveway.
Having removed the body and put it to one side for a while....

Good work on the restoration though, amazing stuff.
It's funny you should say that because I thought the same when I posted the picture so I checked it and it's actually ok. Looking at the picture closely the two tangs of the clip in the middle are on the same level - neither is proud of the other. I think that if one side of the C clip was in the groove (so 60's) and the other wasn't then I think one tang would be sticking up a bit higher than the other. I'm going to check it again though .......just to be sure.Coming along now. The c clip for one of your ujs doesn’t look like it’s in properly
I checked this morning and you were absolutely right - half the 'c' clip was not quite sitting properly. Many thanks for pointing it out.Coming along now. The c clip for one of your ujs doesn’t look like it’s in properly
Mad4slalom
Well-known user
He could have just saved you a floor and a very sore derrierre !I checked this morning and you were absolutely right - half the 'c' clip was not quite sitting properly. Many thanks for pointing it out.

Having added the three fuel hoses at the tank end, glued the anti-squeal liner to the rear of the chassis, fitted the rear brake union on the brake pipe and coated anything vulnerable to corrosion with ACF50....


....it was time to get the hoist ready for action, give the body and chassis one final checkover (remembering to fit the vacuum reservoir and anti splash foam widgets on the chassis) and wash everything that was going to get buried when the body goes on. Then it was time to start lifting....


.. balancing the body with carefully placed blocks of wood....

With my wife kindly steadying the body (which is shown here at max height)and keeping an eye out for interference in the engine bay, the chassis was carefully aligned underneath .....

....and then lowered slowly onto the mounts. Not photographed was the shimming process on the mounts that minimises the distortion of the body/birdcage when the mounts are torqued down. It took about an hour but in the relief/excitement of getting the body back on I forgot to take any pics....
.... and then the reunited car was pushed back into the garage.

The one thing I was going to do, that I just remembered about, was to weigh the body, for curiosity as much as anything.
Tomorrow I will go round the underneath and confirm that everything is safe and nothing is trapped, pinched etc. prior to dismantling the gantry and dolly over the weekend..
Must say that I am relieved (and quite chuffed) that the car is back together again and back in the garage. The weather has been super cooperative and I've enjoyed the banter, support and encouragement of friends, walkers and passing motorists who have stopped to learn more about what was going on. It's been a good day.
Final assembly is just around the corner.....
....it was time to get the hoist ready for action, give the body and chassis one final checkover (remembering to fit the vacuum reservoir and anti splash foam widgets on the chassis) and wash everything that was going to get buried when the body goes on. Then it was time to start lifting....
.. balancing the body with carefully placed blocks of wood....
With my wife kindly steadying the body (which is shown here at max height)and keeping an eye out for interference in the engine bay, the chassis was carefully aligned underneath .....
....and then lowered slowly onto the mounts. Not photographed was the shimming process on the mounts that minimises the distortion of the body/birdcage when the mounts are torqued down. It took about an hour but in the relief/excitement of getting the body back on I forgot to take any pics....
.... and then the reunited car was pushed back into the garage.
The one thing I was going to do, that I just remembered about, was to weigh the body, for curiosity as much as anything.
Tomorrow I will go round the underneath and confirm that everything is safe and nothing is trapped, pinched etc. prior to dismantling the gantry and dolly over the weekend..
Must say that I am relieved (and quite chuffed) that the car is back together again and back in the garage. The weather has been super cooperative and I've enjoyed the banter, support and encouragement of friends, walkers and passing motorists who have stopped to learn more about what was going on. It's been a good day.
Final assembly is just around the corner.....
No kidding - being that close to a flailing prop shaft with only a glass fibre floor to protect you doesn't bear thinking about.....He could have just saved you a floor and a very sore derrierre !
teamzr1
Supporting vendor
How scary it can get when a fitting like that is not on correctly
I was doing an Open Road Race and the road winds through mountain areas
I was doing about 180 MPH when out of the blue I heard loud banging and Corvette ZR-1 was all over the road and rear wheels freewheeling
Maybe by luck it about flipped over, but I managed to get it stopped but landed about 20 feet from the road in weeds and boulders
Corvette would not move at all and the rear end was locked up
When I got under the ass end I found the driveshaft by the diff on the ground and what I found really pissed me off
so the end of driveshaft was bouncing off the road to the underside of Corvette
I was too busy at work, so I had some shop replaced the rear end gear ratio that would have been better for that race
and some A-hole wrencher forgot to tighten down the 2 bolts that mount U-joint of the yoke of driveshaft to the diff
so under speed the bolts backed off and the U-joint just than could pop off -(
Considering the high costs for entry fee for race, all the gas to round trip from CA to NV, hotels, etc
When I got back home, I went to that shop and cleared the place out with my big mouth and real pissed off to even customers
Running out the doors
Mad4slalom
Well-known user
Absolutely brilliant to see body back on Tim. It looks fairly easy and quick in the photos but It does’nt get across the obvious countless hours of work and concentration and probably frustration between each photo. Getting to the homeward straight now. Will you run and drive it for testing and snagging any issues before you paint it ? Top marks TimThat's a lot of work in a short space of time Tim. At that rate I reckon you could make it to the American Speedfest at Brands in 3 weeks time
The weather played a big part in making good progress and fortunately I had anticipated most of the long lead-time parts that I was going to need. Those that I had forgotten were mostly relatively generic items (hose clips etc.) that could be obtained from local motor factors.That's a lot of work in a short space of time Tim. At that rate I reckon you could make it to the American Speedfest at Brands in 3 weeks time
Although I had bought all the brake and fuel lines a few years ago (luckily because they are seriously more expensive now) I thought the kit included the vapour fuel line on the drivers side but it didn't so I needed to make my own. The parts were ordered on Saturday afternoon and arrived (by Royal Mail!) first thing on Sunday morning which I was seriously impressed with.
If I can keep the progress up then that on-the-road mid-July goal is possibly just the right side of difficult.
I must admit it was fairly intense. Strangely enough, there weren't too many unexpected things to be done, other than a couple of areas of pitting in the chassis that I decided to address. It would have been stupid not to have done it whilst access was good.Absolutely brilliant to see body back on Tim. It looks fairly easy and quick in the photos but It does’nt get across the obvious countless hours of work and concentration and probably frustration between each photo. Getting to the homeward straight now. Will you run and drive it for testing and snagging any issues before you paint it ? Top marks Tim
My approach here is that paint will be done after the car has been on the road for a good few months to ensure that any cracks that feel like making an appearance have the opportunity to do so before an expensive paint job goes on. There are plenty of potholes in East Sussex that will help with that. Hopefully everything will work out fine and I can go out and find someone to do a nice job - it's one thing that I would dearly like to do but modern paints need special equipment (particularly from a health perspective) and facilities which I just don't have.
Having now got the body reunited with the chassis the gantry was dismantled....

... and then work started on the rear end of the car. I need to get the wheels shot blasted and powder coated so the car will be on stands for a few weeks and thus immobile. The idea is to get as much of the rear end of the car assembled as possible, push the car right to the back of the garage, remove the wheels and whilst they are being done, complete the final assembly of the cabin and wiring looms.
However, although the chassis has had mercifully few rust spots to tackle there was one perforation in the rear crossmember that had to be put right.
The area around the hole was cleared of paint and some 'construction' lines drawn to get an accurate fix on the position of the hole (which is a threaded hole to attach the top of the spare wheel carrier).

A patch was welded on to the area to be replaced and subsequently cut through both layers with a Dremel.....

... to get a nice patch and hole that are exactly the same size and shape.

The weld and dress, drill and tap the hole...

and then paint .... Apart from the small void in the picture (that will be fixed tomorrow) I am quite pleased how this turned out - the result of a day and a half of lying on my back with welder/grinders/drills/taps etc...

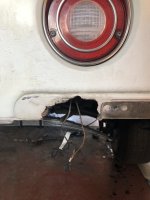
One of the mounting points for the rear number plate lamp was repaired (the hole on the left has still to be drilled) as it was badly broken on arrival... but I had assumed that the two mounting sections were symmetrical right and left. However, they don't appear to be as the number plate lamp bracket isn't quite long enough to straddle the gap so I will need to investigate this and fix as necessary.

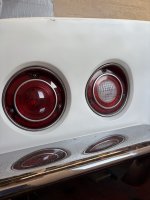
The interior of the rear lamp carriers were painted with shiny chrome paint to make them as reflective as possible. New seals and LED lamps were fitted.

The exhaust panel was brought out of hiding and sanded down to give a smooth surface and painted with a nice shiny gloss to experiment with my choice of white. Not sure why I did this now but I did. This will be refitted soon. This panel came off the car almost in two pieces and has had a lot of surgery to get it to fit right.

To be continued....
... and then work started on the rear end of the car. I need to get the wheels shot blasted and powder coated so the car will be on stands for a few weeks and thus immobile. The idea is to get as much of the rear end of the car assembled as possible, push the car right to the back of the garage, remove the wheels and whilst they are being done, complete the final assembly of the cabin and wiring looms.
However, although the chassis has had mercifully few rust spots to tackle there was one perforation in the rear crossmember that had to be put right.
The area around the hole was cleared of paint and some 'construction' lines drawn to get an accurate fix on the position of the hole (which is a threaded hole to attach the top of the spare wheel carrier).
A patch was welded on to the area to be replaced and subsequently cut through both layers with a Dremel.....
... to get a nice patch and hole that are exactly the same size and shape.
The weld and dress, drill and tap the hole...
and then paint .... Apart from the small void in the picture (that will be fixed tomorrow) I am quite pleased how this turned out - the result of a day and a half of lying on my back with welder/grinders/drills/taps etc...
One of the mounting points for the rear number plate lamp was repaired (the hole on the left has still to be drilled) as it was badly broken on arrival... but I had assumed that the two mounting sections were symmetrical right and left. However, they don't appear to be as the number plate lamp bracket isn't quite long enough to straddle the gap so I will need to investigate this and fix as necessary.
The interior of the rear lamp carriers were painted with shiny chrome paint to make them as reflective as possible. New seals and LED lamps were fitted.
The exhaust panel was brought out of hiding and sanded down to give a smooth surface and painted with a nice shiny gloss to experiment with my choice of white. Not sure why I did this now but I did. This will be refitted soon. This panel came off the car almost in two pieces and has had a lot of surgery to get it to fit right.
To be continued....
The underside of the rear now looks quite presentable - I have included some 'as delivered' pics for comparison. Sorry for the rather dark pics.
Passenger side


Central section...


Driver's side


There are (quite literally) some loose ends to be tidied up in the wiring but otherwise this end is nearly complete. I am developing a lot of respect for those people who have to re-assemble cars after they have been through a very expensive restoration and paint job - how they get it all together without scratching anything is baffling.
The spare wheel carrier assembly and radio aerial shield will be fitted tomorrow prior to putting the car on stands.
It's coming along, but a little slower than I would like - still aiming for a mid-July road trial. Fingers crossed.
Passenger side
Central section...
Driver's side
There are (quite literally) some loose ends to be tidied up in the wiring but otherwise this end is nearly complete. I am developing a lot of respect for those people who have to re-assemble cars after they have been through a very expensive restoration and paint job - how they get it all together without scratching anything is baffling.
The spare wheel carrier assembly and radio aerial shield will be fitted tomorrow prior to putting the car on stands.
It's coming along, but a little slower than I would like - still aiming for a mid-July road trial. Fingers crossed.
Attachments

I must admit it does look like the top leaf is straighter than the ones beneath it but if you look at the tips of each leaf they all curve upwards, so they are consistent in their orientation. If you look at the 'before' picture the top leaf is oriented the same as it is 'after' so it went back on the same way it came off. Perhaps this gives the spring some rising rate characteristic - presumably the top spring only comes into play on extreme spring deformation.
I just screen scraped this picture off a google search and it shows the same characteristic on the top leaf as mine. Interestingly I have also found pictures where the top leaf clearly bends down.
I think it's correct but if anybody can shed some light ....
I just screen scraped this picture off a google search and it shows the same characteristic on the top leaf as mine. Interestingly I have also found pictures where the top leaf clearly bends down.
I think it's correct but if anybody can shed some light ....


teamzr1
Supporting vendor
I think you're correct
Spring is softer until there is enough downward travel and then spring hits the tops ones than only than come into
play and causes spring to be stiffer
1963-77 is 9 leafs
1976-79, which has 10 leafs
1980-82 8 leafs, each being softer or harsher ?
If I counted correctly, yours has 9 leafs
.
Spring is softer until there is enough downward travel and then spring hits the tops ones than only than come into
play and causes spring to be stiffer
1963-77 is 9 leafs
1976-79, which has 10 leafs
1980-82 8 leafs, each being softer or harsher ?
If I counted correctly, yours has 9 leafs
.
Last edited: