You are using an out of date browser. It may not display this or other websites correctly.
You should upgrade or use an alternative browser.
You should upgrade or use an alternative browser.
72 Corvette - Restoration Updates
- Thread starter TimP
- Start date
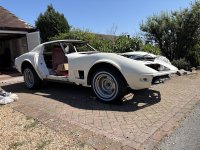
I think you are right - there's still a fair number of parts, particularly the doors which are the heavier intrusion beam doors from a '76, the fuel tank is empty and a lot of interior parts that when fitted will ratchet up the weight. This should settle the car a bit. The geometry at the rear (with the smart struts and shims) has to be set up yet and although that may not have an effect on the spring loading the rear wheels definitely have some camber adjustment before they sit right.Looking at the angle of the drive shafts - surely that angle will decrease a bit once the car is assembled, given a run-out and hopefully settle lower........I would have thought that then the lower leaves will flex and get closer with the two upper leaves?
Mr. Cricket
Committee Member
Mating the body back to the frame is a milestone indeed Tim!
Bring it to the Corvette Nationals for a decent shake-down drive as I know many members including myself would like to set eyes on it, shake your hand and buy you a drink!
I still have those parts boxed up in the garage if you still need them? Can't remember exactly what is in the box but I can check later. Electronic ignition parts and new door seals were the main items.
Sorry to be slow replying - I missed this post.
Getting the car to the Nationals will be a stretch too far to be honest - it's a 300 mile plus round trip (from Eastbourne) and I think I would be pushing my luck to attempt this with literally a few days under its tyres after a complete rebuild.
I'm still interested in the box so if you are happy to part with them I can give them a good home.")
Getting the car to the Nationals will be a stretch too far to be honest - it's a 300 mile plus round trip (from Eastbourne) and I think I would be pushing my luck to attempt this with literally a few days under its tyres after a complete rebuild.
I'm still interested in the box so if you are happy to part with them I can give them a good home.
The last part of the rear end that I needed to do (for the time being anyway) was refitting the handbrake and footbrake components. I forgot to take any photographs as I am in 'press on' mode at the moment but here's a quick before-and-after of the rear brakes...

There are a lot of new components included and the brake callipers have been completely rebuilt with 'O' ring seals, new bolts, pads etc. The calliper rebuild for the rear brakes was done quite a few years ago and they have been in a box since but seem to have faired ok. The brake lines are stainless steel and bought preformed - just needing some final tweeks to the bends to allow the fittings to align well enough to screw them together. Fitting the pads was an exercise in ingenuity but they went in ok in the end - part of the problem was that I had put a thick layer of paint where they slide in and across and there wasn't sufficient clearance so initially they didn't fit at all. After scraping paint off the affected areas everything worked a lot easier. The rebuild kit for the front callipers is still unopened and putting the front callipers back together is next on the list of things to do. The handbrake has been refitted and probably works now as well as it is ever going to. It's quite capable of holding the car on the flat.

Three of the original wheels have been stripped of their tyres and are at the powder coaters to be shot blasted and coated. I had one wheel (the most corroded one) restored 5 years ago (doesn't time fly) by the same company and it still looks good today. I have reserved a set of tyres from Vintage Tyres at the National Motor Museum at Beaulieu which I think will look good on the car when finished. Hopefully I can get these fitted next week and then the wheels can be put straight on the rear allowing me to raise the front and get the brakes completed at that end too.
It will be good to get the new wheels on the car - I'm sure they will make a difference to how the car looks (particularly with the rings and hubcaps in place) and for the first time since I have had it, the car will have tyres all the same sizes on all four wheels. The car originally came with four different size tyres which made the car sit rather oddly.
Next week I will attend to the front brakes, cabin interior trim, wiring, gauges and cables with a view to getting an engine start by the end of the month.
There are a lot of new components included and the brake callipers have been completely rebuilt with 'O' ring seals, new bolts, pads etc. The calliper rebuild for the rear brakes was done quite a few years ago and they have been in a box since but seem to have faired ok. The brake lines are stainless steel and bought preformed - just needing some final tweeks to the bends to allow the fittings to align well enough to screw them together. Fitting the pads was an exercise in ingenuity but they went in ok in the end - part of the problem was that I had put a thick layer of paint where they slide in and across and there wasn't sufficient clearance so initially they didn't fit at all. After scraping paint off the affected areas everything worked a lot easier. The rebuild kit for the front callipers is still unopened and putting the front callipers back together is next on the list of things to do. The handbrake has been refitted and probably works now as well as it is ever going to. It's quite capable of holding the car on the flat.
Three of the original wheels have been stripped of their tyres and are at the powder coaters to be shot blasted and coated. I had one wheel (the most corroded one) restored 5 years ago (doesn't time fly) by the same company and it still looks good today. I have reserved a set of tyres from Vintage Tyres at the National Motor Museum at Beaulieu which I think will look good on the car when finished. Hopefully I can get these fitted next week and then the wheels can be put straight on the rear allowing me to raise the front and get the brakes completed at that end too.
It will be good to get the new wheels on the car - I'm sure they will make a difference to how the car looks (particularly with the rings and hubcaps in place) and for the first time since I have had it, the car will have tyres all the same sizes on all four wheels. The car originally came with four different size tyres which made the car sit rather oddly.
Next week I will attend to the front brakes, cabin interior trim, wiring, gauges and cables with a view to getting an engine start by the end of the month.
Mr. Cricket
Committee Member
The last part of the rear end that I needed to do (for the time being anyway) was refitting the handbrake and footbrake components. I forgot to take any photographs as I am in 'press on' mode at the moment but here's a quick before-and-after of the rear brakes...
View attachment 30617
There are a lot of new components included and the brake callipers have been completely rebuilt with 'O' ring seals, new bolts, pads etc. The calliper rebuild for the rear brakes was done quite a few years ago and they have been in a box since but seem to have faired ok. The brake lines are stainless steel and bought preformed - just needing some final tweeks to the bends to allow the fittings to align well enough to screw them together. Fitting the pads was an exercise in ingenuity but they went in ok in the end - part of the problem was that I had put a thick layer of paint where they slide in and across and there wasn't sufficient clearance so initially they didn't fit at all. After scraping paint off the affected areas everything worked a lot easier. The rebuild kit for the front callipers is still unopened and putting the front callipers back together is next on the list of things to do. The handbrake has been refitted and probably works now as well as it is ever going to. It's quite capable of holding the car on the flat.
View attachment 30618
Three of the original wheels have been stripped of their tyres and are at the powder coaters to be shot blasted and coated. I had one wheel (the most corroded one) restored 5 years ago (doesn't time fly) by the same company and it still looks good today. I have reserved a set of tyres from Vintage Tyres at the National Motor Museum at Beaulieu which I think will look good on the car when finished. Hopefully I can get these fitted next week and then the wheels can be put straight on the rear allowing me to raise the front and get the brakes completed at that end too.
It will be good to get the new wheels on the car - I'm sure they will make a difference to how the car looks (particularly with the rings and hubcaps in place) and for the first time since I have had it, the car will have tyres all the same sizes on all four wheels. The car originally came with four different size tyres which made the car sit rather oddly.
Next week I will attend to the front brakes, cabin interior trim, wiring, gauges and cables with a view to getting an engine start by the end of the month.
Great work as usual Tim.
What size tyres did you go for? I put 225/70/15 on mine as I think the taller wall fills out the wheel well better and takes away some of the 4 x 4 look you sometimes see on C3's
I have gone for 215/70/15 on mine. I think this close to what they were originally. I have one fully refurbished wheel with a 215/70/15 on it and I think it looks ok but I could be persuaded to go for a 225 section. Presumably that doesn't cause any rubbing on the front wheels at full lock. Do you have a picture that shows how the tyres look with the body?Great work as usual Tim.
What size tyres did you go for? I put 225/70/15 on mine as I think the taller wall fills out the wheel well better and takes away some of the 4 x 4 look you sometimes see on C3's
Mr. Cricket
Committee Member
No rubbing and it is lowered by 1"I have gone for 215/70/15 on mine. I think this close to what they were originally. I have one fully refurbished wheel with a 215/70/15 on it and I think it looks ok but I could be persuaded to go for a 225 section. Presumably that doesn't cause any rubbing on the front wheels at full lock. Do you have a picture that shows how the tyres look with the body?

Mr. Cricket
Committee Member
I put the same tyres on this one but this is stock height

antijam
CCCUK Member
When I bought my '71 it was wearing 225/70R15 Goodyear Eagle GTII's. These had excellent tread but were unfortunately very old and starting to go out of shape, so......

......I changed them for 215/70R15 B F Goodrich Radial T/A's. Like you Tim I thought they were a closer fit to the original bias ply tyre rolling radius.

There was no discernible difference in driving quality, but I'm not the sort of driver that exploits the full potential of the car very often. the 225's are just noticeably fatter and do fill the wheelarch slightly more than than the 215's, but the difference is very small. There was certainly no fouling on full lock with the 225's.
......I changed them for 215/70R15 B F Goodrich Radial T/A's. Like you Tim I thought they were a closer fit to the original bias ply tyre rolling radius.
There was no discernible difference in driving quality, but I'm not the sort of driver that exploits the full potential of the car very often. the 225's are just noticeably fatter and do fill the wheelarch slightly more than than the 215's, but the difference is very small. There was certainly no fouling on full lock with the 225's.
The weather had been good so some visible progress has been made. Moving forward in the car, I fitted the astro ventilation drainage ducts that go from the vents behind the rear window to an outlet in the rear wheel well. Here's the passenger side (with the DODOMAT insulation)

The other end has a stainless steel cover that fits over the outlet of the rubber tube. I know this build has taken along time but snails taking up residence in the rear wheel well really is taking the mick......

The rear rivet is a bit difficult to get to and the rivets are pretty meaty so I used a G-clamp to make up for my puny wrist muscles.

Possibly a few of you noticed my deliberate (ahem) error in a previous post where I had attached the top reinforcement bracket to the transmission tunnel.

This was really easy with the body off but I had refurbished and fitted the old reinforcement forgetting that it didn't have the rubber gaiter attached to it. It had to be done again with the new part which with the body on was a bit more tricky....

I had the remaining 3 wheels powered coated locally and then took them down, with the previously refurbished wheel and the spare, to Vintage Tyres at Beaulieu where a set of four new tyres were fitted. The previous tyre I had bought for the car is now no longer available so I had to switch brands and buy one more than I had previously thought. Having got the brakes sorted out at all four corners the wheels were fitted and the car pushed out into the sunshine. As you see I have gone for the 215/70 R15 size with white bands. I know it's a personal choice and possibly wouldn't be everybody's idea of the correct 'look' but the white bands look good (IMO) and help break up the relatively large sidewall expanse. The blue dye is a preservative and washes off. I think they work well with the white body. I haven't tried to get the ride height correct - it's sitting high at the moment - and the camber at the rear and the front steering alignment all need to be done.

Most of the rear end is now in place. I fitted the passenger door using the trolley as the '76 doors I am using have the side-impact bars in them and are quite heavy.... The trolley presents the door at just about the right height so it's relatively easy to align the door and put the bolts in single handed. It's not quite fully aligned yet and will need a couple more spacers at the bottom to make it flush with the body. The driver's door will go on when the wiring/gauges/dash parts have all been installed and a successful engine start has been achieved.

What is nice though is that the car now sits as it should (other than the height issue I mentioned earlier). When it arrived, all four tyres were different sizes and profiles so this is the first time, apart from when it was on stands, that the car sits with the correct stance.

That's it for now. Dash re-assembly, steering column, radiator and headlights are the next things on the list of things to do
The other end has a stainless steel cover that fits over the outlet of the rubber tube. I know this build has taken along time but snails taking up residence in the rear wheel well really is taking the mick......
The rear rivet is a bit difficult to get to and the rivets are pretty meaty so I used a G-clamp to make up for my puny wrist muscles.
Possibly a few of you noticed my deliberate (ahem) error in a previous post where I had attached the top reinforcement bracket to the transmission tunnel.
This was really easy with the body off but I had refurbished and fitted the old reinforcement forgetting that it didn't have the rubber gaiter attached to it. It had to be done again with the new part which with the body on was a bit more tricky....
I had the remaining 3 wheels powered coated locally and then took them down, with the previously refurbished wheel and the spare, to Vintage Tyres at Beaulieu where a set of four new tyres were fitted. The previous tyre I had bought for the car is now no longer available so I had to switch brands and buy one more than I had previously thought. Having got the brakes sorted out at all four corners the wheels were fitted and the car pushed out into the sunshine. As you see I have gone for the 215/70 R15 size with white bands. I know it's a personal choice and possibly wouldn't be everybody's idea of the correct 'look' but the white bands look good (IMO) and help break up the relatively large sidewall expanse. The blue dye is a preservative and washes off. I think they work well with the white body. I haven't tried to get the ride height correct - it's sitting high at the moment - and the camber at the rear and the front steering alignment all need to be done.
Most of the rear end is now in place. I fitted the passenger door using the trolley as the '76 doors I am using have the side-impact bars in them and are quite heavy.... The trolley presents the door at just about the right height so it's relatively easy to align the door and put the bolts in single handed. It's not quite fully aligned yet and will need a couple more spacers at the bottom to make it flush with the body. The driver's door will go on when the wiring/gauges/dash parts have all been installed and a successful engine start has been achieved.
What is nice though is that the car now sits as it should (other than the height issue I mentioned earlier). When it arrived, all four tyres were different sizes and profiles so this is the first time, apart from when it was on stands, that the car sits with the correct stance.
That's it for now. Dash re-assembly, steering column, radiator and headlights are the next things on the list of things to do
Attachments

I agree.White wall tyres to me make the look less aggressive, they especially look good on white corvettes.
White lettered tyres give the car a more aggressive look. To me anyway
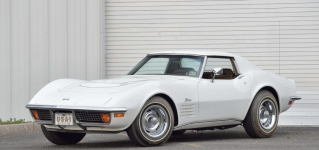
Sad as I am I found the pilot episode on YouTube. At about the 41 minute mark there is an (albeit short) car chase/music/location/direction sequence that must have had the Bullitt corporate lawyers heading for the courts.... The rest of the program is par for the course but the car looks good though.....maybe I'm biased.Here’s the white 1973 corvette used in the pilot for the TV series The Magician starring Bill Bixby.
White with Whitewall tyres for that classy look.
A 1974 model was used in the series.
View attachment 30840
The Magician Pilot
In theory summertime should be a great time to make progress on a car rebuild. Good weather and long days should help move things along nicely but it doesn't seem to work like that and regrettably things have been pretty slow. Too many distractions and other work competing for attention. That's my excuse for a rather short update, though I have done a little more than the pictures would suggest.
Every so often I get a bee in my bonnet about how something needs to be done and, just in case I don't have enough to do, I decided that my rear number plate needs to be attached without visible fasteners.
So out with some big head studs, normally used for bonding/embedding into glass fibre....glued to the number plate in the right positions.....

....and then using some grommets to pack out the existing holes, allowing a nut to be fitted at the back without putting too much pressure on the glass fibre body panels.

I also tried to fit a (good condition) used radiator that I had bought that came from a '73. Which, learning the hard way, I can tell you doesn't fit because it is an inch or so wider that a '72 equivalent. Here's a picture of me not fitting it in the car....

So I bought a new aluminium one that I haven't tried yet although it looks quite promising. It might not fit either but more of that in the next update when I have had a chance to see if it can be persuaded in....

More grief came from the headlight pods that I decided needed to be fitted before the radiator.... For some reason, and heaven knows I have tried, the pods can be made to fit the apertures nicely but they will not go up far enough to get the external bezel on.. Good for illuminating the ground just in front of the front bumper but I would rather they shone a bit further out...... Disconnecting the vacuum actuator rod makes no difference, the pods come to the end of their travel before getting high enough. I have tried every other adjustment (I think) to get max lift but not enough - they are about 5-7mm too low. It's as if the V-shaped reinforcing bracket that they bolt too (the one behind the apertures) is too thick and the pods need to be mounted closer to the outer body surface. To investigate that I removed the reinforcement, cleared out all the adhesive, bonding agent etc.. (fun, fun, fun..... not) to make sure that it sits absolutely as it should - but clamping it in place without adhesive seems to make no difference at all. Glad I removed it now.

I even tried making an adjustable (and experimental) replacement for the lever that connects the vacuum shaft to the moving headlamp assembly ......
......which allowed the pods to move to the correct height but now they sit the same 5-7mm proud of the deck when at their lowest setting.....
So having spent a few afternoons trying to make these work (and failing) I decided to do something straightforward, motivating and gratifying, even though it doesn't move the running capabilities of the car a jot.

Ah yes... putting wheel trims on..... that'll do it.
The lamp pods will be stripped on the bench and installed in a jig that is a copy of the body shape and mountings so that I can understand what's happening and experiment with me standing upright and without putting my back out trying to look at the pod operation upside down.... With a little luck, a flash of inspiration, and a little perspiration this will result in a Eureka moment shows where I have been stupid. Here's hoping....
The 3M 5200 sealant/adhesive that I am using to bond the V-reinforcement to the underside of the bodywork takes about 5 days to reach adequate strength. This will provide time for me to get to grips with the pods and check the radiator fit. I better get the positioning right though as this sealant is mighty strong (I used Tiger Seal before) and will be a b*****r to get off again if I get it wrong. Doesn't bear thinking about....
More trials and tribulations of rebuilding a Corvette in a week or two.....
Every so often I get a bee in my bonnet about how something needs to be done and, just in case I don't have enough to do, I decided that my rear number plate needs to be attached without visible fasteners.
So out with some big head studs, normally used for bonding/embedding into glass fibre....glued to the number plate in the right positions.....
....and then using some grommets to pack out the existing holes, allowing a nut to be fitted at the back without putting too much pressure on the glass fibre body panels.
I also tried to fit a (good condition) used radiator that I had bought that came from a '73. Which, learning the hard way, I can tell you doesn't fit because it is an inch or so wider that a '72 equivalent. Here's a picture of me not fitting it in the car....
So I bought a new aluminium one that I haven't tried yet although it looks quite promising. It might not fit either but more of that in the next update when I have had a chance to see if it can be persuaded in....
More grief came from the headlight pods that I decided needed to be fitted before the radiator.... For some reason, and heaven knows I have tried, the pods can be made to fit the apertures nicely but they will not go up far enough to get the external bezel on.. Good for illuminating the ground just in front of the front bumper but I would rather they shone a bit further out...... Disconnecting the vacuum actuator rod makes no difference, the pods come to the end of their travel before getting high enough. I have tried every other adjustment (I think) to get max lift but not enough - they are about 5-7mm too low. It's as if the V-shaped reinforcing bracket that they bolt too (the one behind the apertures) is too thick and the pods need to be mounted closer to the outer body surface. To investigate that I removed the reinforcement, cleared out all the adhesive, bonding agent etc.. (fun, fun, fun..... not) to make sure that it sits absolutely as it should - but clamping it in place without adhesive seems to make no difference at all. Glad I removed it now.
I even tried making an adjustable (and experimental) replacement for the lever that connects the vacuum shaft to the moving headlamp assembly ......
......which allowed the pods to move to the correct height but now they sit the same 5-7mm proud of the deck when at their lowest setting.....
So having spent a few afternoons trying to make these work (and failing) I decided to do something straightforward, motivating and gratifying, even though it doesn't move the running capabilities of the car a jot.
Ah yes... putting wheel trims on..... that'll do it.
The lamp pods will be stripped on the bench and installed in a jig that is a copy of the body shape and mountings so that I can understand what's happening and experiment with me standing upright and without putting my back out trying to look at the pod operation upside down.... With a little luck, a flash of inspiration, and a little perspiration this will result in a Eureka moment shows where I have been stupid. Here's hoping....
The 3M 5200 sealant/adhesive that I am using to bond the V-reinforcement to the underside of the bodywork takes about 5 days to reach adequate strength. This will provide time for me to get to grips with the pods and check the radiator fit. I better get the positioning right though as this sealant is mighty strong (I used Tiger Seal before) and will be a b*****r to get off again if I get it wrong. Doesn't bear thinking about....
More trials and tribulations of rebuilding a Corvette in a week or two.....