You are using an out of date browser. It may not display this or other websites correctly.
You should upgrade or use an alternative browser.
You should upgrade or use an alternative browser.
72 Corvette - Restoration Updates
- Thread starter TimP
- Start date
Many thanks. I'm looking forward to seeing how your car turns out - judging by the engine and TAs I'm sure it will be amazing.Congratulations to both you and Oneball for taking on these projects.Mine is a breeze compared to yours

")
It's good to follow in the footsteps of someone who knows what they are doing!That all looks terribly familiar!
The next task after the removal of the front fibreglass was to have a look at the bulkhead and see what needed to be done to repair the rusted areas. I really couldn't see a way of doing what I need to do without removing it so off it came., It was easier than I expected possibly because the metal bits had rusted away from the bonding materials but I'm not complaining. The ventilation gubbins on the passenger side of the bulkhead has corroded into oblivion and will need to be replaced (if parts are available) or fabricated (if not). I've set the bulkhead aside for the time being but in preparation for reinstallation, the mating surfaces will be cleaned up and any damage done in removal (not too much) will be repaired.

Removing the bulkhead revealed the birdcage behind in all its glory. Those of a nervous disposition should look away now.


Note to self: must remember to keep the T-Top seals in good condition in future.
First step on this phase is repair the passenger side windscreen lower side frame and hinge post top to give some strength to the lower windscreen surround. Then I will repair the same area on the driver side before replacing the lower windscreen frame rail. Final phase for the front section of the birdcage it to replace the lower rail on each side and rebuild the lower sections of the hinge posts. Fun, fun, fun....!
The ventilation gubbins on the passenger side of the bulkhead has corroded into oblivion and will need to be replaced (if parts are available) or fabricated (if not). I've set the bulkhead aside for the time being but in preparation for reinstallation, the mating surfaces will be cleaned up and any damage done in removal (not too much) will be repaired.Removing the bulkhead revealed the birdcage behind in all its glory. Those of a nervous disposition should look away now.
Note to self: must remember to keep the T-Top seals in good condition in future.
First step on this phase is repair the passenger side windscreen lower side frame and hinge post top to give some strength to the lower windscreen surround. Then I will repair the same area on the driver side before replacing the lower windscreen frame rail. Final phase for the front section of the birdcage it to replace the lower rail on each side and rebuild the lower sections of the hinge posts. Fun, fun, fun....!
I think I am going to be busy for the rest of summer, autumn, winter....Yikes ! That is some serious Tin Worm ! What a nightmare job for you .
I can't say that I 'knew' that it was as bad as this but I had a pretty good idea. It doesn't bother me - I wanted a long term project and must confess to enjoying solving the problems that this car presents and learning new things and skills. Not everyone's cup of tea but I constantly need something to do and keep busy - this car fits that requirement really well.Wow, I definitely got off lightly with mine. Did you have any idea how bad it was when you bought the car?
I have seen worse! This is the assembly that requires replacing/refurbishing...... The rubber flapper is in good shape although I think the actuator will need to be replaced which fortunately is available. I must admit I haven't done a lot of research on this yet other than a brief look in the Factory Assembly Manual which does show the basic shape of the metal brackets and mechanisms that have rotten away but what would be really useful would be a photo what a good example looks like. If you have one like that would help a lot.I think I got off lightly with mine!
What ventilation gubbins do you need?


antijam
CCCUK Member
Crikey! That should be enough to scare off any prospective C3 ownersRemoving the bulkhead revealed the birdcage behind in all its glory. Those of a nervous disposition should look away now.
. Had a previous owner parked it in Davey Jones' lock-up (Errr sorry - locker)?Can we assume the engine looks like this......?

Baron von Del Boy
Well-known user
I think every C3 owner here has a sinking nauseous feeling in their stomach looking at those birdcage pics.
Baron von Del Boy
Well-known user
Can we assume the engine looks like this......?
Literally been used as a boat anchor.
Crikey! That should be enough to scare off any prospective C3 owners
Can we assume the engine looks like this......?
View attachment 12688
Fortunately not
My engine is actually in quite good condition (I think). It is the original engine and has less than 60k miles on it. I'm hoping that a mild refresh, rather than a full rebuild is all that will be required.
Keeping up momentum during the rain this week I stripped the heating and aircon casings. The casings have a large gap between them so I can't imagine the heating/air con was working very well when it was last used.

The heater side casing was cracked and broken around where the blower motor is mounted and required some repairs. I forgot to take a 'pre' picture but you can see the repair areas at 8 and 11 o'clock around the blower motor hole. A few layers of glass fibre dovetailed into the existing material seems to have worked ok.

The blower motor looked a bit sorry for itself but it actually works. Excuse me whilst I sit down for a minute.

The metal panel on the air con side had a large hole where the seal flange is spot welded on. You can just see the while paper showing through in the lower part. It extended about 2 inches up from there under the flange.

New metal was shaped and welded in to fill the hole...

Which required the use of one of these... which you don't get to use very often on a Corvette.

Hole filled in it and flange repaired they looked like this..
With the flange rivetted back in place, cleaned and painted it now looks a bit healthier ..

The (almost) complete blower assembly looks like this... The rubber pipe that goes from the heater plenum to the blower motor to keep it cool has perished so I'll need a section of 18mm I/D rubber pipe to join the two.

Whilst I wait for the new metal to arrive for the birdcage I'll strip the aircon evaporator assembly on the other side and see what lurks there.
The heater side casing was cracked and broken around where the blower motor is mounted and required some repairs. I forgot to take a 'pre' picture but you can see the repair areas at 8 and 11 o'clock around the blower motor hole. A few layers of glass fibre dovetailed into the existing material seems to have worked ok.
The blower motor looked a bit sorry for itself but it actually works. Excuse me whilst I sit down for a minute.
The metal panel on the air con side had a large hole where the seal flange is spot welded on. You can just see the while paper showing through in the lower part. It extended about 2 inches up from there under the flange.
New metal was shaped and welded in to fill the hole...
Which required the use of one of these... which you don't get to use very often on a Corvette.
Hole filled in it and flange repaired they looked like this..
With the flange rivetted back in place, cleaned and painted it now looks a bit healthier ..
The (almost) complete blower assembly looks like this... The rubber pipe that goes from the heater plenum to the blower motor to keep it cool has perished so I'll need a section of 18mm I/D rubber pipe to join the two.
Whilst I wait for the new metal to arrive for the birdcage I'll strip the aircon evaporator assembly on the other side and see what lurks there.
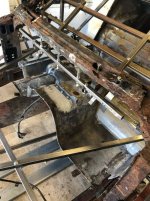
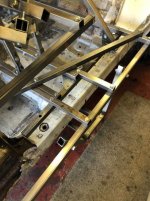
Back to the birdcage..... for the past couple of weeks I have been modifying and extending the jig/brace I built to do the top windscreen surround so that I can tackle some of the other areas. I had (rather stupidly) set up the brace to rest on the chassis through the holes in the longitudinal birdcage rails. As these now need to be replaced I had to extend the transverse jig/brace so that it used the transmission crossmember bolts (removable on my chassis although its a manual) as the main support. This updated perimeter jig/brace now can be used to brace any part of the birdcage and I should be able to remove/replace/refurbish any other part (one at a time) in situ without anything moving out of alignment. It is surprisingly rigid and doesn't flex even with 2 or 3 times the weight it needs to support.

The first part to be replaced is the lower windscreen surround and I have added localised alignment points including the critical steering column captive bolts so that I can remove the lower surround and replace it with a new one without worrying too much about positioning. I will take a fairly comprehensive set of measurements as back up too. The bolt provides variable adjustment on height and fabricated a small platform with a welded on nut to provide the main support and then filled the gap between the surround (suitable covered in sellotape to act as release agent) and the platform with filler giving a precise location for the frame in three places. So long as the new part is a good copy of the original (a big 'if' I know) the new one should go on fairly easily.

The bolt provides height adjustment to ensure that the 'A' members align perfectly with the other three transverse members.


You will notice that there are 2 channels underneath the car that have the critical 3.32 inch (88 mm) width dimension of the lower longitudinal rails. These will form the basis of a fabrication to replace these rails. A lucky find on e-bay.
So the plan (I think plan F - there was a weeks worth of contemplation on the approach before I got to something final) is to remove the lower windscreen rail and then replace/refurbish/repair the passenger hinge post top area - here.

Fortunately the drivers side is in better shape (but still needs replacing). That together with the FAM and a whole bunch of pictures from the internet I will use as a repair guide. Wish me luck!
The first part to be replaced is the lower windscreen surround and I have added localised alignment points including the critical steering column captive bolts so that I can remove the lower surround and replace it with a new one without worrying too much about positioning. I will take a fairly comprehensive set of measurements as back up too. The bolt provides variable adjustment on height and fabricated a small platform with a welded on nut to provide the main support and then filled the gap between the surround (suitable covered in sellotape to act as release agent) and the platform with filler giving a precise location for the frame in three places. So long as the new part is a good copy of the original (a big 'if' I know) the new one should go on fairly easily.
The bolt provides height adjustment to ensure that the 'A' members align perfectly with the other three transverse members.
You will notice that there are 2 channels underneath the car that have the critical 3.32 inch (88 mm) width dimension of the lower longitudinal rails. These will form the basis of a fabrication to replace these rails. A lucky find on e-bay.
So the plan (I think plan F - there was a weeks worth of contemplation on the approach before I got to something final) is to remove the lower windscreen rail and then replace/refurbish/repair the passenger hinge post top area - here.
Fortunately the drivers side is in better shape (but still needs replacing). That together with the FAM and a whole bunch of pictures from the internet I will use as a repair guide. Wish me luck!
Attachments
John, Thanks! It's certainly not pretty but the good news is.....Great work as always Tim, you certainly need some luck with the birdcage it seems worse every time you post a picture.
a) it can only get better
b) I didn't try and lift the body, which was the original plan. I think I know what would have happened with a birdcage in this sort of condition.