The Las Vegas Baked C4 build.

louis_white

Well-known user
That rear hatch is a cow !! Did side windows fine but the rear !!!
I took it off in the end laid it upside down and put towels in and soaked it in thinners nothing in 2 days ended up with paint stripper and a Stanley blade !! Still bits on it but I got the log book through and wanted to drive it ! So it’s got forgotten about now lol
I had a feeling it was going to be a tuff one 😩
I’m thinking of leaving it until summer and trying the big bag technique.
 

louis_white

Well-known user
Been busy the last week with a few projects on the car. Been doing more work on the dash but I won’t bore anyone with that until complete and I can show before and after pictures.
I’ve also been attending to a lot of body work filling and sanding again I’ll upload pictures when complete.
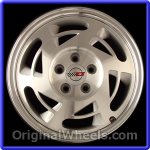
However one project I started today which has a before, during and after pictures are the wheels, well wheel only done one so far but the process will be the same for all three so for now here is the wheel progress.

Although not the era correct wheels for my car and I do plan to get the correct 1990 wheels eventually. I thought I’d brush up the ones I have as they were looking a little shabby with a bad case of lacquer peel.

8759

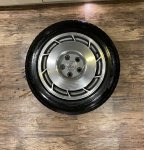
first agood clean with Megiar’s wheel cleaner. This stuff is amazing, highly recommend.
8760
8761

Then I applied some paint stripper, unfortunately not so good at all, as you can see in the picture below it barley touched it....
8762

So as usual when we starting these jobs they become bigger than we expected 🙄
I had to sand the lacquer due to
The paint stripper not working!
Wet sanding my way from 400 grit all the way up to 3000 grit, a long process and in all honesty I didn’t do as good of a job as I hoped. The tedious sanding got the better of me and I think I rushed coats. After a good polish with Autoglym’s metal polish (again great stuff) the end result was satisfactory for an afternoon and evenings grind!

End result...
8764

Before and After, not perfect and still
Some sanding swirls, but at least the lacquer peel has gone. Tomorrow I’ll do the other 3 and touch up the corvette logo’s on centre caps.
8765
 

Attachments

  • ED38EFAD-9A83-4111-A968-FEE72CE80A56.jpeg
    ED38EFAD-9A83-4111-A968-FEE72CE80A56.jpeg
    389.3 KB · Views: 3

Oneball

CCCUK Member
Looks good.
Paint stripper has gone all environmental. 29 years ago I used to strip wheels with Nitro Mors all the time. Nowadays it doesn’t do anything
 

louis_white

Well-known user
Looks good.
Paint stripper has gone all environmental. 29 years ago I used to strip wheels with Nitro Mors all the time. Nowadays it doesn’t do anything
Gutted, saw loads of YouTube videos where it stripped it straight off with ease, they were youtubers in the US though. The stuff I got did absolutely nothing 🙄 must be as you say, environmental diluting.
 

louis_white

Well-known user
Small update and small ascetic difference but a big bloody job to get the part of to repair.
Instrument cluster lens was very smoky from sun damage, I could barley see the dials.
So stripped it down removing foot well dropping steering wheel etc to finally be able to remove the instrument cluster, removed the lens made my way going over it with different grades of sand paper then finally buffed up with some polish and I can now finally see through it.
8866


8867


8870


8871
 

Attachments

  • 67CCA75D-5FE1-4055-9284-397FE1951AF1.jpeg
    67CCA75D-5FE1-4055-9284-397FE1951AF1.jpeg
    325.4 KB · Views: 1

louis_white

Well-known user
Not much of an update but just thought this was a cool find and worth posting.


Working on these old cars can be sole destroying at times and today was one of them days for me.
One of them days you spend several minuets with your face in your hand feeling your finances trickling further into the car than you originally wanted and the small goals you set your self drifting further and further away.
Then boom the car gives you a little love back, an easy fix, a sense of achievement, or in today’s case for me a little bit of history and potentially something a little rare and special that reminds you one of the reasons why you got in to this in the first place, for a piece of that American history!

so check this fossil out 😂

Thought I’d check out my spare and give it a clean. Only turns out it’s the original factory spare with factory Jack. I don’t think this thing has ever been used! Cleaned the wheel but the Jack was already spotless!


8922

8923

8924

8925

8926
 

louis_white

Well-known user
Perks of a nation lock down is time to get a few bits done on the car.
The battery terminal bolts finally arrived today but late evening, so tomorrow the old girl will get some power in her and I can finally see what other skeletons await me! 😱

today I thought I would attended to the cowl drains and gave it all a good clean out. Then removed and painted wiper arms and mesh grills. Give that whole area a refresh!
really pleased with the outcome.

How it was looking. As you can see it was in a bad state, full of that Las Vegas sand.


8964

8965

All completely blocked!!!8973

8967

Well I wasn’t expecting it to come up that clean Bonus!
8968

8969

Nick of paint for these bits....
8966

few hours later, fitted them. Looking fresh!!!
8971

8970

A little side by side comparison....

8974
 

louis_white

Well-known user
Hi all, firstly it’s been some time since I’ve posted on here so I have loads of exciting stuff to update you all on.

The car is still not running, if you all remember I was sold this car as having a spark issue! Well it turned out it wasn’t a spark issue to why the car wouldn’t start and in fact I had been sold a car that needed a lot of work to get running a whole engine rebuild from the bottom up! Among all the other skeletons the car had, I think it’s fair to say this c4 was really ready for that scrap yard 😞 but not on my watch!
Yes I’m throwing money away in most peoples eye and yes it would be cheaper to cut my losses and buy another C4 but I didn’t buy a project car to get back on the road as soon as I could, I bought one to learn how to work on cars and I think it’s safe to say this car is definitely teaching me a lot 😂

In the past few months I’ve either fixed or replaced most parts on the car, barley any of the electrics work now they all do bar the radio. The interior was in dire straits but now it almost looks like new again.
All the lights work and many more bits so the car is comming on nicely.

be prepared for the bombardment of post on my project build vegas C4! EC351A92-54E9-40E8-AF9A-C7AB08165A3E.jpeg
 

louis_white

Well-known user
In the process of removing my valve covers to paint ‘which by the way was a right ball ache of a job’ I discovered the real reason to why the car wouldn’t start!

ready for the shock…….

This was what I saw when I finally removed the valve covers.219AE616-C965-4806-9EFF-788698ADF631.jpeg

As you can imagine my sheer terror of a reality check of how big a project I had gotten my self into for my fist time! Clearly not just a spark issue as advertised

I’ve got to admit I spent the next 24/48 hours feeling sick and stressing my next move!
I then remembered I bought this car to learn and to go on a journey of knowledge, I told my self I wasn’t unlucky but lucky to go down a path that was going to teach me more about these cars then I ever imagined!
I change my mind set to having this car ready for summer 2021 and set my hart on taking my time and tearing the engine down and building my knowledge the best I can.

so firstly I got to stripping the top end. I soon discovered under all the old oil, rust and crud I had several bent and broken push rods, this was clearly signs of skeletons lurking deeper down the rabbit whole!

5BEA4D90-2147-4276-95EF-45D68AD97401.jpeg


Removing the cylinder heads a picture was starting to come together on what exactly had happened to this car. Well I’ll let the pictures do the talking….

49020AD0-3338-4810-AC18-BFF4557AEDC2.jpeg5CBF74E0-C6D3-4553-B53D-9A91E1E24CD6.jpeg

As you can imagine the constant surprise and bad news was quite a heavy blow so I decided to take some time looking at what parts of the top end could be salvaged and took on my original project of cleaning up and painting the valve covers and a few other bits.

8E566CAC-A0DD-4E6C-A462-81A94FD5C3A9.jpeg0022D10E-6DF7-4192-9108-4B84BF1D7585.jpeg9AE7F1AE-34AC-4930-ACED-6C47E86DB0D2.jpeg63AF6788-8EB8-4EBD-B79E-BDFFC72DE394.jpeg
 

louis_white

Well-known user
With my nice new shiny valve covers, new badges and pcv valves. I was inspired to see what other parts I could give a new lease of life! So I sent the heads off to be skimmed, cleaned and pressure tested.
I Started to strip down clean and paint the fuel rail, manifold, runners, plenum, lower manifold and throttle body.

0C0E656D-D0BE-4C42-82FF-123F5EAAA945.jpeg
534AD0EE-6E06-4010-A13A-C9C60195EEDF.jpeg7296C85E-DDD5-41BF-AE02-5DDB9C1176FE.jpeg69AE7A46-72BC-4CEE-A310-A65CEEB6F55F.jpeg1010E7BE-B73F-4D5B-8183-EA8052901425.jpeg2F334AEC-A7A4-463A-82B5-FCA113EE4AEB.jpegFAB740DA-7D84-49BB-BDEA-F9956B578A78.jpegA2D68A32-B267-443F-994E-526B9B390F56.jpeg8A843F16-3AEA-42F4-93B6-8555393B88F0.jpeg24FA566D-E6CD-426D-AC8A-914392E0B57D.jpeg
 
Top