72 Corvette - Restoration Updates

TimP

CCCUK Member
A quick update on the rear lights ...
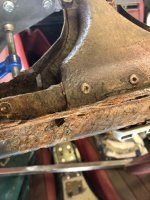
The two 'holes' for the drivers side rear light assemblies were both very badly damaged. It looked like the last person to work on this area removed the lights used a hammer without undoing the fixing nuts so some repair work was necessary.

The four rear light base units were cleaned up and painted.
Body drv rear qtr 4.JPG
I forgot to take a picture of the damage but a good portion of the rear surface that the light base butts up to was missing - most of what you can see that is grey on the back surface is new material. Three layers of glass fibre were used to patch the damaged area.... and the two mounting holes and the centre keyhole shaped err... hole was cut out with a multitool after carefully taking a template from the passenger side.
Body drv rear qtr 2.JPG

And lastly with a rear light base for a test fit.


Body drv rear qtr 3.JPG

I think that 'Beach Sport' logo will have to go. A pity as (to my mind) its very reminiscent of the 70's/80's era and definitely in keeping with this car's Vero Beach (FLA) home in the US . A bit naff too - especially for Eastbourne.
 

Oneball

CCCUK Member
You could replace the sticker with a Boyd Coddington shirt, it’d be right at home in Eastbourne ;)
 

TimP

CCCUK Member
This post should probably have some sort of government health warning or 'X' rating so if you are easily upset by corrosion, rust, holes in the birdcage or anything like that look away now!

My original intention was to do the 'easy' stuff myself and let the professionals tackle the really tricky parts of this build. However having stripped the car to it's component pieces I have decided to go the whole hog and do the tricky bits too. So lets have a look at what I have let myself in for .....

No surprise to me at all (and probably nobody else who has been following my posts) the birdcage is seriously corroded. Here is the passenger side windscreen frame top
Pax BC-2.JPG

...and the drivers side windscreen frame top
Pax BC-3.JPG

the same from a different angle
Pax BC-4.JPG

Here is the windscreen top frame from the underneath

Pax BC-5.JPG

The passenger side lower windscreen frame area

Pax BC-6.JPG

The base of the passenger windscreen frame side rail
Pax BC-1.JPG

So having decided to take on this job the first thing I need (after a drink) is a jig or brace. It's not finished yet but you probably can get the basic gist of what I am trying to do (see pics below). The basic aim is to provide some rigidity to the somewhat fragile parts of the windscreen frame that are going to be repaired or replaced.

Birdcage brace 2.JPG
Most of the clamps will be removed when the alignment is all confirmed and the bolts/welds are completed. It's already pretty rigid but I will add some braces in the appropriate places just to make sure. The brace/frame will also be attached to door mounts on the A posts (which are pretty solid) to make sure that everything stays in place. You can see that the lower windscreen frame rail isn't brilliant either.

Birdcage brace 3.JPG
The articulation in the windscreen side frame provides some adjustment. The uprights have sliding collars at the movement to provide adjustment in height and these will be pinned when the correct height is established.
Birdcage brace 4.JPG
Once the frame is complete and fully bolted down I will take a set of key measurements (belt and braces) so that these can be checked prior to spot welding everything back together. I have most of the replacement parts that I need and will start next week with the windscreen top frame.


.
 

Attachments

  • Pax BC-7.JPG
    Pax BC-7.JPG
    64.7 KB · Views: 5

Oneball

CCCUK Member
Blimey that’s rusty. I found when I did mine the moment I cut the t bar off, the screen moved away from the rear. Take plenty of measurements.
Good luck!
 

Mad4slalom

CCCUK Member
Dont envy you that job Tim,😱 Impressed how you just take all this in your stride 👍 you are going to be one proud fella when she hits the streets😄
 

TimP

CCCUK Member
Wow Tim, you're brave!
Some would say deluded :) However nothing ventured nothing gained.....

Here is the finished brace now connected to the A post and with most of the clamps replaced with bolts or welds.

Birdcage brace 5.JPG

It is probably slightly over the top but if nothing else, it is rigid. You can probably just see plastic filler oozing out from between the windscreen side pillars and the brace. This is to fill the irregular space between the straight square tube and the curved pillar. I can now put clamps on the pillars to stop them moving upwards away from the brace without risk of distorting or damaging the pillars. Don't worry - there is a layer of cling film between the pillar and the filler, and the filler and the brace so that it all comes apart again when I want it to!


Birdcage brace 6.JPG
Those good at spot the ball competitions (remember those?) will have noticed that I removed the steering column which was till in situ in the last set of pics. I thought I could get away with leaving it in place but not so. However this was quite straightforward and I could use the brace to support it whilst I maneuvered it through the bulkhead.

Birdcage brace 7.JPG.

I will take a full set of measurements tomorrow as a back up.
 

TimP

CCCUK Member
Dont envy you that job Tim,😱 Impressed how you just take all this in your stride 👍 you are going to be one proud fella when she hits the streets😄
Can't wait to start putting things back together and that's what is motivating me at the moment (as well as seeing how other member's builds are coming together). The birdcage remediation is the critical part - no point in putting anything back together until this is finished. Once this is done (and it will take a few months) things should start going back together quite quickly. That's the theory anyway.:sneaky:

Most importantly I'm still enjoying doing this stuff - project fatigue hasn't set in yet...
 

johng

CCCUK Member
I don't think project fatigue does set in whilst you can see that you are making improvements and have some confidence that you will eventually complete the job.
 

Corvette

Well-known user
Good evening Tim, I’ve been awol for a while and haven’t seen your thread. Good to see you are taking full control of the birdcage Work. As Oneball advised measurements are essential along with angles and drawings and photos. If you need any measurements confirmed I have a 1974 t-top tub with screen out and bare so pics and measurements are easy for me to send you. Screen frame is razor sharp so close ups may help? Get that twisted wire wheel on your grinder and see what clean metal you have left and as you know the missing stuff is only mild steel, it’s just the cost of gas that adds up! You can do it.
 

TimP

CCCUK Member
Hi Frank, many thanks for your offer of pictures. That will be very helpful as a lot of my screen surround is in poor shape. I'll send a help message when I get stuck! I have taken lots of measurements and will make some templates for the angles this weekend so that I can reproduce what I have if necessary. Hopefully if the brace does it's job I should not need them but I will make/take them anyway and keep safe for reference.
 

TimP

CCCUK Member
Having finished the jig/brace, documented key measurements and taken a whole bunch of photographs the time has come to bite the bullet and do something with the window frame. It was going to need some equipment.... so out with the plastic and invested in one of these....


Birdcage brace 12.JPG

Some of these....
Birdcage brace 13.JPG
and most importantly a new set of these...
Birdcage brace 11.JPG
The plan for phase 1 is to remove and replace the windscreen top frame. After some thought I decided that the order should be ...... remove the T-Top bar connection, then the drivers side corner moulding, then the passengers side corner moulding and then when all that was done to seprate the two ends of the windscreen top frame and then remove it from the car. My belief was that the T-Top bar connection was going to be the most difficult (it was) and thus I should keep the whole frame braced as much as possible to protect it from any distortion possible.

I also wanted to remove the top frame in one piece so that it preserved all the original dimensions. There are a number of holes that need to be drilled in the replacement top frame and it will be really useful to have a baseline set of dimensions from the original item.

So one weekend later ... the top brace is separated. I did use the belt sander although I will forgive anyone who thinks I used a can opener.
Birdcage brace 8.JPG

the drivers side corner moulding was removed to reveal this ...
Birdcage brace 9.JPG
The passenger side moulding was removed...
Birdcage brace 10.JPG

leaving a pile of these...
Birdcage brace 14.JPG

Ready to be refitted with a couple of these..
Birdcage brace 15.JPG

The belt sander was terrific - £50 well spent. It really works well: very controllable, doesn't apply any pressure on the frame (like a drill would), and lets me work at a comfortable, and by that I mean slow, speed (I can do a whole bunch of damage with a grinder before I've realised it). I did buy a spot weld drill bit but haven't used it and probably won't. I got through about a dozen belts doing the above but they are cheap and easy to fit.

This week I will fully remove the top frame, clean up and make good the original parts that are to be retained and then trial fit all the new bits. I'm impressed with the new parts I purchased - they seem to be accurately made, the same gauge of material as the original (but I will take some measurements) and at first glance look like they are going to fit without too much fuss. Fingers crossed.

Having completed in a weekend what I thought would take a fortnight I rewarded myself by cleaning out the workshop. If anyone is wondering,
this is the 'after' shot.
Birdcage brace 16.JPG

Have a good week everybody!
 

TimP

CCCUK Member
The longitudinal T-Top rail will stay as it's in pretty good shape overall. It will need a bit of tidying up at the windscreen top frame end but otherwise it is good. If it all goes according to plan the top and bottom frame pieces and the lower inner corners will be replaced to give a solid frame. Phase 1 is the top frame piece and phase 2 the lower part of the screen frame. There's (a lot) more to do after that though....
 

TimP

CCCUK Member
It's been a good week down in the shed. Having spent a long time fretting about getting the angle on the new top frame correct I decided to create a couple of braces that fit underneath the top frame that use filler pads to capture the profile of the underside of the top frame. Thus (theoretically) if the new piece is placed on the pads it should already point roughly in the correct direction....
Birdcage brace 17.JPG Birdcage brace 24.JPG

Just in case the measurements, photographs and above braces weren't enough I decided to make a 'steel windscreen' that mimics the shape and angles of the windscreen at four key points. Each strip of steel touching the windscreen frame has been shaped to be flush with the frame just as the windscreen would be. It's a a lot more wieldy that using a real screen although I do have the old one (I managed to get it out without breaking it) and also a brand new one for final checks prior to finishing the welding.

Birdcage brace 18.JPGBirdcage brace 19.JPG

Having four different methods to check the correct fit I then felt reasonably confident that I could get the new one installed correctly. I then removed the top frame which - using a spot weld drill bit - didn't take long.
Birdcage brace 20.JPG
On the bench you can see just how corroded the old one is - without some careful handling would quite happily fold in two. It's also about half the weight of the new one.
Birdcage brace 21.JPG
The attachment point on the drivers side is quite corroded but the passenger one isn't too bad.
Birdcage brace 22.JPG Birdcage brace 23.JPG

The top 3 inches or so of the driver's side will need to be replaced but the passenger side just needed a little tlc to fill the holes and get the thin areas back to strength. Here's how it looks now.

Birdcage brace 25.JPG
.... and the same area with the new corner piece snugly trial fitted. I'll need to trim the upright part a little (as the vertical section is too long) but I will wait to do that until the new top frame is ready to be installed.
Birdcage brace 26.JPG

I hope to get the driver side frame piece refurbished over the rest of the long weekend - maybe the centre piece too (which needs quite a bit of work) if I get the time.
 

Mad4slalom

CCCUK Member
Having finished the jig/brace, documented key measurements and taken a whole bunch of photographs the time has come to bite the bullet and do something with the window frame. It was going to need some equipment.... so out with the plastic and invested in one of these....


View attachment 11013

Some of these....
View attachment 11014
and most importantly a new set of these...
View attachment 11012
The plan for phase 1 is to remove and replace the windscreen top frame. After some thought I decided that the order should be ...... remove the T-Top bar connection, then the drivers side corner moulding, then the passengers side corner moulding and then when all that was done to seprate the two ends of the windscreen top frame and then remove it from the car. My belief was that the T-Top bar connection was going to be the most difficult (it was) and thus I should keep the whole frame braced as much as possible to protect it from any distortion possible.

I also wanted to remove the top frame in one piece so that it preserved all the original dimensions. There are a number of holes that need to be drilled in the replacement top frame and it will be really useful to have a baseline set of dimensions from the original item.

So one weekend later ... the top brace is separated. I did use the belt sander although I will forgive anyone who thinks I used a can opener.
View attachment 11009

the drivers side corner moulding was removed to reveal this ...
View attachment 11010
The passenger side moulding was removed...
View attachment 11011

leaving a pile of these...
View attachment 11015

Ready to be refitted with a couple of these..
View attachment 11016

The belt sander was terrific - £50 well spent. It really works well: very controllable, doesn't apply any pressure on the frame (like a drill would), and lets me work at a comfortable, and by that I mean slow, speed (I can do a whole bunch of damage with a grinder before I've realised it). I did buy a spot weld drill bit but haven't used it and probably won't. I got through about a dozen belts doing the above but they are cheap and easy to fit.

This week I will fully remove the top frame, clean up and make good the original parts that are to be retained and then trial fit all the new bits. I'm impressed with the new parts I purchased - they seem to be accurately made, the same gauge of material as the original (but I will take some measurements) and at first glance look like they are going to fit without too much fuss. Fingers crossed.

Having completed in a weekend what I thought would take a fortnight I rewarded myself by cleaning out the workshop. If anyone is wondering,
this is the 'after' shot.
View attachment 11017

Have a good week everybody!
 
Top