72 Corvette - Restoration Updates

antijam

CCCUK Member
From the job you've been doing Tim I've no doubt the completed frame and birdcage assembly will certainly be as strong as, and probably more rigid than, the original.
A manufacturers build is always subject to the exigences of cost and time - an individual rebuild can deploy more of both. From your pictures I'm pretty sure I'd much prefer your rebuild to a 50 year old original. (y)
 

TimP

CCCUK Member
From the job you've been doing Tim I've no doubt the completed frame and birdcage assembly will certainly be as strong as, and probably more rigid than, the original.
A manufacturers build is always subject to the exigences of cost and time - an individual rebuild can deploy more of both. From your pictures I'm pretty sure I'd much prefer your rebuild to a 50 year old original. (y)
Many thanks - hope I can live up to that!
 

TimP

CCCUK Member
In my last post I think I mentioned that I had had a problem that required me to do some rework.

I had managed to get to this point (see pic) where I had welded in the passenger side hinge post in place and was attempting to fix the lower windscreen surround. As you might expect before fully welding it to the sill I had checked as many dimensions as possible to ensure that it was in the right place. Or so I thought ....
Birdcage brace 130.JPG

However, no matter how hard I tried, when I fitted the lower windscreen support that goes across the car, I could not get the distance from the top of the windscreen to the bottom to be the same on both sides - it was about 10mm out, so not even close. Much head scratching later, and I mean hours and hours of checking and rechecking dimensions, I still could not see why this should be. I also couldn't see why only one dimension was out - surely there should be another one which is wrong by the same amount in the opposite direction? Everything else matched.

Birdcage brace 130.JPG

Christmas intervened and after a short break of cold weather and warm festivities I relooked at the problem with fresh eyes and decided to measure a few things that I hadn't tried before. The first breakthrough came when I measured the angle that the windscreen has with the rest of the car on each side. Making up a quick comparison tool with two straight edges, a clamp and a spirit level I realised that the side windscreen supports were at a slightly different angle to each other. This lead to the discovery that the hinge post was also very slightly off the vertical leaning backwards.
Birdcage brace 131.JPG

Unfortunately the only resolution was to take off the hinge post, readjust the angle between the hinge post and the screen surround (the top of the windscreen surround was perfectly in position - the lower end had slipped out of its spot at some point ) and then reattach (top and bottom of the hinge post). The hinge post was carefully removed sacrificing the attachment brace at the bottom in order to preserve the post itself.

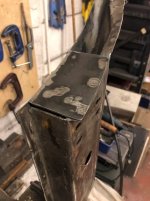
A new one hinge post lower brace was fabricated - I had kept the template - and refitted... Here checking the fit prior to assembly.

Birdcage brace 132.JPG
Hinge post sitting nicely....

Birdcage brace 136.JPG
And with boot.. To be welded on when I am absolutely sure that everything else on the bird cage is finished.
Birdcage brace 137.JPG
With hinge post clamped in place the lower surround was refitted. This time everything fitted perfectly with precise measurements left and right, top and bottom. You live and learn:rolleyes:

Birdcage brace 133.JPG
Birdcage brace 134.JPG
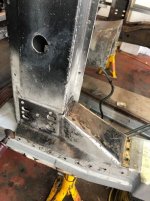
Here's a shot post welding with the firewall in place. The hinge post is now welded in position and the main pieces of the lower surround are rivetted together to keep them locked in position, prior to final fit.

Birdcage brace 135.JPG

A few things left to do but the next thing on the list is to tidy this up a bit...
Birdcage brace 138.JPG

TTFN.
 

Attachments

  • Birdcage brace 129.JPG
    Birdcage brace 129.JPG
    70.6 KB · Views: 5

TimP

CCCUK Member
Another quick update on my birdcage....

Starting here .... having removed the sill, hinge post and lower windscreen corner bracketry as a single item....
Birdcage brace 138.JPG
... which was then split into its component parts.
Birdcage brace 139.JPG
On the bench the damage to the sill was fairly obvious so I spent a few weeks cutting out and replacing the corroded metal.
Birdcage brace 140.JPG
Birdcage brace 141.JPG
Measure, cut, weld, grind and repeat ...
Birdcage brace 142.JPG
Birdcage brace 143.JPG
Many hours and many cups of tea later....
Birdcage brace 144.JPG
... out pops out a reasonably serviceable sill.....
Birdcage brace 146.JPG

Even better - it's still fits!
Birdcage brace 145.JPG

Probably about 30% of the sill is now new metal and none of it will be rusty when it goes back on. Keeping it that way will require some thought on the paint to be used...Any suggestions? I really (yes really, really) want to do this just once.

And so on to the drivers side hinge post..... and then fit it all together .... The end of the bird cage rebuild is in sight.o_O
 

TimP

CCCUK Member
Having refurbished the sill I turned my attention to the hinge post which was in slightly better condition that the passenger side equivalent but this paradoxically created more work as I had to get rid of the areas which were present but corroded to an unusable state.
Birdcage brace 139.JPG

The lower section was rebuilt as per the passenger side ...
Birdcage brace 148.JPG
The inside top was repaired using the same template as before as it was corroded in exactly the same places as on the other side - nothing if not consistent! Also shows dodgy use of Crocs in the workshop.
Birdcage brace 151.JPG
The top was repaired in the same way as before using some masking tape to make a template.
Birdcage brace 149.JPG Birdcage brace 154.JPG

Once the hinge post was completed I had a comparable set of bits as my first photograph, but in usable condition (and some new!)
Birdcage brace 155.JPG
Which just left a trial fit... Notice that the jig has been in place so long it has gone rusty....
Birdcage brace 156.JPG

And a new reinforcement boot....
Birdcage brace 157.JPG

That just leaves a few jobs to do: Make the front and rear inserts, prepare all the different pieces for welding, paint with weld thru primer where appropriate, make the rear join (rear of sill to door post) patches and modify the two lower windscreen corner pieces. You can buy these windscreen corners new for 1973 and onwards cars but the 68 to 72 pressings are different so the ones I have bought need a little work to be done to make them look and function correctly. And there are also two little brackets that go towards the rear of the hinge post that I keep on forgetting about. And I need to fit the seat belt guide bracket. And, and, and.... the list seems to be endless but its tantalisingly close to being all back together again.
 

Attachments

  • Birdcage brace 152.JPG
    Birdcage brace 152.JPG
    49.5 KB · Views: 2

TimP

CCCUK Member
.... the list seems to be endless but its tantalisingly close to being all back together again.

'Tantalisingly close' . Hmmmm........ Wrong!

There is lots to do starting with.... the lower windscreen corners. New (pattern) versions of these parts are available for the '73 onwards cars but for '68 to '72 they are different presumably because of the wiper door changes that occurred for 73. The '72 part has one additional raised area (that fits under the lower windscreen assembly and a different shaped curve that supports the windscreen in the corner. Here is the '73 part..
Birdcage brace 158.JPG
... and here are the changes part way through. The smaller raised area under the lower windscreen assy is done and the first (of 4) 1.5mm shapes is being added to the original curve (although on the drivers side rather than first pic which is the passenger side equivalent)
Birdcage brace 159.JPG
Resulting ultimately, (after a lot of grinding) to a part ready to be installed, here being mocked up with the rest of the lower windscreen assy.
Birdcage brace 160.JPG

It's not quite finished. The windscreen wiper stop pad is attached to this area but this will be fitted with any additional grinding/shaping later when I know exactly where it needs to go and what angles it should be mounted at. Below is the old one in what is left of the original lower corner.
Birdcage brace 161.JPG

Here is the same area (although both sides have now been done) in a trial fit. One of many....! You can also see the steering column mount casting hanging from the lower windscreen assy. This is important as there are two both captive nuts to hold the mount on two different pieces of the assy that need to be at precisely the right distance apart.
Birdcage brace 162.JPG
This casting is a heavy thing, to the point that it actually distorts the frame when clamped together. So to avoid any problems related to this I made a small fixture to replicate the shape (there is a kink in it) and hole distance of the mount.
Birdcage brace 163.JPG
I have had before to modify some of the new sheet metal parts that didn't quite fit properly (upper windscreen corners) . The lower windscreen corner and the lower windscreen surround also needed a mod because they didn't quite fit together properly - when clamped together there was about a 2-3mm gap.
Birdcage brace 164.JPG
This is a critical area for strength and forthe positioning of the steering column mount bolt so this needed to be right. A quick incision with the grinder and reweld gave a much better fit.
Birdcage brace 165.JPG
The brackets at the rear of the hinge posts were finally constructed and fitted. These are normally a pressing but this fabricated equivalent had to suffice.
Birdcage brace 166.JPG
At the back of the car the lower lock post brace (or transom as I tend to call it) had a perforated lower edge in the corner and a patch was cut out and welded in place. Here shown in a pre-weld trial. One of the rivets that holds the transom(?) to the floor (glass fibre on '72) can be seen at the bottom of the patch which made positioning a bit tricky.
Birdcage brace 168.JPG

To be continued .....
 

TimP

CCCUK Member
After this was done the overall lower windscreen assembly (7 parts in total) is ready to be welded in place. The bar clamped across the hinge posts is to keep them precisely the right distance apart to make sure that the holes int he hinge posts line up with the equivalent holes in the firewall.
Birdcage brace 169.JPG

Before doing the welding I decided to clear my head by doing some painting and experimenting with the Rustbuster paint discussed in earlier posts. I applied the first coat with a brush - it adhered really nicelyl and seems very tough. However it didn't flow very well and left very noticeable brush marks when it dried. Otherwise the colour and finish looked very good. It is an epoxy paint and needs to be used in a well vented area (ie not my garage).
As the weather was so good on Saturday I decided to wheel the car out on to the driveway, sanded down the original coat where I had applied it (mainly the transom) and painted the lower birdcage with the same paint with a brush and then went over the wet paint with a foam radiator roller. This dried to a really nice textured finish that I am really pleased with. Many thanks to JohnG and Oneball for the recommendations (y)(y)
Birdcage brace 170.JPG

Now I just need to do do some final checks and measurements, bite the bullet and weld the lower assembly in place. Hope to give an update on that in a week or so.
 

Oneball

CCCUK Member
Getting there!

I also found this to do the inside of box sections. Comes in black or green like the factory used

A18585CD-A050-4A78-829F-1DBD7968A96D.jpeg
 

Chuffer

CCCUK regional rep
I can also recommend Dynax S50 by Bilt Hamber . It has a top notch reputation for anti corrosion protection dynax_s50_1.jpgand natural ` creep ` qualities that gets into weld seems etc . The cans come complete with flexible tubes about 2 feet long with 360 degree spray heads to get into all internal cavity spaces . I did my C3 with it .
 

Mad4slalom

CCCUK Member
Cant wait to see this at a show somewhere. Would be interestedto know what your background is , whether a lifetime engineer or just a self taught genius!! Absolutely stunning work Tim, I have followed this restoration in awe! An honorary position of C3 restoration technical guru and admin should be bestowed upon you by the club 😁👍
 

johng

CCCUK Member
Don't think you can claim slowest, took me 3.5 years and looks like you've only been at it for 1.5 years so far and you are doing a lot of stuff I didn't need to (thank god).
 
Top