72 Corvette - Restoration Updates

TimP

CCCUK Member
My background is a degree in Mech Eng from Brighton Poly but never really did any proper engineering work. Moved into Data Processing (as we used to call IT) fairly quickly in my first job and carried on from there. Definitely not in the genius category although I do have the luxury (being retired) of having lots of time on my hands which helps a lot. Very kind of you to say so but I know (I've read their posts!) there are many more technically knowledgeable people than me on this forum but I am going to claim to be pretty familiar with TSX 529K by the time it is finished.:)
 

TimP

CCCUK Member
Don't think you can claim slowest, took me 3.5 years and looks like you've only been at it for 1.5 years so far and you are doing a lot of stuff I didn't need to (thank god).
I've actually been going nearly three years now - I started before I joined the club when the car arrived at the end of July 2019 - and I'm going to need at least another year or so, so probably 5 when all is said and done. Hope there is still some petrol left when I've finished!
 

TimP

CCCUK Member
So having welded on the lower windscreen surround, corner pieces and related braces I applied a liberal coat of seam sealer in the appropriate places...
Birdcage brace 174.JPG

And gave it 2 coats of Rustbusters finest epoxy paint.
Birdcage brace 171.JPG


Birdcage brace 172.JPG

Birdcage brace 173.JPG
So .... bar painting the insides of the hinge posts (which I will do later) and drilling a few holes for the firewall and windscreen trim that's it. (I think). There's some pitting on the lower part of the rear lock post brace (or transom) but I made a judgement that this is strong enough as it is. I have removed all the rust but if it bothers me that much at a later date I can replace it then as it is probably one of the few easily exposed parts of the birdcage.

I'm very pleased with the result particularly as I can now get onto the reassembly stage which I think will be the most satisfying. It has been an education doing this, I have had lots of fun (yes really) and, over the 13 months it took, I have gained some new skills but if its all the same to you I'd rather not do it again.

If anybody would like to know what it has cost to do this I will put together some numbers - I keep pretty good track of costs and I should be able to provide quite an accurate view.
 

TimP

CCCUK Member
Looks good, what’s next, bulkhead?
Thanks! Yes indeed. Bulkhead and all the otherglassfibre pieces that cover the birdcage. Then the big front moulding. This will be prepared for installation then put to one side whilst I will remove the entire body, then inspect, clean and paint the chassis, then fit new brake and fuel lines and do the engine and gearbox installation. Then stick the front moulding on. This will probably be 4-6 months work that will take me to the end of summer. It should look a bit more like a car at that point, though.
 

Mad4slalom

CCCUK Member
My background is a degree in Mech Eng from Brighton Poly but never really did any proper engineering work. Moved into Data Processing (as we used to call IT) fairly quickly in my first job and carried on from there. Definitely not in the genius category although I do have the luxury (being retired) of having lots of time on my hands which helps a lot. Very kind of you to say so but I know (I've read their posts!) there are many more technically knowledgeable people than me on this forum but I am going to claim to be pretty familiar with TSX 529K by the time it is finished.:)
Well , “Aww 165K “ cant wait to meet Him/Her ! 👍😁
 

TimP

CCCUK Member
Whilst working on the repairs to the glass fibre bits I thought I would take some time out and sort out an issue that has been bugging me for some time.

When taking off the glass fibre panels to get to the birdcage I had attempted to remove, in it's entirety, the passenger side lock post cover from the rear quarter and roof bow. This did not work well at all and I ended up with an awful mess where the bonding strip runs along the rear quarter. Rather than going further and doing more damage I decided instead to cut out a section so that I could get to the join of the birdcage sill and lock post. A bit brutal but it should end up ok. I would have preferred not to have done this but I was doing more harm than good trying to remove the whole panel so this revised approach seemed the best - well the least worst anyway - idea.
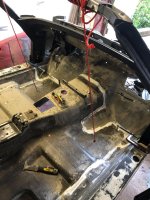
It ended up looking like this - this area was quite noticeable in my 'finished' birdcage pictures in the last post. The rear quarter is actually detached from the bottom right up to the roof bow. It looks bad in the picture but really, really ugly in the flesh, as it were.

GF-01.jpg

Thus the first task was to reattach the rear quarter with bonding agent. Another reason for trying this repair was to experiment with the bonding process - I didn't want to use it the first time on something so critical and complex as the floor and firewall.

Thus, with bonding agent mixed up I reattached the top part of the rear quarter back to the lock post cover, using plasticene to spread the load, cling film to ensure that I didn't end up gluing a large block of wood to the side of my car, and a bucket full of water to provide some weight to press the pieces together. The other end of the rope is tied to the holes in the opposite wheel. A bit Heath-Robinson but it actually worked quite well so after leaving it overnight to go off....
GF-02.JPG

... I repeated the process to glue the rest of the quarter to the lock post cover. This time with the addition of a 4mm steel strip bent to the profile of the car to provide a reasonably consistent load all along the join. Again plasticene was used to allow for any discrepancies in the curvature between the quarter and the metal strip
GF-03.JPG

After leaving it over night I ended up with a reasonably good looking repair that fitted closely together.

To fill the gash in the side I chopped out any loose glass fibre, ground down the sides of the hole produced and applied three layers of glass fibre mat and resin. After sanding that down to get a rough profile I applied a coat of glass fibre filler (Proworx in this case which works very nicely). This is a very strong filler and helps add some rigidity to the repair. I think it is known in the US as kitty hair filler.

This was then sanded down and body filler (again Proworx brand) applied. After some further iterations (3 I think) I applied a final layer of glazing putty (UPOL Dolphin glaze) which is quite fluid and gives a very nice finish. Apologies: forgot to take any pictures of these stages.

Finally a coat of high build primer was used to check the finish. Paint often shows up all sorts of imperfections - and there are some - but I think it looks Ok for the time being and will be finished off when the rest of the body is ready for full prep and paint.
GF-04.JPG

... and now back to the firewall installation....
 

TimP

CCCUK Member
Can't believe it is 2 months since my last post... You wouldn't think it would take that long to stick a firewall back on.

Firstly, there were quite a few repairs to be made to individual fibre glass pieces.. including the hinge post covers

Birdcage brace 195.JPG
the sill covers and the firewall bonding areas...

Birdcage brace 196.JPG Birdcage brace 197.JPG Birdcage brace 199.JPG Birdcage brace 200.JPG
This took a long time to get right so that every part fitted correctly to every other part it touched.

Then the underside of the seat belt guides were bonded to the floor on both sides..
Birdcage brace 202.JPG
and then the door sills were bonded in - one at a time. (which I forgot to take pictures of)
Then the lower windscreen surround had the rivet holes drilled.
Birdcage brace 201.JPG

I had to work out a method of bracing the firewall and everything else in the right position whilst the adhesive went off. This involved a minimal amount of temporary riveting in strategic areas and some rope. You can just see the shanks of the rivets in the sill covers to make sure the sills are in the right position. The glue is white in colour.
Birdcage brace 203.JPG
Once this was right the firewall was bonded into position.
Birdcage brace 204.JPG
The bonding agent I am using is 3M 5200 marine adhesive which was highly recommended on one of the US Corvette forums. It's very strong but flexible - I managed to get some glue in the wrong place when bonding one of the sill covers and it was really hard to separate the two glass fibre pieces, which was reassuring if somewhat annoying. It takes about a week to go off which leaves plenty of time to make sure it is all set up correctly. I glued each part separately leaving a week between each for the adhesive to go off - so that's at least 4 weeks of the 2 months. The adhesive is about £30 a tube so not too expensive - I used three in total. I did a number of experiments during the summer heatwave where I learned that reasonable humidity is vital for this adhesive (and any other polyurethane adhesive/sealant) to go off as it uses moisture from the air as a curing agent. Hence the wet towel underneath the firewall to provide a little extra humidity - during the near 40 degree heat of my earlier tests the glue barely cured at all.

Needless to say it's a very messy process but got there in the end.
 

Attachments

  • Birdcage brace 205.JPG
    Birdcage brace 205.JPG
    243.6 KB · Views: 6

TimP

CCCUK Member
Whilst the glue has been going off I have been able to get going on some other areas though, notably ...
... the engine cleaning and painting
Engine 1.JPG Engine 2.JPG Engine 3.JPG

.. ..the rear compartments .... (loads of work to do here as all the hinges are broken)

Interior 1.JPG

.....and the seat belt brace assembly that rivets to the bottom of the glass fibre floor which will have to be repaired because they don't see to be available new. Fair bit of work required here too....

seat belt plate asm-3.JPG

Most of the engine parts required for a minor rebuild have been purchased. I'll cover this in a separate post (in a month or so) but this is the next major area I will be working on when the firewall adhesive has gone off and the overall assembly has been painted.
 

johng

CCCUK Member
Given how thoroughly you've done everything else, I'm surprised you're not going to completely rebuild the engine :)
 

Mad4slalom

CCCUK Member
Game on....:)

Firewall now with paint..
.View attachment 19553

Hope to get engine cleaned, serviced and back in the car with the gearbox, ready for attempted 'first' start in Nov. Fingers crossed....
Brilliant tim! Another step closer. How are your bumpers? I have a front one , I also have a pair of t tops , no trim or seals but with hardware. 👍
 

TimP

CCCUK Member
Given how thoroughly you've done everything else, I'm surprised you're not going to completely rebuild the engine :)
I have changed my mind on this several times but in the end decided that as the engine is relatively low mileage and there aren’t any signs of anything amiss that I would only do a thorough clean, fit new timing chain and water pump, new seals and gaskets where appropriate, heads off, valves relapped and then all new service items. Rebuilt original distributor, new flywheel and clutch. Lots of new bolts where necessary too. Three oil filters and enough oil to do a couple of changes if and when I get a few hours on it. One of the exhaust manifolds had a big crack in it so a new one of those was found too.

I think that’s it - I am about half way through the above but as usual multi-tasking with other things at the same time, like refitting all the wiper equipment etc..
 

TimP

CCCUK Member
Brilliant tim! Another step closer. How are your bumpers? I have a front one , I also have a pair of t tops , no trim or seals but with hardware. 👍
Thanks! the front bumper that came with the car was full of holes and what steel was left was thinner than the chrome that was plated on it so if you do have a front bumper available and for sale that would be terrific. T-tops will need some therapy but basically ok.
 
Top