72 Corvette - Restoration Updates

TimP

CCCUK Member
Lots of pics then please.
Ok - here goes! Starting with the HVAC ducting....
The HVAC centre module wasn't in too bad a shape but one or two areas of surface rust needed to be dealt with.. Here it is, part way through strip down
HVAC 1.jpg

All stripped and cleaned it looks like this...
HVAC 2.jpg

Reassembled.... the 'blue' refers to the stripe on the pipe that connects to the top of the actuator, the red pipe attaches to the other side. This should help speed up final assembly if I don't have to think too much about where everything goes.
HVAC 4.jpg

The ducts joined to this module were in ok shape but the internal springs that keep the vents in place were quite rusty..
\HVAC 3.jpg

All other bits of metal bracketry or guides were removed, any rust treated, painted and then replaced with new rivets... eg in the centre module duct
HVAC 5.jpg
Then a trial assembly in the car..... the attachment holes on the lower windscreen surround for the central demister duct are missing so its being held up with tape until I can drill some holes and fix them properly in place. It will all have to come off again to get insulation and wiring in place (I think) so nothing permanent for now anyway.
HVAC 6.jpg

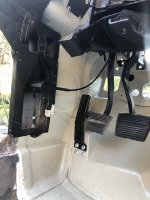
Whilst I was in this area I rebuilt the hood release mechanism that had seized up. The sheath had also split. So a new length of sheath was cut to length, greased and fitted.
Interior-2.jpg

A new grommet was installed on the firewall. This was a real challenge - you need arms like an Olympic swimmer to hold the grommet on one side of the firewall and manipulate it into place on the other.... It took about an hour to get it all tidy. Just now need to find the clamp for the hood release and then that is done. I've got a boot for the end of the sheath somewhere too...
Interior-4.jpg

The two HVAC valves in front of the door on the passenger side of the car need to be replaced/rebuilt so that's on the list for this week. As is the driver's aircon module and hoses, and the dash wiring and insulation. I also want to try and test this part of the set up prior to moving on to other areas so that's something for me to think about. More to follow.... :)
 

Attachments

  • Interior-3.jpg
    Interior-3.jpg
    180 KB · Views: 4

TimP

CCCUK Member
This week work progressed on the HVAC ... installing the lower valve on the passenger side. The spigot on the lever arm on the actuator that connects to the spring on the door had corroded away so the remains were ground off, a new hole drilled and a pin pressed into place.
HVAC 7.jpg HVAC 8.jpg
.... it needed to be tested so armed with a hand held vacuum pump .... here it is closed with no vacuum and then starting to open with a partial vacuum.
HVAC 9.jpg HVAC 10.jpg

Then the passenger side plenum valve/actuator ..... which was beyond saving so new parts were bought and a new reinforcement plate made.
HVAC 12.jpg HVAC 13.jpg

Then installing the wiper motor assembly, wiper hubs and first fit of the wiper door and mechanism (mainly to get it out of the way - it will have to come off again later)
Wiper-5.jpg

To be continued....
 

TimP

CCCUK Member
Then various reinforcement plates including the two splash shields, the passenger side seat reinforcements and the passenger side seat belt reinforcement.. By the way I put copper grease on all the threads (after cleaning out with a tap) so although it looks rusty (on the new bits) in places that's actually just me being messy. However there are some rusty areas shown (the prop shaft for example) that will be dealt with when the body comes off.
Body Reinf 1.jpg Body Reinf 2.jpg Body Reinf 7.jpg Body Reinf 6.jpg

The centre console hole for various wires and the gear lever hole reinforcement...... I think this latter area is going to need some work so have only put 4 rivets in so far to hold it in place. This car has been converted from auto to manual and I think the hole for the auto is bigger than that of the manual equivalent. There was a bit of a bodge involving an aluminium plate to cover the difference originally which I would like to do better but will wait until the gearbox returns from rebuild to work out what needs doing.Body Reinf 4.jpg Body Reinf 5.jpg

Next week I will try and work out the layout of the vacuum hoses and the control unit, hopefully rebuild the second cylinder head (first is done) and start prepping the front clip for replacement which I hope to do (weather permitting) before the end of the year. Probably some other misc jobs too. Hopefully this isn't too much detail but let me know....
 

TimP

CCCUK Member
I think the gear lever hole plate is supposed to be on the other side.
Do you mean on the underside of the transmission tunnel? There is one already in place there so I assumed that this one went on top. Maybe this was a bigger bodge than I thought!. Thanks for the tip - I will investigate further......
 

Oneball

CCCUK Member
Do you mean on the underside of the transmission tunnel? There is one already in place there so I assumed that this one went on top. Maybe this was a bigger bodge than I thought!. Thanks for the tip - I will investigate further......

That’s what I meant. But if the underside one is there then maybe that one is supposed to be inside but over the top of the rubber gaiter?????
 

TimP

CCCUK Member
Ok ....Not sure to be honest - was putting it back the way it come off, but probably means it wasn't right - there's obviously a home made plate that was being used to fill a gap which I knew was incorrect. I'll have a look through the Factory Assembly Manual and come back with an update tomorrow. If all else fails read the instructions... :) Thanks!
Having researched the FAM and the internet I can confirm that the hole in the floor is much too big for the manual and therefore to get a decent repair I will need to glass over the gap and end up with a hole of the right shape and size. A bit of a distraction but it needs to be done. The existing (rusty, but will be cleaned up) reinforcement and the new gear level boot (which comes with a new reinforcement) will provide the necessary support and dimensions. I will have to wait for the gearbox to return tomcat the exact positioning though. Plenty of other things to do in the meantime.
 

TimP

CCCUK Member
Thanks for posting this pic - I think that confirms what I need to do.

This pic shows the difference between what I have - an automatic shifter hole and reinforcement, and the reinforcement plate for the manual gear lever....

Body Reinf 8.jpg


... and what the previous owner had done to bridge the gap.

Body Reinf 9.jpg

which probably worked to a certain extent, but also possibly leaked.

Once again, thanks for posting - it helps a lot.
 

TimP

CCCUK Member
Continuing with the aircon.... the passenger side upper actuator was a real problem to fit. Further investigation showed that the connecting rod on the actuator was about 5-6mm too long and therefore tried to push out the rubber hinged vane too far when trying to fit it. The only solution was to cut off the connecting rod end with a grinder, cut out a 5mm length and then weld it back on, making sure it was facing in the right direction - you can see it is a bit lumpy in the picture. Fitting was now a lot easier... and once done the actuator pipe was connected and then tested with a vacuum pump/gauge. Even when itstalled as per the FAM - unless I'm not understanding it - it's a fairly clunky set up and the vane rubs on the firewall (even after I had trimmed the vane a bit to match the old one) when not deployed but that's exactly how the old one was so I'm assuming its correct.
HVAC 14.jpg HVAC 15.jpg HVAC 16.jpg

Most of the work last week was on the passenger side cylinder head - cleaned and painted, new exhaust valves, new seals all round, valves/seats lapped and reinstalled on the block with new head bolts. There's still a bit more to do in this area - mainly the inlet manifold and harmonic balancer then all the various brackets, mounts, pct bungs, fuel pump etc.... when it should be ready (weather permitting - it will have to be done outside) to be installed on the chassis. Then manifolds, carb, etc....
Engine Bay 4.jpg Engine Bay 5.jpg

Once the engine is in I will then be trying to get the front moulding back on so will need doors to be refitted. So starting to clean up hinges and shims....
Interior-5.jpg

The centre console is in serious need of therapy. As well as the vinyl being very brittle and cracked I think someone must have sat on it at some point because the basic shell is badly damaged and all the mount points are broken. It had been badly repaired but was failing again. So out with the glass fibre and resin....
Interior-7.jpg Interior-6.jpg Interior-8.jpg

The rear edge over which the hand brake housing fits is still to be repaired but the main crack is now structurally sound. There's quite a lot to do to get it right .... and then there's the interesting question of how to retrim it....

Fixing this console might seem a distraction from the current activity but I want to make sure that the HVAC all fits together properly as far as possible before putting the front clip back on.

This week will be more of the above - hopefully get the engine ready for installation and perhaps finish the HVAC stuff. There are some grp 'brackets' on the front clip that need to be repaired and the clip itself needs to be made ready....
 

TimP

CCCUK Member
Work this week has continued with the engine - just the inlet manifold to bolt down properly now and it should be ready to go back in the chassis.
Engine Bay 6.jpg

The two brackets that help secure the front moulding to the birdcage were repaired - these sit just below the gills on each side of the front clip. They were (admittedly by me) badly chewed up when the front clip was removed and each bracket was in two pieces, so these are now serviceable if not pretty...

Body Reinf 10.jpg

I started working on the centre console last week and the base structure is now nearly finished.. Here shown with various reinforcing brackets in place and the main console top. Once I had removed all the cosmetic trim there were a lot more cracks and breakages exposed but it's all pretty solid now.

Interior-9.jpg Interior-10.jpg Interior-12.jpg
When looking at this last pic (see below) I was wondering why GM had put a control knob in such a weird place (by the horse power rating decal at the base) but of course they didn't - this is a previous owner 'improvement', though I'm not sure what it did. It's mounted in one of the fixing holes and means I will have to add another fibreglass repair to the list off things to do as I had carefully avoided the potentiometer that is on the other side when doing the original repairs. Doh!


Interior-11.jpg

Whether I re-trim this (probably) or buy a new one (hope not - they are expensive) I will use this to help install all the wiring looms, vacuum pipes and controls. It is now structurally solid - probably more so than on an original item - and can be fixed in position on the transmission tunnel. Speaking of which....

I have started adding sound deadening on the firewall and floor. I'm using Dodo Mat sound deadening aluminium/butyl sheets that will be covered in a Dodo mat rubber insulation later on. It's gone in quite nicely but it's really time consuming as every piece needs to be trimmed to fit using a template - I can confirm that there aren't many straight lines on a C3 interior. There are another few days of work to do before this part of the interior is done and I can (re) fit the HVAC stuff.
Interior-13.jpg

Lastly I started looking at the interior wiring loom.
The bad news is that it's
a) dirty and greasy
b) the binding tape is brittle and a bit snaps off at every opportunity
c) Joy of joy it's been hacked about by the previous owner and all the new wire pieces are unlabelled and the same colour

The good news is that I have a wiring diagram and I labelled most ends when I removed it so it shouldn't be impossible to get it back to something close to original.Electrical 1.jpg

There is a 9V DC to DC converter in there which I think was used for a radar detector and a few other splices into the main loom that will need investigating.... I have bought a few LED instrument lights to try out so it will be interesting to see if these are an improvement on stock. Nevertheless I think it going to take a while to sort out..... more next week when I shall also try to get the engine back in the chassis and continue with the sound deadening, and probably a few other things that I will get distracted by. TTFN
 

Roscobbc

Moderator
You’ve done well with the console they always seem to be in a million bits
Even the replacement aftermarket centre consoles seem potentially fragile........you only need someone to lean or kneel on the console to damage it badly. Logic says to build-up the underside with some bonded-in ally strengthening formers.
 

TimP

CCCUK Member
Even the replacement aftermarket centre consoles seem potentially fragile........you only need someone to lean or kneel on the console to damage it badly. Logic says to build-up the underside with some bonded-in ally strengthening formers.
That sounds like a good idea - will give that a whirl. Thanks!
 

TimP

CCCUK Member
This week's activities have included ...
Fitting the inlet manifold and replacing the rear main seal. The old seal was really brittle so glad I did that. It's now ready to go back in the chassis where I can finalise the ancillaries build and set the valve clearances, which I haven't done yet.
Engine Bay 7.jpg

Started cleaning up the hinges - there was some heavy pitting on a couple of these so some welding was required.

Interior-14.jpg

Started sorting out the main interior wiring loom and separated the power window circuit. Using an old piece of OSB as a wiring board I mounted the loom using p-clips. The centre section goes to the switches on the centre console and the long wires left and right go to the doors.

Electrical 2.jpg
Removing the binding tape revealed that three of the wires were (I think) chewed through - it might just be rubbing wear but there seem to be some gnawing marks. Shows how important it is to check old looms on project cars - rebuilding the car and watch it burn to a crisp due to a wiring short would have been disappointing.
Electrical 3.jpg

Using the excuse of the cold weather I have stayed indoors and placed a fairly substantial order for wire, connectors, battery cable, binding tape, fuses etc.. which should hopefully allow me to move forward and get most of the interior wiring done in the next few weeks, plus a bit more.

Some of the HVAC has gone back in the car including some of the vacuum pipes. I think I said earlier that the holes in the lower window surround for the centre vent weren't there but I was wrong - can't see how I missed them - so most of it is now hooked up. All vacuum actuators have been tested and they work fine. Once the wiring loom is sorted I can finalise this area.
Interior-15.jpg

Next week I will try and finish and fit the power window loom, fit the engine back in the chassis and continue to work on the hinges to get them to a reasonable standard. I will also prep the doors for refitting to help align the front clip. Here is the passenger door which is looking a little neglected. It's going to need quite a lot of work to get them both serviceable but for the time being they will go in as is ... but hopefully a bit cleaner.

Interior-16.jpg
 

TimP

CCCUK Member
wasn’t in a fit state to run when I got it although the vendor said that they had tried (and failed) to start it. There was some evidence of this but I’m not surprised they weren’t successful - I’m fairly sure the fuel pump was clapped out and the starter cabling was really badly corroded and wouldn’t have carried much load. I’m optimistic that the basic engine is ok - there didn’t seem to be much wear and the sump was clear of shavings or glitter. Will soon find out though!
 
Top