You are using an out of date browser. It may not display this or other websites correctly.
You should upgrade or use an alternative browser.
You should upgrade or use an alternative browser.
C3 Race Car Build
- Thread starter Oneball
- Start date

teamzr1
Supporting vendor
Hi James,@teamzr1 You know a lot about C4s so I was wondering if it's possible to swap a circle tail light bumper with a square tail light one or is it difficult? Thanks.
I do not know for sure as I have never done that,
but I cannot think of any problem as long as Nassau65 mentioned not trying to put a C4 ZR-1 on as it is wider than the base C4s had
Oneball
CCCUK Member
Why are the sockets so expensive? It looks like RockAuto have them for £2.84 each. Presumably these aren't what you need.
Im imagining those are the connectors for the later type. On my 69 the wires and bulb holder are all part of the light assembly

teamzr1
Supporting vendor
I will probably run about 1/4-1/2” inch of rake front to back. I’ve not adjusted the rear yet. Will get it about right and do the geometry and then put some miles on it before doing it properly with corner weights. Both front and rear sway bars are bigger than standard. The regulations don’t allow coil overs, but I do have some custom shocks.
OK Oneball I understand as having raced in SCCA or NASA and rules for the group running in
I did to maintain their rules for the class I ran was they allowed for non-stock shocks, but I wanted an adjustable suspension system
so depending on if drag racing, autocrossing, track or Open Road Racing I could adjust as need be
I was able to lower the car, so used longer bolts to transverse springs.
Cut rear inner fenders and pushed them inwards 1 1/2 inches and cut the end or rear spring so that I could shove
in 12" wide rims and used 335/30/18 tires in front and 10" wide on fronts with 275/35/18 tires
Needed to trim ends of transverse springs to make it all fit
These shocks then gave me a lot of adjustment so when like drag racing I would remove 1 bolt of front sway bar to cancel it out
set the front shocks with far less pressure than rears and set the Nitrogen PSI firmer on rears so when launching the front of Corvette comes
up, shifting weight to back tires for better traction
Or if doing Open Road Racing such as the Big Bend out of Fort Stockton Texas the course (public road) is 60 miles south, turn around and go back 60 miles covering about 130 blind turns and 2,000 feet elevation changes.
There I can set the shock settings to reduce under steer and body roll as running speeds of 140-180 MPH you cannot afford to miss the exit of a turn
")

Then selected Penske 8100 shocks that were designed to be shorter and used bump stops to prevent bottoming out


For those who like the techie detail :
They use nitrogen in shocks as it is more stable during operation than air, especially when subjected to heat.

The goal is to keep the static rod force (the damper pressure acts to extend the damper shaft) as consistent as possible for best performance.
The nitrogen charge in gas shocks is essential to keep them working properly. If the charge is too low, the oil will break down and the damper won't perform correctly and consistently.
Adding gas pressure above the minimum required will simulate a stiffer spring rate in the suspension, as now a higher force is required to compress the shock and spring due to the added force from the gas charge acting on the cross-section area of the damper shaft. Although the shaft diameter isn't massive (5/8"), pressure acting on this will have an effect.
The Nitrogen canister knob affects compression damping only. Has a knob with 6 positions. 1 = softest, 6 = stiffest.
If bottoming out over big bumps or the car feels like it's moving around too much, then I would go to a stuffer setting.
If the car feels too harsh and lacking grip, I would go to a softer setting.
The rebound adjuster will be at the other end of the shock on the end of the chrome shaft.
This adjuster makes the rebound stiffer when you turn it clockwise.
This adjuster controls roll stiffness and will help if the car takes a few oscillations to settle down after a bump.
Again, if the car feels like it's moving around too much or a bit lazy on turn in, I will want to go to a stiffer setting.
If the car gets a little tail happy or light in the rear when on the brakes, I may want to add a little rear rebound.
If the car is under steering say on corner out on power, I may want to add some front rebound.
The 8100 Series adjuster I use offers a wide range of compression adjustment for the serious racer.
The method in which the PENSKE 8100 adjusts compression forces is simple.
When the damper is put into a compression condition, the fluid being displaced by the shaft entering the body must pass through the compression adjuster drum and the selected orifice located in the remote reservoir.
As the knob is rotated, a drum inside the compression adjuster is rotated, aligning the chosen orifice within the direct flow of oil into the remote reservoir.
The adjustment knob is numbered, from one to six. By clicking to the number one position, the adjuster is set at full soft (utilizing the largest hole in the compression adjuster drum).
The number six position on the knob denotes a full hard setting (oil flow is greatly restricted). This method of adjusting compression damping is ideal for most forms of racing, especially those having higher shaft speeds and displacements. The redesigned orifices make every adjustment have a noticeable "feel" and have increased the range of adjustment.
At higher shaft velocities, oil passes through the orifice in the compression adjuster drum and gets a point of "packing-up". Instead of packing-up and increasing the damping force, a valve in the compression adjuster housing allows for the oil to bleed off, making for more linear force curves.
Let's Go a Racing . . . . Boys !
Oneball
CCCUK Member
OK Oneball I understand as having raced in SCCA or NASA and rules for the group running in
I did to maintain their rules for the class I ran was they allowed for non-stock shocks, but I wanted an adjustable suspension system
so depending on if drag racing, autocrossing, track or Open Road Racing I could adjust as need be
I was able to lower the car, so used longer bolts to transverse springs.
Cut rear inner fenders and pushed them inwards 1 1/2 inches and cut the end or rear spring so that I could shove
in 12" wide rims and used 335/30/18 tires in front and 10" wide on fronts with 275/35/18 tires
Needed to trim ends of transverse springs to make it all fit
These shocks then gave me a lot of adjustment so when like drag racing I would remove 1 bolt of front sway bar to cancel it out
set the front shocks with far less pressure than rears and set the Nitrogen PSI firmer on rears so when launching the front of Corvette comes
up, shifting weight to back tires for better traction
Or if doing Open Road Racing such as the Big Bend out of Fort Stockton Texas the course (public road) is 60 miles south, turn around and go back 60 miles covering about 130 blind turns and 2,000 feet elevation changes.
There I can set the shock settings to reduce under steer and body roll as running speeds of 140-180 MPH you cannot afford to miss the exit of a turn
View attachment 13594
Then selected Penske 8100 shocks that were designed to be shorter and used bump stops to prevent bottoming out
View attachment 13592
View attachment 13593
For those who like the techie detail :
They use nitrogen in shocks as it is more stable during operation than air, especially when subjected to heat.
View attachment 13595
The goal is to keep the static rod force (the damper pressure acts to extend the damper shaft) as consistent as possible for best performance.
The nitrogen charge in gas shocks is essential to keep them working properly. If the charge is too low, the oil will break down and the damper won't perform correctly and consistently.
Adding gas pressure above the minimum required will simulate a stiffer spring rate in the suspension, as now a higher force is required to compress the shock and spring due to the added force from the gas charge acting on the cross-section area of the damper shaft. Although the shaft diameter isn't massive (5/8"), pressure acting on this will have an effect.
The Nitrogen canister knob affects compression damping only. Has a knob with 6 positions. 1 = softest, 6 = stiffest.
If bottoming out over big bumps or the car feels like it's moving around too much, then I would go to a stuffer setting.
If the car feels too harsh and lacking grip, I would go to a softer setting.
The rebound adjuster will be at the other end of the shock on the end of the chrome shaft.
This adjuster makes the rebound stiffer when you turn it clockwise.
This adjuster controls roll stiffness and will help if the car takes a few oscillations to settle down after a bump.
Again, if the car feels like it's moving around too much or a bit lazy on turn in, I will want to go to a stiffer setting.
If the car gets a little tail happy or light in the rear when on the brakes, I may want to add a little rear rebound.
If the car is under steering say on corner out on power, I may want to add some front rebound.
The 8100 Series adjuster I use offers a wide range of compression adjustment for the serious racer.
The method in which the PENSKE 8100 adjusts compression forces is simple.
When the damper is put into a compression condition, the fluid being displaced by the shaft entering the body must pass through the compression adjuster drum and the selected orifice located in the remote reservoir.
As the knob is rotated, a drum inside the compression adjuster is rotated, aligning the chosen orifice within the direct flow of oil into the remote reservoir.
The adjustment knob is numbered, from one to six. By clicking to the number one position, the adjuster is set at full soft (utilizing the largest hole in the compression adjuster drum).
The number six position on the knob denotes a full hard setting (oil flow is greatly restricted). This method of adjusting compression damping is ideal for most forms of racing, especially those having higher shaft speeds and displacements. The redesigned orifices make every adjustment have a noticeable "feel" and have increased the range of adjustment.
At higher shaft velocities, oil passes through the orifice in the compression adjuster drum and gets a point of "packing-up". Instead of packing-up and increasing the damping force, a valve in the compression adjuster housing allows for the oil to bleed off, making for more linear force curves.
Let's Go a Racing . . . . Boys !
On long events how did the weight change from a full to empty tank of fuel affect the handling?
teamzr1
Supporting vendor
Really not bad as having the corner weight adjusted and center of gravity set cannot really feel the difference of fuel weight loss
More about the elevation changes, the BB ORR starts at about 4,500 feet above sealevel, run 60 miles south, and it is 6,500 feet
so clearly have to do a good tune to makeup for that, density and weather
This effects engine output as losing maybe 40-50 flywheel HP at elevation
I run rear wing size, wicker & angle at about 500 pounds downforce and lots of areo changes at front end to reduce any lift above 140 MPH but can feel it above 180-200 MPH
ORR like the one in Texas is 60 miles one way
Then have to wait until all cars have done the north to south run
With that wait time there is fuel trucks to fill up and then run the south to north run so not a lot of fuel loss each direction
But ORR like the Silver State Classic out of Nevada is 90 miles long, one way, and it has a lot more straight road so
top speeds are higher and more fuel used.
James Vette
CCCUK Member
James Vette
CCCUK Member
teamzr1
Supporting vendor
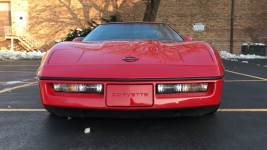
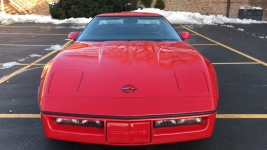
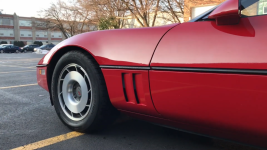
C4 angles.
Looks clean,
C4 angles.
not seeing any rock chips on front fascia or hood, windshield or outside mirrors so owner took care of it from those few photos
Headlights look flush and in alignment
C1CKS
Well-known user
Nice job

Daytona Vette
Well-known user
Tim you and the Vette have come a long way from where you started and in particular the condition of the Vette at the outset - the phrase "well done" is insufficient for the quality and detail of your workmanship - I hope you are keeping an inventory of all the parts utilised with cost, so at the end you have a figure for the components you have had to purchase.
....as a warning to the rest of us to not attempt this unless you have won the lotteryTim you and the Vette have come a long way from where you started and in particular the condition of the Vette at the outset - the phrase "well done" is insufficient for the quality and detail of your workmanship - I hope you are keeping an inventory of all the parts utilised with cost, so at the end you have a figure for the components you have had to purchase.
Oneball
CCCUK Member
Tim you and the Vette have come a long way from where you started and in particular the condition of the Vette at the outset - the phrase "well done" is insufficient for the quality and detail of your workmanship - I hope you are keeping an inventory of all the parts utilised with cost, so at the end you have a figure for the components you have had to purchase.
I stopped adding it up! Cost of a nice C2 or maybe C1. And that’s just parts as only the rollcage and engine machine work i didn’t do.
Its turned out way too expensive. I’d basically underestimated the cost of Corvette parts. It’s not a UK thing, they’re 2, 3, 4 times as much as the equivalent bit off say a Mustang in the States too. Easily the most expensive car I’ve owned including Alpina and Maserati.
Couldn’t possibly have done it with out the UK suppliers and all I’ve dealt with have been superb:
Scott @ Corvette Kingdom
Keith @ Eurovettes
Ron @ STS
Tom @ Claremont
Daytona Vette
Well-known user
More than I thought then, but that is how it always goes, when I bought my Vette in 85, it already came with £30K of receipts and that did not include everything as there were obvious changes like it had a close ratio manual and not the original auto box etc etc and then since my ownership you would think I was insane if I told you how much has gone in, but you always under estimate and if you want it, you have to pay, but I dare say if you realised at the beginning, some may not do it, but at the end of the day you have got what you want and bespoke to you, whether it is matching numbers or notI stopped adding it up! Cost of a nice C2 or maybe C1. And that’s just parts as only the rollcage and engine machine work i didn’t do.
Its turned out way too expensive. I’d basically underestimated the cost of Corvette parts. It’s not a UK thing, they’re 2, 3, 4 times as much as the equivalent bit off say a Mustang in the States too. Easily the most expensive car I’ve owned including Alpina and Maserati.
Couldn’t possibly have done it with out the UK suppliers and all I’ve dealt with have been superb:
Scott @ Corvette Kingdom
Keith @ Eurovettes
Ron @ STS
Tom @ Claremont
You should be very proud of what you have achieved Tim - go and enjoy and drive fast but carefully
PS and a nice "Thumbs up" for the suppliers - Great
johng
CCCUK Member
As it happens I do have a record of everything I bought for my refurb, but it's at the other end of the price scale than Tim's. I've got to say I found most parts to be surprisingly cheap if you are careful where and when you buy them. I didn't think anyone other than myself would be interested, but if you are I'll post the list on one of my threads rather than hijack Tim's.
Oneball
CCCUK Member
As it happens I do have a record of everything I bought for my refurb, but it's at the other end of the price scale than Tim's. I've got to say I found most parts to be surprisingly cheap if you are careful where and when you buy them. I didn't think anyone other than myself would be interested, but if you are I'll post the list on one of my threads rather than hijack Tim's.
Go on I’m interested.
James Vette
CCCUK Member
Ok fun police.James, post your irrelevant comments elsewhere and keep this thread on topic.
Roscobbc
Moderator
As JohnG says some parts can be surprisingly cheap......especially if yours is 'long term' owned. If you see or hear of something that may be relevant to your car at some point in the future and reasonably priced it makes sense to buy it and store it away. This is perhaps essential if your Vette is one of the rarer cars (i.e my '68) where the chances of sourcing in the uk are limited. If it turns out that you don't need after all simply sell it and get your money. I think the real issue when 'totting-up' what you have spent on your car is whether (if it comes to selling it) you can recoup the original purchase cost of the car and the parts and labour that have gone in to it. With long term ownership of a car the increased values of classic cars may help tip the balance for you.....but will a potential new owner be happy to pay the market value of the car PLUS the value of all the new parts etc that have gone in to it? - if the parts had not been replaced the new owner would still most likely need to buy them. Anyway I might find out the answer to that later......my '68 is going back on the Cars For Sale section again later on today. And it's expensive!