Exciting day - rebuild of 78 coupe

johng

CCCUK Member
Coming together really nicely, I used to paint cars back in the early eighties, always a thrill laying on those first colour coats after all the hours of work filling , sanding , priming , flatting and masking. Bet you cant wait to get her back 👍
Mad4, don't understand this post as I got my car back last November. Was it meant for someone else? Oneball perhaps?
 

johng

CCCUK Member
John

I feel your pain! The first time I did this was in the lock-up we used in West Malling - no power or light! But, I did buy an expensive ring spanner to deal with the nut and bolt heads of the cam. I found it juts a little easier with the spare wheel try out. But, last time I did it I put the car on ramps, so it was effectively on the ground, but in the air. That worked OK and when back on the "real" ground it was just at the point of negative camber on both sides. (I use a small spirit level on the wheel and like the "bubble" to be just touching one side of the marks)

I used a Gunson laser set to set the front toe, which worked surprisingly well, considering its a bit Heath Robinson in appearance! And I used a gauge to set caster and camber on the front, with a couple of pieces of vinyl floor tile (with grease in between) to allow the wheels to turn easier.

After I'd done the rear training arms I used a method outlined by a racing driver friend, to set up all 4 wheels, using two lengths of wood and fishing line. It took a while to set it up, and even longer for me to work out which shims I needed where, but in the end it worked a treat and the car is sooo much better!
Sounds like I'm planning to do things pretty much as you did (minus the Gunson laser, I'm going for the string method front and rear). At present the rear toe is zero degrees both sides, not sure what the benefit of a small amount of toe in is at the rear. If it's worth doing then I'll just need to move one shim over on each side.
 

Oneball

CCCUK Member
Toe in will make the back more directionally stable. It’s perhaps more critical on a C2/3 Corvette than many cars because as the rear rises under braking the trailing arms introduce toe out which increases instability. The last thing you want is the back end trying to step out under hard braking.
 

kentvette

CCCUK Member
I think the spec for the C3 is 1/4 inch toe in at the rear (total) and I've managed to get just about that. Id did take me half a day with the calculator to work out which shims needed to go where after the initial (hopeless!) assembly set-up!
Using the fishing line set-up I was pleasantly surprised to find that the front, which I'd done separately with the Gunson "machine" was pretty much spot on!
I'd read such a lot of old tosh on some of the US forums about alignment, thrust angles and finding the centre of the car etc etc that the fishing line method proved a revelation!
 

johng

CCCUK Member
Ah sorry thought it was currently in paint, must have been an old thread 👍
This is a fairly old thread, I started it when the car went off for paint. I'm now adding anything else I do to the car to this thread. I wish I had done that when I first started the restoration, so that I would now have 1 thread of everything I've done (like Oneball has)
 

Forrest Gump

CCCUK regional rep
Andy, I've been thinking about this (always a bad idea!). Are you still using the original bracket on the diff with adjustment slots in it? If so, why don't the bolts still keep coming loose?
Yes, still using the original bracket. The threaded strut rods come with a square plate that sits between the ears of the bracket holding it in a fixed position.
You can get a “smart” bracket that lowers the pivot point and is supposed to improve rear end stability by making the strut rod and driveshaft parallel. I think smart brackets are still slotted.

8A8703EE-879B-4727-B87C-62D9D85A9CA2.png
 
Last edited:

Oneball

CCCUK Member
Yes, still using the original bracket. The threaded strut rods come with a square plate that sits between the ears of the bracket holding it in a fixed position.
You can get a “smart” bracket that lowers the pivot point and is supposed to improve rear end stability by making the strut rod and driveshaft parallel. I think the slot in these smart brackets is still slotted.

View attachment 13708

Im not convinced by those ‘smart’ brackets GM spent a lot of money on suspension development and I doubt a bloke in his shed knows better. There’s this massively incorrect assumption that you don’t want camber and toe changes as the suspension moves but in reality you do.
 

Forrest Gump

CCCUK regional rep
Im not convinced by those ‘smart’ brackets GM spent a lot of money on suspension development and I doubt a bloke in his shed knows better. There’s this massively incorrect assumption that you don’t want camber and toe changes as the suspension moves but in reality you do.
True, the designers must have had their reasons for sure.
I think it is acknowledged now that the rear does have more camber change than ideal by modern standards and for modern tyres, and in comparison to most other cars.
 

Forrest Gump

CCCUK regional rep
An interesting post just appeared on CF that goes into great depth analysing C3 suspension design.

Just thought it would make a bit of light reading for you John before you get back under your car!!


johng

CCCUK Member
That's certainly an interesting read Andy. I'd like to hear what our resident race engineer has to say.
 

Oneball

CCCUK Member
I did have a read, but only really noticed the bad bits. You do want camber changes as the suspension moves so as the car rolls the tyres stay flat with the ground. There’s a balance between this and camber changes under accel or braking but it’s not 0 change, unless maybe drag racing don’t know about those.

Bump at the front; again he’s gone down the internet fallacies that you want no bump steer. As you hit a bump with say the left wheel and the suspension compresses you want the wheel to steer into the bump so you don’t dive across the road. So setting the steering arm lower to give 0 movement in the first 2” of travel like he says is going to give you a car that darts all over the road and needs constant correction.
 

johng

CCCUK Member
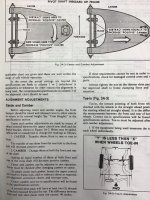
Had a go at my front camber and caster yesterday. I made up some additional shims and as per advice from our resident race car guru I've set camber to zero (although if I move the car and remeasure it can be anywhere from 0 to -0.5) and caster to the maximum possible, whilst keeping the rear shims no more than 0.4" bigger than the front shim. This gives a camber change of 2 degrees when turning the steering plus or minus 10 degrees and according to Oneball's chart equates to just under 3 degrees of caster.
This is how it looks now.
IMG_20211003_103344.jpg
 

johng

CCCUK Member
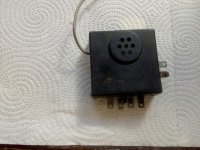
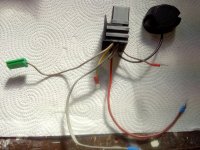
Fancied a bit of a change today, so decided to have a go at making a new ignition key and headlight warning buzzer module. Mine has never worked and I took it apart a week or so ago to discover that the only bit that was functional was the seat belt warning light coming on for a few seconds when the ignition is switched on (which was not very useful as I don't have a working switch in my seatbelt). None of the rest of the electronics or the buzzer itself worked. This is the unit which plugs into the fuse box

IMG_20211003_141908.jpg

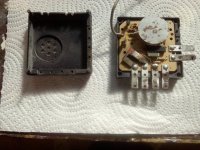
and here's wahit looks like inside

IMG_20211003_141947.jpg
I found a good Youtube video of a guy who made up a replacement unit, so I copied that although I haven't bothered with the seat belt warning, which would require another relay.
All that is needed is a couple of relays, a buzzer and a bit of wiring.
IMG_20211003_142033.jpg

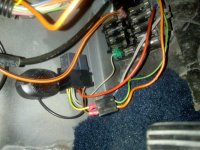
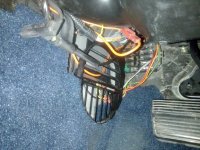
I've stuck it to wing near the fuse box behind the kick panel

IMG_20211003_145014.jpg

IMG_20211003_145355.jpg

It works well and just needs a bit of tidying up of the wiring.
 

Forrest Gump

CCCUK regional rep
Had a go at my front camber and caster yesterday. I made up some additional shims and as per advice from our resident race car guru I've set camber to zero (although if I move the car and remeasure it can be anywhere from 0 to -0.5) and caster to the maximum possible, whilst keeping the rear shims no more than 0.4" bigger than the front shim. This gives a camber change of 2 degrees when turning the steering plus or minus 10 degrees and according to Oneball's chart equates to just under 3 degrees of caster.
This is how it looks now.
Camber variation - is garage floor flat and level? Distorted wheel?
Definitely worth getting as much caster as you can to help steering feel. Where did the 0.4” figure come from?
 

johng

CCCUK Member
Garage floor is flat and level. I've only got a cheap gauge so can't read better than 0.25 degree and I suspect it might be a bit of friction as I was turning the steering putting a preload on the suspension. I don't have much room in the garage to roll the car back and forth either. I'll take it for a drive and try again to see how consistent it is.
Oneball told me about the 0.4" don't know where he got it from, but I believe him!
 
Top