Exciting day - rebuild of 78 coupe

Daytona Vette

Well-known user
So, am i right in thinking that you are only using a relay for the main beam to use brighter main beam bulbs... your dipped beam still runs directly through the headlight switch? Can the headlight switch cope with brighter than standard bulbs for dipped beam?

I dont know why im asking, just out of curiosity.. ive never driven mine at night and probably never will.
I am running upgraded Philips halogen in all four headlights which are Cibie (hopefully better) so all four on main beam and ditto on low beam, but two relays are required to protect the switch, one for each circuit
 

johng

CCCUK Member
So for those that might be interested, here's what I've spent on my car (so far). The prices from US suppliers include all import duties and all prices include postage (except for the bits from JD Corvettes which I bought whilst on holiday in the US).

parts list 1.png
parts list 2.png
 

Roscobbc

Moderator
I think that is very resonable - OK, so it doesn't factor-in your labour content.......but you've done it 'for love' so that's OK I guess.
 

johng

CCCUK Member
Yes it's just a bit above my original (and wildly optimistic) budget of £10k, but I'm happy with the cost and my wife isn't complaining too much. As you say, it was and continues to be, a labour of love.
 

James Vette

CCCUK Member
No chuffs , I have not had any more info on led h4’s other than some say the light beams are all over the place. . Have all the new switches in case it is that . But been busy bringing front of shed down to door hieght. Had a clearout ready to pull old shed down. Sold buggy and bike goes tuesday as the shed needs doors and floors which wont be cheap. The price of timber made my eyes water this week 😱. All be worth it in the end tho 👍
What a stunning view from your window!
 

Chuffer

CCCUK regional rep
Yeah Mad4 , some do say that LED beams are bit random and it would interesting to know excactly what effect they have . Might be better than the bog standard lamps though or the threat of being plunged into darkness ! It must be a real wrench parting with the buggy and the bike but needs must I guess as prices of building materials are going through the roof , especially timber . Anyone would think it didn`t grow on trees ! :LOL: But at least you will have a fab workshop / storage / man cave when it`s all finished .
 

johng

CCCUK Member
Made a start on adjusting my suspension geometry today. I'd done it roughly before I put the body back on, but I clearly had too much camber at the rear and I want to check everything else. Thought I'd start with something easy (rear camber) - took me all afternoon in the end!
First problem was I couldn't get a socket on the nut that locks the the cam bolt on the inner end of the strut rod. The rear spring is in the way. Had to get a 3/4" crows foot socket. Then I found why I had so much rear camber (3 degrees one side 3.5 the other), the nuts were not very tight. They must have worked loose as I know I torqued them when assembling the suspension.
I had to jack the rear end up to adjust the cam bolts. You are not supposed to torque up the nut until the suspension is back at ride height, so I lowered it back down to find that I hadn't adjust it far enough. After doing this a few times I realised that the cam bolts were turning everytime I lowered the car!! I decided to torque up the nuts before lowering the car, but then found that if I didn't hold the cam bolt in place it just turned as I torqued up the nut. Without a vehicle lift, there was no way I could hold the bolt and tighten the nut without taking off the wheel. So jack up the car, remove the wheel, adjust the bolt, torque the nut, put the wheel back on, lower the car and then find I was half a degree out so start again!!!!! All done now, but a little frustrating.
The reason you're supposed to torque the nut at ride height is to avoid pre-loading the rubber bush in the strut rod. Luckily I have poly bushes so this isn't a problem, but I don't know how you could do it with rubber bushes.

Now just got all the rest of the adjustments to do :(
 

Forrest Gump

CCCUK regional rep
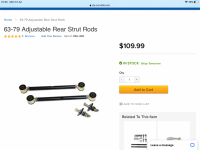
I’ve had the same struggles as you John with stock strut rods being a pita to adjust and then finding they’ve moved after driving a few miles. I ditched them and fitted threaded strut rod. They are a doddle to adjust and don’t move.

5F598F8F-3819-403F-AF44-3CB3D839B2C3.png
 

Forrest Gump

CCCUK regional rep
Santa might as well order them now!
Old thread on the topic…
 

Mad4slalom

CCCUK Member
Santa might as well order them now!
Old thread on the topic…
If you add neg camber by adjusting the strut rods does that lower it ? Or is that done by adjusting the spring bolts , ( lengthening / loosening them ?)👍will look at some adjustable strut rods 👍
 

Mad4slalom

CCCUK Member
Coming together really nicely, I used to paint cars back in the early eighties, always a thrill laying on those first colour coats after all the hours of work filling , sanding , priming , flatting and masking. Bet you cant wait to get her back 👍
 

kentvette

CCCUK Member
Made a start on adjusting my suspension geometry today. I'd done it roughly before I put the body back on, but I clearly had too much camber at the rear and I want to check everything else. Thought I'd start with something easy (rear camber) - took me all afternoon in the end!
First problem was I couldn't get a socket on the nut that locks the the cam bolt on the inner end of the strut rod. The rear spring is in the way. Had to get a 3/4" crows foot socket. Then I found why I had so much rear camber (3 degrees one side 3.5 the other), the nuts were not very tight. They must have worked loose as I know I torqued them when assembling the suspension.
I had to jack the rear end up to adjust the cam bolts. You are not supposed to torque up the nut until the suspension is back at ride height, so I lowered it back down to find that I hadn't adjust it far enough. After doing this a few times I realised that the cam bolts were turning everytime I lowered the car!! I decided to torque up the nuts before lowering the car, but then found that if I didn't hold the cam bolt in place it just turned as I torqued up the nut. Without a vehicle lift, there was no way I could hold the bolt and tighten the nut without taking off the wheel. So jack up the car, remove the wheel, adjust the bolt, torque the nut, put the wheel back on, lower the car and then find I was half a degree out so start again!!!!! All done now, but a little frustrating.
The reason you're supposed to torque the nut at ride height is to avoid pre-loading the rubber bush in the strut rod. Luckily I have poly bushes so this isn't a problem, but I don't know how you could do it with rubber bushes.

Now just got all the rest of the adjustments to do :(
John

I feel your pain! The first time I did this was in the lock-up we used in West Malling - no power or light! But, I did buy an expensive ring spanner to deal with the nut and bolt heads of the cam. I found it juts a little easier with the spare wheel try out. But, last time I did it I put the car on ramps, so it was effectively on the ground, but in the air. That worked OK and when back on the "real" ground it was just at the point of negative camber on both sides. (I use a small spirit level on the wheel and like the "bubble" to be just touching one side of the marks)

I used a Gunson laser set to set the front toe, which worked surprisingly well, considering its a bit Heath Robinson in appearance! And I used a gauge to set caster and camber on the front, with a couple of pieces of vinyl floor tile (with grease in between) to allow the wheels to turn easier.

After I'd done the rear training arms I used a method outlined by a racing driver friend, to set up all 4 wheels, using two lengths of wood and fishing line. It took a while to set it up, and even longer for me to work out which shims I needed where, but in the end it worked a treat and the car is sooo much better!
 

johng

CCCUK Member
I’ve had the same struggles as you John with stock strut rods being a pita to adjust and then finding they’ve moved after driving a few miles. I ditched them and fitted threaded strut rod. They are a doddle to adjust and don’t move.

View attachment 13695

Andy, I've been thinking about this (always a bad idea!). Are you still using the original bracket on the diff with adjustment slots in it? If so, why don't the bolts still keep coming loose?
 
Top