James Vette
CCCUK Member
I forgot what it was like to be warm outside although I didn't miss the sweating...
It only got to 14 Deg. C . If you were sweating your`e either unfit or unhealthy !! Just wait until global warming really get a grip on us .I forgot what it was like to be warm outside although I didn't miss the sweating...


Beyond stunning! Happy birthday!Treated the birthday girl to a wash, pamper and set of new plates
53 years to the day (H21), since she rolled off the St. Louis assembly line!
View attachment 16047View attachment 16048


Do you mean why charge for new sump plug ? Jusy good practice as it might have a captive O ring to give a perfect seal in the sump as the old one will be compressed and deformed . Even if not a captive O ring it still good practice and at end of day is only peanuts in the grand scheme of things .
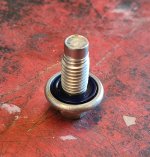
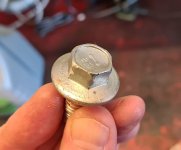
It has a captive seal . Once torqued up it will compress and possible not seal correctly if re used . Is £9.50 for a new plug worth quibling over for the sake of good engineering practice ? Spoiling a ship foe ha`puth of tar if you ask me .Well here is the sump plug in question and I can't see any good reason for Ian Allan Motors to change it at every service. Nor is replacing it required by GM as far as I can see.
Also, for a brand new sump plug it sure looks to have wear on it considering it probably does not need much torque.
The oil pan on mine is an aftermarket unit - the sump plug it came with had a rather tough appearing nylon (rather than rubber or fibre) 'gasket' which did leak after several oil changes. I simply wrap the plug threads in plumbers PTFE tape.....job done!It has a captive seal . Once torqued up it will compress and possible not seal correctly if re used . Is £9.50 for a new plug worth quibling over for the sake of good engineering practice ? Spoiling a ship foe ha`puth of tar if you ask me .
That's an interesting gizmo - who does that?
In exactly the same way as some charge you for oil in multiple 500 ml quantities rather than 4 or 5 litre plus the 500 ml can or two if needed.They charged the previous owner £9.95. Not £9.50 So call it an extra £10 on top of what they are charging for the job anyway. Nice little earner.
The Neoprene seal on this C7 sump plug should last many years. It's not something that is likely to fail and cause anything more than an occasional drop even if it did.
It's YOUR responsibility to check your oil level now and again and a small leak is not going to cause catastrophic engine damage between oil changes.
A REAL care of duty and "good engineering practice" would be putting a bit of sealant on the threads (which I have done) because you don't even need the seal if you do that.
You are completely naive if you think fitting a new bolt is anything other than just taking extra money off you.
I'd not thought of that before - and I've been using the stuff recently doing lots of plumbing work in the house. Thanks.I simply wrap the plug threads in plumbers PTFE tape.....job done!
Its good for carb and fuel line unions too!I'd not thought of that before - and I've been using the stuff recently doing lots of plumbing work in the house. Thanks.
Finally got the second T/A (sawn) off and the new one fitted but on cleaning up the brake disc prior to refitting I discover it cracked through in three places.....After some unhappy delays and the generally unwelcoming temperature in the garage, I finally have one new trailing arm built and installed. First job was to loose assemble the spindle support, caliper mount bracket and parking brake flange plate to the arm to align the studs while I punch them in....
View attachment 15864
....then fit the nuts and washers and torque up to ensure the studs are fully seated.
I strip down the arms again and fit the outer races of the spindle bearings to the spindle support then dry assemble the support, inner races, bearing spacer and the thickest shim available to the bearing assembly tool....
View attachment 15866
..... torque up the nut to 100 lbf ft and check the end float.....
View attachment 15867
I substitute a thinner shim to reduce the end float and achieve .004". Although within tolerance (.001" to .008") I lap the shim to achieve .001".
Since the assembled arm is heavy I prefer to assemble it on the car. With the arm supported by rope round the chassis I fit a length of fishing line through the split pin hole in the trailing arm bolt, feed it through the washer, frame, trailing arm bush and frame again and while lining up the arm by hand, pull the bolt into the bush. Once started I push the bolt through, fit the washer and nut and remove the fishing line.
View attachment 15868
Since I'm fitting new arms and the rusty old toe adjustment shims had to be cut off, I fit the shim pack half and half either side of the bush. I'll check toe when back on the ground.
The spindle support, caliper mount bracket and flange plate are assembled to the arm, the stud nuts torqued to 30 lbf ft and the parking brake parts fitted ( much easier without the spindle in)
View attachment 15869
The bore of the spindle support and the bearing races are loaded with grease and fitted together with the spacer and shim then the inner and outer seals fitted.
View attachment 15870
With the spindle inserted and pulled in with the installation tool.....
View attachment 15874
......the dust deflectors, drive flange and a new washer and nut are fitted and the assembly was torqued up. (I can confirm that any 80 year old lying supine on a smooth floor under the car will find applying - and reacting - 100 lb ft torque not easy) Eventually I get a satisfying click from the torque wrench then use my impact wrench to align the nut to the split pin hole and fit the pin.
View attachment 15871
With the brake rotor cleaned up and fitted I check the run-out with the rotor indexed one stud at a time. This gives values between .012" and .003" - and me a problem.
The .003" is acceptable but with the rotor in this position, the parking brake adjuster hole in the spindle is covered. The alternative of shimming out the run-out with the rotor correctly fitted is unattractive, so with a bit of careful lining up and manipulation I find the brake adjuster can be indexed with a screwdriver through the vacant rivet holes instead.
View attachment 15872
With the brake shoes adjusted, I refit the caliper, replacing the brake hose and steel caliper line at the same time.
View attachment 15873
So, all I have to do now is fit and re-assemble the other trailing arm, refit the shocks, half shafts, strut rods and road spring, adjust the handbrake, bleed the brakes, lower the car back on the ground, check and adjust the camber and toe-in and I'm back on the road!
Hopefully fitting the second arm will be a little quicker!
 . So, I've unlocked the piggy bank and have these to fit instead.....
It's an anti-corrosion coating. I queried with EBC whether it should be removed before fitting but they said fit them as they are and the black will be scrubbed off by the coating on the new pads as they bed in.What's with the black colour, carbon fibre discs on a C3!!??!!