72 Corvette - Restoration Updates

CaptainK

CCCUK Member
Not too many of us around with '68 Vettes - need to stick together :)
Indeed we do. I like the chalk and cheese of your 68 and my 68 - mine is probably the least powerful of all the 68s (is a 327/300 car), whereas yours would be the most powerful.
 
Last edited by a moderator:

TimP

CCCUK Member
Thought I would clean up the inlet manifold.

All right on top.... (except for the choke spring bolt that snapped off and will have to be repaired later)
Inlet Manifold top-1.JPG

OK underneath..
Inlet Manifold bottom-1.JPG

Let's have a look under the heat shield. Oops.
Inlet Manifold bottom-2.JPG

Will a little digging you can see the manifold
Inlet Manifold bottom-3.JPG

That's better...
Inlet Manifold bottom-4.JPG

Are they always this bad?

Now just need to degrease everything, prep the gasket surfaces, repair the choke bolt hole and then (probably when the rest of the engine has been cleaned and checked out) a coat of Chevy orange.
 

Attachments

  • Inlet Manifold bottom-5.JPG
    Inlet Manifold bottom-5.JPG
    55.6 KB · Views: 3

Corvette

Well-known user
That looks like forty years of old oil deposits. I can smell it from here. Good to see you’re keeping the cast iron manifold.👍
 

TimP

CCCUK Member
This weeks activities:

Couldn't resist painting the inlet manifold - I had originally intended to leave it until later but it was flashing over with surface rust probably due to the damp salty air down here on the south coast so I got out a brush and 4 light coats later it looks like this.....
Inlet Manifold top-painted.JPG

I also rebuilt the gear lever mechanism as it was badly corroded and badly in need of a clean and grease as you can see....
Gearshift Assy 2.JPG

Post clean and paint it looks a lot better, should last a long time - I had to remove some areas of paint that should have been left unpainted and it was reassuring difficult to get the paint off - and feels, as far as I can tell with it disconnected from the gearbox, silky smooth.
Gearshift Assy 0.JPGGearshift Assy 1.JPG

Next week I will drill and tap the choke bolt on the inlet manifold (now that the taps I wanted have arrived) and start - in the somewhat random way I tend to do things - restore the gauge cluster and have a look at the seat mechanisms which are in a poor state.
 

TimP

CCCUK Member
Ah yes, forgot about that - good point. The gearbox is sitting on the garage floor at the moment but once I have cleared the workshop of the things I have been working on this week I will take it down there (it's beneath my garage as I live on the side of a steep hill) clean it up on the outside, drain the oil and check for any obvious signs of damage, corrosion, wear etc.. In theory as the car has only done about 60k miles the gearbox should be in reasonable shape mechanically. Having said that the rest of the car is in pretty poor shape so why should this be different :) I will do some research but if anybody has any suggestion/tips on what to look for that would be really useful.

I think it was last week that we discovered my car was built as an automatic and converted to manual at some point - giving me the dilemma of how to go forward (metaphorically and literally) now that the car is in bits. So far my thinking is to keep everything manual if the gearbox is in good shape. However, if the gearbox is unserviceable (which I think is unlikely but possible) I will convert it back to automatic as this will help with my sketchy knees.
 

Oneball

CCCUK Member
It’d definitely be worth replacing the seals on the gearbox whilst it’s out. Check for play where the levers go through the side plate, again an easy fix. Check the output and Input for play. Pull the output off and check it’s not scored and again change the seal. Check the sleeve the clutch release runs on too for scoring.
 
Last edited:

TimP

CCCUK Member
Evening all!

A few jobs to report on this week.... The snapped choke spring bolt has been drilled out and tapped so I can now put the inlet manifold to one side and move on to other parts of the engine later this month.
Choke coil 1.JPG

I finally painted and fully itted the new wiper actuator to the rest of the wiper door mechanism...
Wiper actuator link 1.JPG

.... and that allowed me to start testing the overall system using the rig shown below.
Vacuum test rig 1.JPG


It's been really useful to test all the individual components off the car and so far the filter, non-return valve, wiper actuator and headlamp switch have all been found to be faulty and either replaced (filter, valve) or rebuilt (wiper actuator). I'm going to strip the headlamp switch (I think it's possible) and see what is going on there.
The actuator seal was broken in two
Wiper actuator old seal.JPG

... which would explain the vacuum leak. Front and rear seals were replaced and it now individually works perfectly. I need to set up the mechanism properly at some point - it's just screwed on randomly at the moment
Wiper actuator new seal.JPG

The biggest single job this week has been cleaning 48 years of grit, oil, grease and who knows what else off the gearbox. At some point it looks like my Corvette was driven through some freshly laid concrete too, The change links and reverse switch link are in the electrolysis bath to remove a fair amount of rust. The good news is that after a day of cleaning it now looks a lot better, the bad news is that most of that grit, grease etc. has now coated the inside of my workshop. So after a good cleanup this week, a final going over on the gearbox with degreaser and the gearbox should be ready for inspection and the fitting of new seals (and rear bushing) and gaskets - which was recommended (thanks!) last week. The links will be painted and refitted as and when the rest of the gearbox is ready but hopefully by next weekend.
Gearbox clean 1.JPG
 

Oneball

CCCUK Member
Lots of mine was caked in “concrete” I wonder if it’s actually the binding agent they use on some dirt roads in the states.
 

TimP

CCCUK Member
John, that's good to know - thanks! Hopefully I can put it together again afterwards too.... I'll have a go this week.
 

TimP

CCCUK Member
Yes - going through a number of these this morning. Some are very good - GearBoxVideo content is very helpful.
 

TimP

CCCUK Member
It's been quite a productive week and I have made some progressive on a number of (somewhat random) fronts....

First I stripped and cleaned the headlight switch as the vacuum part of the mechanism didn't seem to be working. It does seem to be working now although I can't honestly say that I did anything significant to it - perhaps a clean was all it needed. If anyone was wondering what the internals look here is the mechanism in pieces before cleaning. I also took the opportunity to clean and burnish all the electrical contacts too as they were quite tarnished.
HL Switch.JPG

All the individual pieces of the vacuum system seem to work now but it doesn't work as a connected system so either I have connected it up wrong (very possible), the pipes and connections aren't sealing properly (more than likely) or the manual vacuum pump isn't powerful enough to work the whole system. Or all of the above. More investigation necessary....

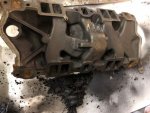
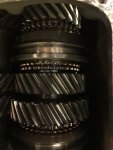
Having cleaned the gearbox casing (again) I removed the side cover and had a look inside. I realise I am a novice at this but from what I have read and watched the gearbox appears to be in good shape. The teeth aren't worn or chipped, the synchoniser rings don't appear to have a lot of wear and the selector levers don't have any appreciable wear either. The selector shafts don't have any play nor do the input and output shafts. I think I have been lucky here. Please let me know if you see something I should know about!
Muncie internals.JPG
So after a little cleaning I replaced the scissor mechanism and the 2 seals and gasket on the side plate.
Muncie scissors.JPG
Muncise select seals.JPG

This week I will remove the tail shaft housing, inspect inside and replace the tail shaft bush and seal. Hopefully that will go as well as the front half.

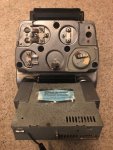
I finally got round to refurbishing the very tatty gauge cluster and vent housing from the dash centre. After cleaning it was sprayed with a matt black rattle can and then the 'volume', 'tuning' etc highlights were trimmed carefully back with a bit of 800 grade sandpaper wrapped around a large washer. A bit like doing a scratch card and yes it took a long time but I think it came out ok. Here's the vent section after paint but before doing the highlights.
Gauge vent painted.JPG

Then I got a bit of a surprise with this..... the warning light on the right hand side...
Gauge radar warning.JPG

Apologies for the poor quality picture. How very advanced for 1972..... I scoured the internet for an obscure feature on the Corvette options list but could find nothing. And then it twigged and I realised it corresponded to an odd mod to the wiring loom in this area that I had noticed on strip down. The previous owner had connected their radar detector to the seat belt warning light and made a custom fitting for it. I will order a new seat belt lens and that should bring things back to stock.

Whilst the cluster was stripped I polished the clear gauge lens - which made a surprisingly big difference - burnished all the electrical connectors and painted the rear cover which was originally quite rusty, just masking off anything that looked like a potential earthing point. New vents were fitted as the old ones crumbled on disassembly. I also noticed that the anti rattle foam strips (which also fell out on strip down) were now hard as nails so I improvised with the 'furry bit' of a self adhesive velcro strip which looks ok and certainly works well. The resulting cluster is below - quite pleased with it.Gauge cluster after.JPG.

Before packing away I will test each gauge (not sure how yet) and the radio to see if they work.

Over the weekend and next week I will remove the gearbox tail shaft housing and do what's necessary there, complete the vacuum rig work and maybe move on to the seats or perhaps some engine work. Or maybe something else entirely - probably something I trip over in the workshop.
 

Attachments

  • Gauge reverse.JPG
    Gauge reverse.JPG
    61.8 KB · Views: 8
  • Muncie internals 2.JPG
    Muncie internals 2.JPG
    43.5 KB · Views: 8
  • Muncie Select Links.JPG
    Muncie Select Links.JPG
    41.3 KB · Views: 8
Top