You are using an out of date browser. It may not display this or other websites correctly.
You should upgrade or use an alternative browser.
You should upgrade or use an alternative browser.
72 Corvette - Restoration Updates
- Thread starter TimP
- Start date
Hi Oneball, That's a great picture. Yes, I tried heat. I also made a drift out of an old screw driver shaft to be the same size as the diameter of the lower end of the pin so that I could try and shift it without spreading the lower end and making it worse. I braced the other side of the turret with a socket and extension against the wall of my workshop and after hitting it as hard as I dared to try and move it I only succeeded in bending the drift.
Oddly enough one of my best friends from school and someone I still see regularly is called Tim too. As you say, it must be age related.
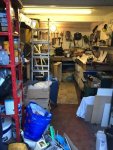
First of all I hope everybody had a good Christmas. Not too much happening on the car front at the moment but having decided to step back a little and work out a more structured approach to doing things I had half made up my mind to sort out the storage issue. Then my workshop developed a serious water leak due to all the rain/high winds we have had lately which forced me to address the issue properly, fix the water leak problem, clean up the mess (nothing damaged as everything was off the floor) and put everything back more tidily (and yes this the after picture - you should have seen it before). So off to Wickes and bought these:

which at £15 each are pretty good value and they are very robust. Each box is now labelled with contents and the space released gives me room to have a work-in-progress shelf and have my worktops back. Suitably inspired by Johng I also installed a heater which although small makes a huge difference to my desire to get into the workshop whilst it is so cold and damp.

Back to the car... I have painted the seat reinforcement plates, cleaned out the threads and found some replacement bolts.

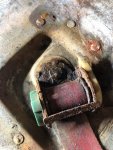
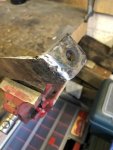
These are brush painted so not pretty but they aren't going to rust anytime soon. I mentioned in my last update the need to extract some rusted/snapped bolts from the drivers side plate and the passenger side plate was even worse. The stubs were really short requiring a different technique to get the corroded stubs out. So for these I filed down each stub end and welded a bolt to it. (see pic)

I could then use some heat and a spanner to get the stubs out. Heat wasn't enough for one stub and I was using enough force on it to start bending the plate. Quenching the still hot stub with cold water seemed to do the trick and the stub then came out really easily.
Some progress on the never-ending wiper story. I made the mistake of assuming that new parts work the same way the old parts did - not always so! As I understand it (important caveat) the original GM produced wiper safety check valves are designed to hold the vacuum from the pipe attached to the red centre port and then pass through the vacuum through to the white port if the safety switch is depressed by the wiper, triggering the actuator and opening the wiper door. The new ones release the vacuum on the red port through the vent port under normal conditions and then pass the vacuum through to the white port when the switch is depressed. So it sort of works the same but with the way I was testing the system it was never going to give the result I was expecting. I'm beginning to see why electric conversions are quite popular.
One of the other benefits of the tidy up was that I found the old check valve and although it's too badly damaged and corroded to do a comparison test (BTW there is a good YouTube video on how to do this) I could sacrifice this one to see how it works. Part of my storage issue is that I don't get rid of the old bits (even after I have bought the replacements) which occasionally is very useful. With the end cap drilled out and valve body removed it looks like this....

It's quite simple in operation and as I would like my new switch to operate like an original one I'm going to drill the new one and try and make the appropriate modifications to the valve body. Hope that will work ok - fingers crossed.
Next week I will try and clear all my somewhat random work in progress items, refit the seat reinforcement plates and start work on everything that needs to be done before the car goes off (Feb/Mar) for the bird cage work.
First of all I hope everybody had a good Christmas. Not too much happening on the car front at the moment but having decided to step back a little and work out a more structured approach to doing things I had half made up my mind to sort out the storage issue. Then my workshop developed a serious water leak due to all the rain/high winds we have had lately which forced me to address the issue properly, fix the water leak problem, clean up the mess (nothing damaged as everything was off the floor) and put everything back more tidily (and yes this the after picture - you should have seen it before). So off to Wickes and bought these:
which at £15 each are pretty good value and they are very robust. Each box is now labelled with contents and the space released gives me room to have a work-in-progress shelf and have my worktops back. Suitably inspired by Johng I also installed a heater which although small makes a huge difference to my desire to get into the workshop whilst it is so cold and damp.
Back to the car... I have painted the seat reinforcement plates, cleaned out the threads and found some replacement bolts.
These are brush painted so not pretty but they aren't going to rust anytime soon. I mentioned in my last update the need to extract some rusted/snapped bolts from the drivers side plate and the passenger side plate was even worse. The stubs were really short requiring a different technique to get the corroded stubs out. So for these I filed down each stub end and welded a bolt to it. (see pic)
I could then use some heat and a spanner to get the stubs out. Heat wasn't enough for one stub and I was using enough force on it to start bending the plate. Quenching the still hot stub with cold water seemed to do the trick and the stub then came out really easily.
Some progress on the never-ending wiper story. I made the mistake of assuming that new parts work the same way the old parts did - not always so! As I understand it (important caveat) the original GM produced wiper safety check valves are designed to hold the vacuum from the pipe attached to the red centre port and then pass through the vacuum through to the white port if the safety switch is depressed by the wiper, triggering the actuator and opening the wiper door. The new ones release the vacuum on the red port through the vent port under normal conditions and then pass the vacuum through to the white port when the switch is depressed. So it sort of works the same but with the way I was testing the system it was never going to give the result I was expecting. I'm beginning to see why electric conversions are quite popular.
One of the other benefits of the tidy up was that I found the old check valve and although it's too badly damaged and corroded to do a comparison test (BTW there is a good YouTube video on how to do this) I could sacrifice this one to see how it works. Part of my storage issue is that I don't get rid of the old bits (even after I have bought the replacements) which occasionally is very useful. With the end cap drilled out and valve body removed it looks like this....
It's quite simple in operation and as I would like my new switch to operate like an original one I'm going to drill the new one and try and make the appropriate modifications to the valve body. Hope that will work ok - fingers crossed.
Next week I will try and clear all my somewhat random work in progress items, refit the seat reinforcement plates and start work on everything that needs to be done before the car goes off (Feb/Mar) for the bird cage work.
Attachments
Dazaa
Well-known user
Evening All! It's been a week of mixed fortunes as far as the rebuild is concerned. I'm still tinkering with the vacuum system - something still isn't quite right. A set of golf tees that I can't remember why I have - I don't play golf - are very effective at blocking off individual sections of the circuit to help isolate problems. Hopefully I can get this sorted soon.
Not being someone to do one thing at a time I decided to rebuild the heater box - it's been taking up a fair bit of floor space and once rebuilt can be boxed up and stored somewhere until next required. The heater core is scrap, something I had suspected as it has been bypassed by the previous owner. A new one has been ordered but I have put the old one back in until that arrives to keep everything in order.
View attachment 8538
View attachment 8539
The heater cable (from the control unit to the heater box) has also seized and unfortunately snapped (due to corrosion) when I tried to free it up. I will try and repair this if possible otherwise a new one will be required. Amazingly, the vacuum actuator still works. The mechanism operates a lot more smoothly now that it has been cleaned and lubricated.
View attachment 8540
View attachment 8541
The rubber valves/vanes were treated with a rubber lubricant made for window seals which hopefully will keep them supple for another few years - they certainly look and feel a lot better for it.
The control unit has been cleaned, lubricated and the electrical contacts have been polished. I will paint the lens surround black sometime next week if the weather warms up a bit. A new lens is probably required but stripping it may well turn out to be a one way street as it's quite complicated and the design seems to rely on bending a metal tab to get the lens out - I never seem to get on well with those and they are quite expensive if the tab snaps off. It feels much better with a little grease on the moving parts so I will probably leave it as it is.
View attachment 8542
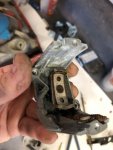
The main problem for this week was the gearbox. Removal of the tail shaft to replace the bush and seal requires a small tapered pin to be knocked out of the reverse selector lever turret. Apparently these are notoriously difficult to remove and this one is no exception. I tried everything but decided to bale out before I broke something or the pin became unrecognisable - I think it will require drilling out and needs a precision I don't think I can do at home. The tail shaft is very worn on the outside (hence the desire to inspect and replace the bushing) although there is no play in the spline. This doesn't seem to make sense to me and may indicate some other issue. Anyhow I have decided that this diagnosis and repair needs to be done by someone who knows what they are doing so it will taken to a local professional in the New Year.
Lastly, I removed the drivers seat reinforcement plate from the underside of the floor pan by drilling out the 4 rivets that hold it in place. When I removed the seat one bolt had already corroded through and one had to be sawn off (see pics) - a common situation with my car. It was going to be a lot easier to remove these broken bolts on the bench especially as the remaining stubs had to be filed down to get purchase, heated, squirted with Plus Gas etc. to get them out. Which they did - after a struggle. This plate is now having the rust removed - not a lot of rust actually and it's in remarkably good shape - and will be painted prior to refitting.
View attachment 8543
View attachment 8544
Over the next week I am going to try and plan out the next part of the rebuild and sequence the work a little better. One of the things I had underestimated was the amount of space necessary to do a build like this so I need to shuffle things around a bit so that I can keep going...
The tabs bend enough to allow you to remove the window from the heater control, and the whole assembly comes apart easily. I fitted a Vintageair kit to my 71 which involved replacing the window and converting the controls to fly by wire, not the cheapest upgrade but you bin all the old vacuum stuff and it's much, much better than the stock air box.
Thanks for your suggestion on this. It sounds easier than I thought. When the tab on the heater control unit is bent over does the module with the wheels and 'string' mechanism (which is being held in by the tab) come out as a single unit or does it come apart into many pieces at that point?
Another quiet week on the car front but I have managed to make progress on a few work-in-progress items that I need to finish.....
Get all the rust off and clean up the clutch pedal linkage:

and repair one of rear body/bumper supports which was badly corroded and needed a new nut welded on

I had removed the drivers seat previously and have been slowly working my way through the items required to get it properly reinstalled as I would like to get this done before it goes to have the birdcage repaired. The mounting and seat belt bolts at the rear have corroded too (see below) and took about half a day or so to remove them from the glass fibre floor (which prevents the use of heat).


Both reinforcements plates underneath the floor were removed - the aluminium rivets drill out very easily so it doesn't take long. The rear seat reinforcement by the transmission tunnel was beyond repairing so I made a new one..

The seat belt reel reinforcement plate on the other hand is in surprisingly good condition and after rust removal looks like this

Just two or three more rusty bolts to remove on the drivers side - I have this to look forward to next week.... I think it's going to be tricky.

I should be able to get the above parts (and a few others) all painted and put into storage next week. I will also hopefully get time to dismantle and rebuild the drivers seat frame ready for some new runners.
Get all the rust off and clean up the clutch pedal linkage:
and repair one of rear body/bumper supports which was badly corroded and needed a new nut welded on
I had removed the drivers seat previously and have been slowly working my way through the items required to get it properly reinstalled as I would like to get this done before it goes to have the birdcage repaired. The mounting and seat belt bolts at the rear have corroded too (see below) and took about half a day or so to remove them from the glass fibre floor (which prevents the use of heat).
Both reinforcements plates underneath the floor were removed - the aluminium rivets drill out very easily so it doesn't take long. The rear seat reinforcement by the transmission tunnel was beyond repairing so I made a new one..
The seat belt reel reinforcement plate on the other hand is in surprisingly good condition and after rust removal looks like this
Just two or three more rusty bolts to remove on the drivers side - I have this to look forward to next week.... I think it's going to be tricky.
I should be able to get the above parts (and a few others) all painted and put into storage next week. I will also hopefully get time to dismantle and rebuild the drivers seat frame ready for some new runners.
Attachments
Hi Johng, The birdcage is corroded in the usual places - the windscreen surround will need to be replaced and the sills will need some work. The initial survey (by someone with experience) planned for Feb/Mar should reveal the whole truth so should find out fairly soon what needs to be done.
Hi Oneball, Yes, I think you are right, the car has definitely seen a lot of water at some point. The main chassis itself is solid and the removable transmission mount, the TAs and the thinner metal structures in the area around the gas tank are all in good condition. The front crossmember had vanished from corrosion except for a small part at each end where it joined on the chassis extensions. The bottom section of the radiator support had gone with the front crossmember. However, some of the thinner pieces of sheet metal are in fairly good shape. I think that the car may have been kept in a garage without a front door so that the front end was more exposed than the back. It's from Florida so hot and humid wouldn't have helped preserve it either.
Hi Oneball, Yes, I think you are right, the car has definitely seen a lot of water at some point. The main chassis itself is solid and the removable transmission mount, the TAs and the thinner metal structures in the area around the gas tank are all in good condition. The front crossmember had vanished from corrosion except for a small part at each end where it joined on the chassis extensions. The bottom section of the radiator support had gone with the front crossmember. However, some of the thinner pieces of sheet metal are in fairly good shape. I think that the car may have been kept in a garage without a front door so that the front end was more exposed than the back. It's from Florida so hot and humid wouldn't have helped preserve it either.
Dazaa
Well-known user
Thanks for your suggestion on this. It sounds easier than I thought. When the tab on the heater control unit is bent over does the module with the wheels and 'string' mechanism (which is being held in by the tab) come out as a single unit or does it come apart into many pieces at that point?
From memory it comes out in a few pieces, but it's not hard to reassemble at all, took me about 10 minutes, just remember to get the pointer on the string in the right location in relation to the thumbwheel position
Here are a few pics which show a little bit of the ends of the cross members but I don't seem to have any pictures from underneath but I think you can see it's in a pretty crusty state...


... and the rusty rad support


The good news is they now look like this...


Thanks for the info about the heater control unit - I'll get a new window and have a go at fitting it. I think it will make a big difference to how it looks as most of the words are flaking off on the old one.
... and the rusty rad support
The good news is they now look like this...
Thanks for the info about the heater control unit - I'll get a new window and have a go at fitting it. I think it will make a big difference to how it looks as most of the words are flaking off on the old one.
Last time I provided an update I had still to remove a heavily corroded seat belt guide on the drivers side floor. That's now been done (see pic) mainly using a Dremel to cut through what was left of the the mounting bolts. Unfortunately, the forward bolt came out with some of the glass fibre body still attached to it and this will need to be repaired when the weather gets a little warmer. Now that all the rusted bits in this area are out I can prepare the floor for refitting all the refurbished/remade reinforcement plates so that I can get the drivers seat back in properly.

Another of those items I wanted to get sorted out was the speedo/rev counter. Not only was it rather vulnerable sitting in a corner of the workshop floor (in a protective wrap) it was also badly corroded and I wanted to stop that getting any worse as there are potentially some quite expensive bits in there. This week I stripped it down and worked on some of the component parts:
Firstly the trip reset cable and bracket. The reset cable had completely seized up but with a little persuasion I managed to strip out the cable from the sheath and clean it up. It now works a lot better.


The speedo casing was also corroding badly although mainly surface rust rather than anything too substantial. I have painted it although I think it would have been left unpainted at the factory. However, I would like this to remain rust free in the future. I'll just have to remember to clean paint off the earth points for the bulbs when I come to putting the loom back in.


The drivers side fresh air vent was also completely seized and needed to be rebuilt. The rivets were drilled out and the appropriate items were derusted, cleaned and painted. I had to cut the rod from the mechanism to the black knob on the front of the dash in order to get the mechanism out. Luckily, I found a bolt with the required dimensions, cut off the bold head and welded it to the remaining part of the rod that controls the mechanism. This now works fine


I also needed to rejoin one of the speedo mount points which had broken off. I superglued the broken piece back on to hold it in the correct position and then fibre glassed the join to give it some strength.

All in all a lot of work but nevertheless quite satisfying.
Time permitting, restoration plans for the weekend include the rebuild of the speedo, milometer and trip mechanism as it is also seized up (notice a theme here?). The rev counter is fortunately in much better condition and I only need to paint the back cover to get it looking right. Also the fibreglass structure that the dials mount on needs some repair. The reinforcement plates are rusty and one or two of the screw 'turrets' are a bit damaged - you can see evidence of this in the speedo casing 'pre' photo. JB Weld should sort the broken plastic bits without too much trouble. The front of the dash panel isn't bad (see below) but there is a crack at the top and one or two crushed areas lower down. The vinyl is very brittle and fractures easily. I won't do anything with this for the time being (not sure how to resolve this - to be honest) but I would like to sort it out before the final fit back into the cockpit.
.
Another of those items I wanted to get sorted out was the speedo/rev counter. Not only was it rather vulnerable sitting in a corner of the workshop floor (in a protective wrap) it was also badly corroded and I wanted to stop that getting any worse as there are potentially some quite expensive bits in there. This week I stripped it down and worked on some of the component parts:
Firstly the trip reset cable and bracket. The reset cable had completely seized up but with a little persuasion I managed to strip out the cable from the sheath and clean it up. It now works a lot better.
The speedo casing was also corroding badly although mainly surface rust rather than anything too substantial. I have painted it although I think it would have been left unpainted at the factory. However, I would like this to remain rust free in the future. I'll just have to remember to clean paint off the earth points for the bulbs when I come to putting the loom back in.
The drivers side fresh air vent was also completely seized and needed to be rebuilt. The rivets were drilled out and the appropriate items were derusted, cleaned and painted. I had to cut the rod from the mechanism to the black knob on the front of the dash in order to get the mechanism out. Luckily, I found a bolt with the required dimensions, cut off the bold head and welded it to the remaining part of the rod that controls the mechanism. This now works fine
I also needed to rejoin one of the speedo mount points which had broken off. I superglued the broken piece back on to hold it in the correct position and then fibre glassed the join to give it some strength.
All in all a lot of work but nevertheless quite satisfying.
Time permitting, restoration plans for the weekend include the rebuild of the speedo, milometer and trip mechanism as it is also seized up (notice a theme here?). The rev counter is fortunately in much better condition and I only need to paint the back cover to get it looking right. Also the fibreglass structure that the dials mount on needs some repair. The reinforcement plates are rusty and one or two of the screw 'turrets' are a bit damaged - you can see evidence of this in the speedo casing 'pre' photo. JB Weld should sort the broken plastic bits without too much trouble. The front of the dash panel isn't bad (see below) but there is a crack at the top and one or two crushed areas lower down. The vinyl is very brittle and fractures easily. I won't do anything with this for the time being (not sure how to resolve this - to be honest) but I would like to sort it out before the final fit back into the cockpit.
.
Yes it scary how rebuilds can grow and grow. I never thought I would have to do surgery at the level of detail here....
Firstly the JB weld repair to the cowl mount turret

And then dismantling the speedo/odometer mechanism which had completely seized up. This was due to (a) the rotor bush seizing - now fixed and rotating freely with a little help from some Plus Gas - and (b) the little idler wheel attached to the side had seized too. This also now fixed. However the seizure of the idler wheel resulted in the plastic gear shaft getting a little chewed up and not engaging properly with the (not shown here) vertical odometer shaft. A new plastic gear shaft will have to be fitted.

The drum assembly also had to be cleaned up. The drum is shown after clean up and the casing before (cleaning in progress) - they had corroded together to become one solid unit.


Other than these items it all worked perfectly...")
On the good news front I repainted the cowls inners in matt black as these surfaces were starting to show the chrome beneath (seen here before the masking tape was removed).

.... and the housings are going back together. The lenses came up really nicely after some polish with T-Cut.

This will now be parked until I can locate a new odometer drive gear and (hopefully) put it all back together.
Firstly the JB weld repair to the cowl mount turret
And then dismantling the speedo/odometer mechanism which had completely seized up. This was due to (a) the rotor bush seizing - now fixed and rotating freely with a little help from some Plus Gas - and (b) the little idler wheel attached to the side had seized too. This also now fixed. However the seizure of the idler wheel resulted in the plastic gear shaft getting a little chewed up and not engaging properly with the (not shown here) vertical odometer shaft. A new plastic gear shaft will have to be fitted.
The drum assembly also had to be cleaned up. The drum is shown after clean up and the casing before (cleaning in progress) - they had corroded together to become one solid unit.
Other than these items it all worked perfectly...
On the good news front I repainted the cowls inners in matt black as these surfaces were starting to show the chrome beneath (seen here before the masking tape was removed).
.... and the housings are going back together. The lenses came up really nicely after some polish with T-Cut.
This will now be parked until I can locate a new odometer drive gear and (hopefully) put it all back together.