You are using an out of date browser. It may not display this or other websites correctly.
You should upgrade or use an alternative browser.
You should upgrade or use an alternative browser.
72 Corvette - Restoration Updates
- Thread starter TimP
- Start date
Yes - Christmas 2025Awesome work, ready for Christmas then?!")
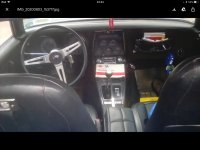
I hope everyone has had a good Christmas. Like most of the country the weather down South has been pretty poor and the idea of grubbing around on the garage floor working on the birdcage whilst it's hacking down with rain hasn't been too attractive. So... until it improves I have retreated to the workshop where at least it is dry, there is a small heater and I can work on something that will need to be done before the car gets back on the road. Here is my steering column - it doesn't tilt or telescope and I'm not sure it even steers at the moment but here goes....
It's a little corroded (oh really?) and needs a little TLC.....


The horn button is broken... they are about £90 for a new one (together with the rest of the horn push assembly). I think I can be innovative on this for a little less.....more on that in a future update.

The top cover came off with a puller I had to make....

.....and the steering lock daisy wheel came off with a 'pusher' which also had to be fabricated. It actually worked a lot better than it looks.

There's an evil little c-clip that needs to be removed before the lock wheel can be removed - you can just see it in the pic above. I think I took longer to take this off than the rest of the bits put together. I think it's been going to be easier putting it back on again but I wouldn't bet the farm on it.
More to come on this but I do have a question.....
The steering wheel has come up quite nicely with a bit of matt black paint on the spokes and a little furniture care product on the leather rim although I am going to treat it to a leather restorer to bring back the colour or at least make the shade a bit more consistent all over.


As an aside...... I was a little surprised to remove an old label to see 'Made in France' stamped into one of the spokes.
Most of the '72's I have seen have slotted chrome spokes on the wheel so is this an alternate design, a wheel from a later model (I think it might be), from another car or an aftermarket item? Can anyone help on this?
It's a little corroded (oh really?) and needs a little TLC.....
The horn button is broken... they are about £90 for a new one (together with the rest of the horn push assembly). I think I can be innovative on this for a little less.....more on that in a future update.
The top cover came off with a puller I had to make....
.....and the steering lock daisy wheel came off with a 'pusher' which also had to be fabricated. It actually worked a lot better than it looks.
There's an evil little c-clip that needs to be removed before the lock wheel can be removed - you can just see it in the pic above. I think I took longer to take this off than the rest of the bits put together. I think it's been going to be easier putting it back on again but I wouldn't bet the farm on it.
More to come on this but I do have a question.....
The steering wheel has come up quite nicely with a bit of matt black paint on the spokes and a little furniture care product on the leather rim although I am going to treat it to a leather restorer to bring back the colour or at least make the shade a bit more consistent all over.
As an aside...... I was a little surprised to remove an old label to see 'Made in France' stamped into one of the spokes.
Most of the '72's I have seen have slotted chrome spokes on the wheel so is this an alternate design, a wheel from a later model (I think it might be), from another car or an aftermarket item? Can anyone help on this?
Mad4slalom
Well-known user
Nice work tim, that wheel looks smaller diameter with a thicker rim than the one on my 72. Maybe a later one but funny from france as you say.I hope everyone has had a good Christmas. Like most of the country the weather down South has been pretty poor and the idea of grubbing around on the garage floor working on the birdcage whilst it's hacking down with rain hasn't been too attractive. So... until it improves I have retreated to the workshop where at least it is dry, there is a small heater and I can work on something that will need to be done before the car gets back on the road. Here is my steering column - it doesn't tilt or telescope and I'm not sure it even steers at the moment but here goes....
It's a little corroded (oh really?) and needs a little TLC.....
View attachment 14777 View attachment 14778
The horn button is broken... they are about £90 for a new one (together with the rest of the horn push assembly). I think I can be innovative on this for a little less.....more on that in a future update.
View attachment 14779
The top cover came off with a puller I had to make....
View attachment 14780
.....and the steering lock daisy wheel came off with a 'pusher' which also had to be fabricated. It actually worked a lot better than it looks.
View attachment 14781
There's an evil little c-clip that needs to be removed before the lock wheel can be removed - you can just see it in the pic above. I think I took longer to take this off than the rest of the bits put together. I think it's been going to be easier putting it back on again but I wouldn't bet the farm on it.
More to come on this but I do have a question.....
The steering wheel has come up quite nicely with a bit of matt black paint on the spokes and a little furniture care product on the leather rim although I am going to treat it to a leather restorer to bring back the colour or at least make the shade a bit more consistent all over.
View attachment 14782 View attachment 14783
As an aside...... I was a little surprised to remove an old label to see 'Made in France' stamped into one of the spokes.
Most of the '72's I have seen have slotted chrome spokes on the wheel so is this an alternate design, a wheel from a later model (I think it might be), from another car or an aftermarket item? Can anyone help on this?
Attachments
Thanks for the pic. I think I will find an original chrome spoke wheel once the car is back on the road. I quite like the one I have got but I think the chrome ones look really nice.Nice work tim, that wheel looks smaller diameter with a thicker rim than the one on my 72. Maybe a later one but funny from france as you say.
Most excellent - have you got a picture? I'm going to try and make a new one over the next week or so but if you have one spare that could be really good too.I’ve got a hornpush somewhere I think. It’s not great but it is in one piece.
Forrest Gump
CCCUK regional rep
Surely the steering wheel is an aftermarket fitment if it is French made?As an aside...... I was a little surprised to remove an old label to see 'Made in France' stamped into one of the spokes.
Most of the '72's I have seen have slotted chrome spokes on the wheel so is this an alternate design, a wheel from a later model (I think it might be), from another car or an aftermarket item? Can anyone help on this?
I would have thought just about everything on a C3 is actually made in the USA, but it’s a good question.
Later Corvettes might have quite a few imported components I would imagine.
Oneball
CCCUK Member
Will do when I leave Kent and return to civilisationMost excellent - have you got a picture? I'm going to try and make a new one over the next week or so but if you have one spare that could be really good too.

Fabulous! Thanks!Just one more cardboard box then they will finally be on their way to you Tim.View attachment 14836
Looking in to this further I think the wheel is from a '77 with the spokes painted black. I watched a youtube video of somebody replacing the horn switch contact on their '77 and the wheel is the same apart from the spokes which on mine have been painted black....Surely the steering wheel is an aftermarket fitment if it is French made?
I would have thought just about everything on a C3 is actually made in the USA, but it’s a good question.
Later Corvettes might have quite a few imported components I would imagine.
Forrest Gump
CCCUK regional rep
Take a look at this link to an article about Lecarra steering wheels - originally made in France. This is likely what you have, but I’m still thinking it might be aftermarket.Looking in to this further I think the wheel is from a '77 with the spokes painted black. I watched a youtube video of somebody replacing the horn switch contact on their '77 and the wheel is the same apart from the spokes which on mine have been painted black....

Lecarra Steering Wheels - Street Rodder Magazine
Street Rodder Shop Tour at Lecarra Steering Wheels
You can still get them for a Corvette, now made in USA
Pardon Our Interruption
www.summitracing.com
Last edited:
I think you've got this spot on!Take a look at this link to an article about Lecarra steering wheels - originally made in France. This is likely what you have, but I’m still thinking it might be aftermarket.
Lecarra Steering Wheels - Street Rodder Magazine
Street Rodder Shop Tour at Lecarra Steering Wheelswww.motortrend.com
You can still get them for a Corvette, now made in USA
Pardon Our Interruption
www.summitracing.com
I have read the articles above and checked the pictures and dimensions - and everything tallies. Another website says that the Made-in-France Lecarra wheels have this stamped on the back of the spokes, which also fits perfectly. Many thanks - mystery solved!
As I mentioned in an earlier post I thought I would try and fabricate a new horn bush as the old centre was in 4 pieces...

Yes, they are available as a complete unit but I wondered if this could be fixed in a different way - at least for the time being, and it might be fun trying. So whilst the weather outside was the wrong side of miserable I retired to the workshop and set about creating a new one.
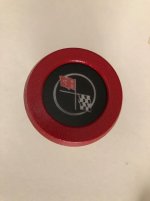
First I printed off a suitable logo that I found on the internet and printed it off on glossy photo paper. The two 'ears' are there because I need to cover up a white hole that was (some unknown reason) in the middle of the logo and the two corners of the black rectangle stuck out the top.

Then by scouring the house I found a suitable mould of the right diameter to cast the new horn centre in. This is the plastic top to an Illy coffee tin which is correct to the millimeter, flexible (so the moulding pops out easily) and made out of polypropylene and the resin won't stick to it. Perfect!

Then mix and pour in the resin - I am using a GlassCast 3 resin from Easy Composites for this - and then swear and stamp feet and be generally disagreeable as the resin is full of bubbles....

But don't worry! This resin is self degassing and after 36 hours it has cured quite nicely. Not perfect but Ok for this purpose. There quite a lot of tiny bubbles if you look closely but if my head gets that close to the horn button when driving my car a few bubbles in the resin will be the least of my problems.

After drilling three holes to fit in the metal horn ring and stacking it together with a cleaned up steering wheel (using a red leather restorer from Furniture
Clinic) and a freshly painted boss looks quite presentable.

.... and a bit better than it was before anyway.

The weather seems to be a lot better the last couple of days so the funs over and its back to the garage and more birdcage bliss... Sort of.
Yes, they are available as a complete unit but I wondered if this could be fixed in a different way - at least for the time being, and it might be fun trying. So whilst the weather outside was the wrong side of miserable I retired to the workshop and set about creating a new one.
First I printed off a suitable logo that I found on the internet and printed it off on glossy photo paper. The two 'ears' are there because I need to cover up a white hole that was (some unknown reason) in the middle of the logo and the two corners of the black rectangle stuck out the top.
Then by scouring the house I found a suitable mould of the right diameter to cast the new horn centre in. This is the plastic top to an Illy coffee tin which is correct to the millimeter, flexible (so the moulding pops out easily) and made out of polypropylene and the resin won't stick to it. Perfect!
Then mix and pour in the resin - I am using a GlassCast 3 resin from Easy Composites for this - and then swear and stamp feet and be generally disagreeable as the resin is full of bubbles....
But don't worry! This resin is self degassing and after 36 hours it has cured quite nicely. Not perfect but Ok for this purpose. There quite a lot of tiny bubbles if you look closely but if my head gets that close to the horn button when driving my car a few bubbles in the resin will be the least of my problems.
After drilling three holes to fit in the metal horn ring and stacking it together with a cleaned up steering wheel (using a red leather restorer from Furniture
Clinic) and a freshly painted boss looks quite presentable.
.... and a bit better than it was before anyway.
The weather seems to be a lot better the last couple of days so the funs over and its back to the garage and more birdcage bliss... Sort of.
Attachments
Hi John, Thanks! Yes some of the resin goes underneath but some of the photo paper is still exposed so I will lacquer ity before putting it all back together.
The three rivets that hold the centre disc on don't seem to have a regular shape - they are not equally spaced around the disc but they are tucked out of sight once assembled. See pic below

The three rivets that hold the centre disc on don't seem to have a regular shape - they are not equally spaced around the disc but they are tucked out of sight once assembled. See pic below
Chuffer
CCCUK Member
Damned clever stuff old chap !As I mentioned in an earlier post I thought I would try and fabricate a new horn bush as the old centre was in 4 pieces...
View attachment 15030
Yes, they are available as a complete unit but I wondered if this could be fixed in a different way - at least for the time being, and it might be fun trying. So whilst the weather outside was the wrong side of miserable I retired to the workshop and set about creating a new one.
First I printed off a suitable logo that I found on the internet and printed it off on glossy photo paper. The two 'ears' are there because I need to cover up a white hole that was (some unknown reason) in the middle of the logo and the two corners of the black rectangle stuck out the top.
View attachment 15031
Then by scouring the house I found a suitable mould of the right diameter to cast the new horn centre in. This is the plastic top to an Illy coffee tin which is correct to the millimeter, flexible (so the moulding pops out easily) and made out of polypropylene and the resin won't stick to it. Perfect!
View attachment 15036
Then mix and pour in the resin - I am using a GlassCast 3 resin from Easy Composites for this - and then swear and stamp feet and be generally disagreeable as the resin is full of bubbles....
View attachment 15033
But don't worry! This resin is self degassing and after 36 hours it has cured quite nicely. Not perfect but Ok for this purpose. There quite a lot of tiny bubbles if you look closely but if my head gets that close to the horn button when driving my car a few bubbles in the resin will be the least of my problems.
View attachment 15032
After drilling three holes to fit in the metal horn ring and stacking it together with a cleaned up steering wheel (using a red leather restorer from Furniture
Clinic) and a freshly painted boss looks quite presentable.
View attachment 15035
.... and a bit better than it was before anyway.
View attachment 15037
The weather seems to be a lot better the last couple of days so the funs over and its back to the garage and more birdcage bliss... Sort of.
I have been asked a few times if I am confident that my repairs are as strong as the original. It's a very good question, not meant to be critical and certainly not taken that way. Over the months (more like years actually ) I have given it a lot of thought. I am a novice with Corvettes and I first started welding when I bought this car a couple of years ago. Obviously I want this car to be safe when finished so it's a question that really does need to be addressed.
To mitigate that risk (almost sounded like an ex-project manager there) I have a copy of the Factory Assembly Manual and I'm following the build instructions very carefully. Replacement parts and patches are made from as thick a replacement steel as was used in the original (if not a bit thicker due to using metric thicknesses) and I am taking time to get things right (probably about 1000 times longer than when my car was actually put together!) The bottom hinge post brace is probably a good example.
Here is the hinge post with it's boot in its 'test' position prior to its second attempt at fitment.

There are six holes for plug welding that I have drilled on the boot brace face where the door hinge mounts (by the 4 elongated holes). These are in the same places where the FAM says they should be.
When removing the old ones I have noticed that the production spot welds are somewhat ... ahem.. approximate. There were the 6 spot welds to be removed on the passenger side that needed to be drilled out but only one or two were close to where they should be, certainly not positioned for max strength..

The driver's side was a lot worse.....

The (only remaining) part of the boot brace that I had to remove from the driver's side hinge post came off very easily as it only had one spot weld (of the 6 specified) and one tiny dot in the middle that broke off by itself when I pulled it. Oops!
When I saw the severely corroded condition the of the lower birdcage when I removed the glassfibre I was amazed that the doors were still hanging let alone functional so I think GM's engineers must have included a generous safety margin in their stress calculations.
I think that having the plug welds in the right place and in the right quantity, and with the right amount of care I should be able to match the original integrity. Having had to remove the hinge post that I had so carefully welded in place before Christmas (oh yes - more on that in a later post) I can say that the plug welds I did were everything I hoped they would be - a mixed blessing when you need to remove them, but good to know nevertheless. With a decent paint finish on top it should last a whole lot longer too.
I have spent the last two months trying to fit the lower windscreen frame (.... about 1000 times longer than when my car was actually put together is probably an understatement) which ... TaDaaaaaa ...I have now finished. I hope to write post on this soon.....
) I have given it a lot of thought. I am a novice with Corvettes and I first started welding when I bought this car a couple of years ago. Obviously I want this car to be safe when finished so it's a question that really does need to be addressed.To mitigate that risk (almost sounded like an ex-project manager there) I have a copy of the Factory Assembly Manual and I'm following the build instructions very carefully. Replacement parts and patches are made from as thick a replacement steel as was used in the original (if not a bit thicker due to using metric thicknesses) and I am taking time to get things right (probably about 1000 times longer than when my car was actually put together!) The bottom hinge post brace is probably a good example.
Here is the hinge post with it's boot in its 'test' position prior to its second attempt at fitment.
There are six holes for plug welding that I have drilled on the boot brace face where the door hinge mounts (by the 4 elongated holes). These are in the same places where the FAM says they should be.
When removing the old ones I have noticed that the production spot welds are somewhat ... ahem.. approximate. There were the 6 spot welds to be removed on the passenger side that needed to be drilled out but only one or two were close to where they should be, certainly not positioned for max strength..
The driver's side was a lot worse.....
The (only remaining) part of the boot brace that I had to remove from the driver's side hinge post came off very easily as it only had one spot weld (of the 6 specified) and one tiny dot in the middle that broke off by itself when I pulled it. Oops!
When I saw the severely corroded condition the of the lower birdcage when I removed the glassfibre I was amazed that the doors were still hanging let alone functional so I think GM's engineers must have included a generous safety margin in their stress calculations.
I think that having the plug welds in the right place and in the right quantity, and with the right amount of care I should be able to match the original integrity. Having had to remove the hinge post that I had so carefully welded in place before Christmas (oh yes
- more on that in a later post) I can say that the plug welds I did were everything I hoped they would be - a mixed blessing when you need to remove them, but good to know nevertheless. With a decent paint finish on top it should last a whole lot longer too.I have spent the last two months trying to fit the lower windscreen frame (.... about 1000 times longer than when my car was actually put together is probably an understatement) which ... TaDaaaaaa ...I have now finished. I hope to write post on this soon.....