You are using an out of date browser. It may not display this or other websites correctly.
You should upgrade or use an alternative browser.
You should upgrade or use an alternative browser.
C3 Race Car Build
- Thread starter Oneball
- Start date

Oneball
CCCUK Member
Great work ...beyond my capabilities but sharing this is what its all about
You’ll never know until you try.
Oneball
CCCUK Member
Is that the original Hood surround or a new one - if it is a new one (which it looks) is the Headlight Support Bar Riveted or not? This is a question a lot of owners ask, It must be bonded in, but the question of Rivets?
It’s a new surround and just bonded.
Being a 1969 the original was bonded and riveted. They changed to just bonded some point later in production but I don’t know when.

Daytona Vette
Well-known user
Cheers for the info Tim
Oneball
CCCUK Member
Cheers for the info Tim
Interestingly (or not!) the bonding on the original rail is rubbery and more like builders caulk than the panel adhesive they used to bond the wings etc.


Daytona Vette
Well-known user
Tim, if you drive it as well as you have made it - You will have made it!
Great build thank you for sharing with us and taking the time.
Great build thank you for sharing with us and taking the time.
Oneball
CCCUK Member
Tim, if you drive it as well as you have made it - You will have made it!
Great build thank you for sharing with us and taking the time.
My spannering is definitely better than my driving.
Where do you buy the covered heater hole?
I just made it from 1.5mm aluminium. It’s just a flat plate riveted to the bulkhead. There’s another one you can’t see covering the fresh air inlet in the inner wing.
Oneball
CCCUK Member
Okay
I have to do the same....
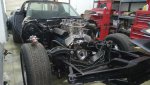
Nice carbs! Are you building it as a fast road car or a race car?
Didn’t realise but the heater setup looks completely different on the later cars.
Daytona Vette
Well-known user
Nice Carbs indeed - Fire extinguisher pleaseOkay
I have to do the same....


